iNSTALLATiON

REMOVE OLD THERMOSTAT

1.Shut off electricity at the main fuse box until installation is complete. Ensure that electrical power is disconnected.

2.Remove the front cover of the old thermostat. With wires still attached, remove wall plate from the wall. If the old thermostat has a wall mounting plate, remove the thermostat and the wall mounting plate as an assembly.

3.Identify each wire attached to the old thermostat using the labels enclosed with the new thermostat.

4.Disconnect the wires from old thermostat one at a time. DO NOT LET WIRES FALL BACK INTO THE WALL.

5.Install new thermostat using the following procedures,

ATTENTION!

Mounting

Screw anchors

s

This product does not contain mercury. However, this product may replace a unit which contains mercury.

Do not open mercury cells. If a cell becomes damaged, do not touch any spilled mercury. Wearing nonabsorbent gloves, take up the spilled mercury with sand or other absorbent material and place into a container which can be sealed. If a celt becomes damaged, the unit should be discarded.

Mercury must not be discarded in household trash. When the unit this product is replacing is to be discarded, place in a suitable container and return to White-Rodgers at 2895 Harrison Street, Batesvitle, AR 72501-2117 for proper disposal.

ELECTRIC HEAT OR SINGLE-STAGE

HEAT PUMP SYSTEMS

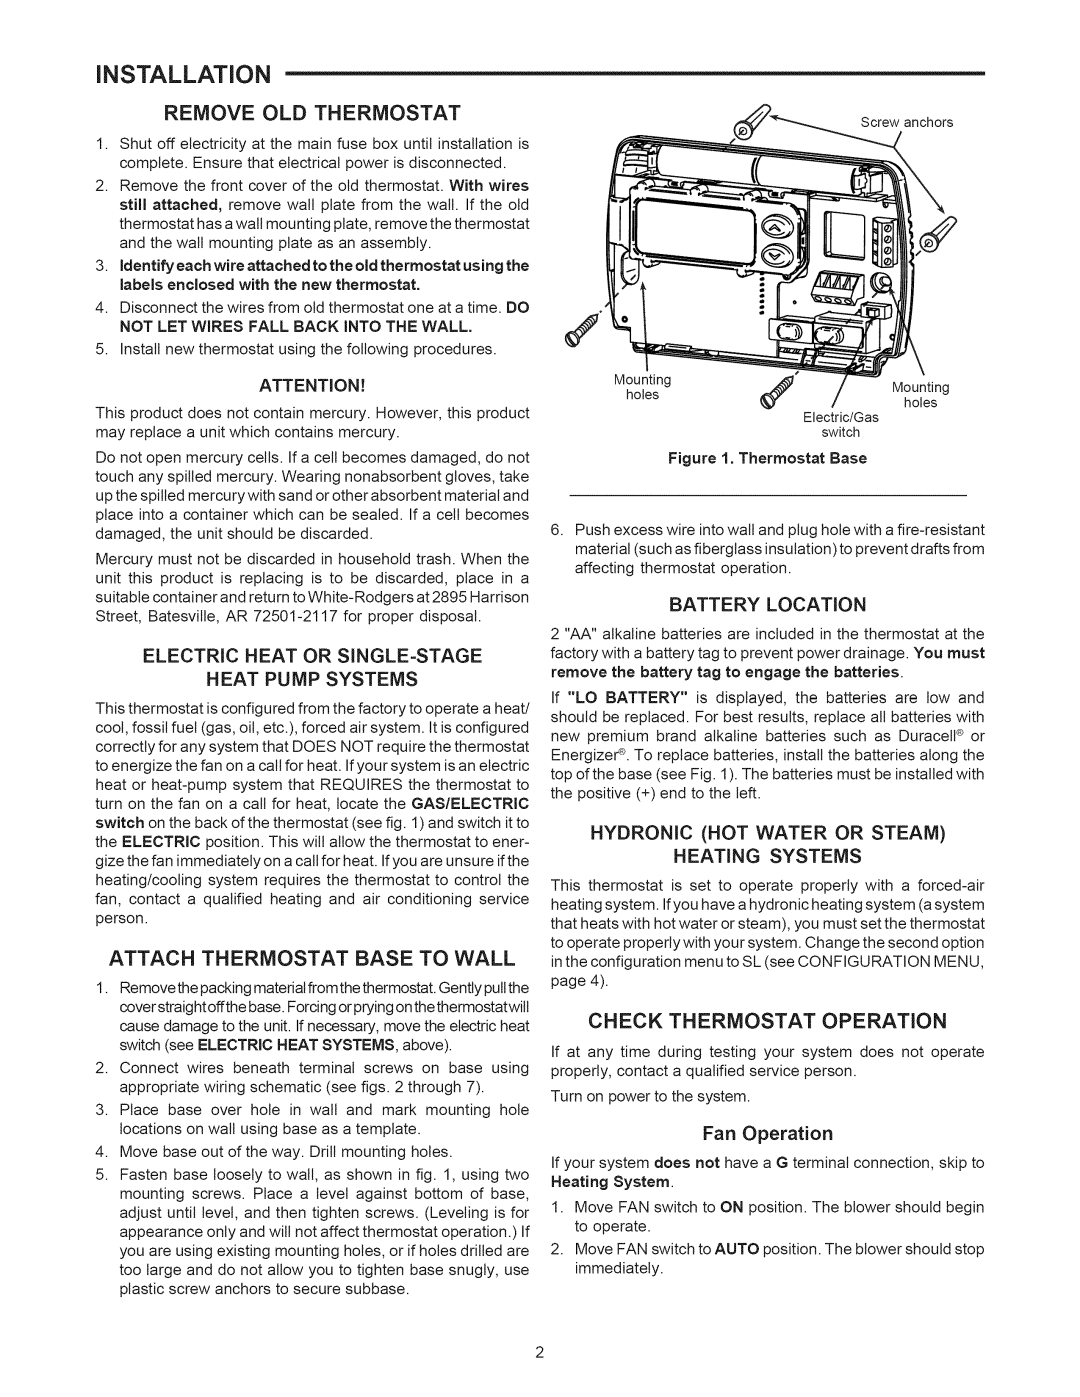
This thermostat is configured from the factory to operate a heat/ cool, fossil fuel (gas, oil, etc.), forced air system. It is configured correctly for any system that DOES NOT require the thermostat to energize the fan on a call for heat. If your system is an electric heat or heat-pump system that REQUIRES the thermostat to turn on the fan on a call for heat, locate the GAS/ELECTRIC switch on the back of the thermostat (see fig. 1) and switch it to the ELECTRIC position. This will allow the thermostat to ener- gize the fan immediately on a call for heat. If you are unsure if the heating/cooling system requires the thermostat to control the fan, contact a qualified heating and air conditioning service person.

ATTACH THERMOSTAT BASE TO WALL

1.Remove the packing material from the thermostat. Gently pull the cover straight offthe base. Forcing orprying on the thermostatwill cause damage to the unit. If necessary, move the electric heat switch (see ELECTRIC HEAT SYSTEMS, above).

2.Connect wires beneath terminal screws on base using appropriate wiring schematic (see figs. 2 through 7).

3.Place base over hole in wall and mark mounting hole locations on wall using base as a template.

4.Move base out of the way. Drill mounting holes.

5.Fasten base loosely to wall, as shown in fig. 1, using two mounting screws. Place a level against bottom of base, adjust until level, and then tighten screws. (Leveling is for appearance only and will not affect thermostat operation.) If you are using existing mounting holes, or if holes drilled are too large and do not allow you to tighten base snugly, use plastic screw anchors to secure subbase.

holesMounting holes

Electric/Gas switch

Figure 1. Thermostat Base

6.Push excess wire into wall and plug hole with a fire-resistant material (such as fiberglass insulation) to prevent drafts from affecting thermostat operation.

BATTERY LOCATION

2 "AA" alkaline batteries are included in the thermostat at the factory with a battery tag to prevent power drainage. You must remove the battery tag to engage the batteries.

If "LO BATTERY" is displayed, the batteries are tow and should be replaced. For best results, replace all batteries with new premium brand alkaline batteries such as Duracetl ® or EnergizeP. To replace batteries, install the batteries along the top of the base (see Fig. 1). The batteries must be installed with the positive (+) end to the left.

HYDRONIC (HOT WATER OR STEAM)

HEATING SYSTEMS

This thermostat is set to operate properly with a forced-air heating system. Ifyou have a hydronic heating system (a system that heats with hot water or steam), you must set the thermostat to operate properly with your system. Change the second option in the configuration menu to SL (see CONFIGURATION MENU, page 4).

CHECK THERMOSTAT OPERATION

If at any time during testing your system does not operate properly, contact a qualified service person.

Turn on power to the system.

Fan Operation

If your system does not have a G terminal connection, skip to Heating System.

1.Move FAN switch to ON position. The blower should begin to operate.

2.Move FAN switch to AUTO position. The blower should stop immediately.

Page 2
Image 2
Sears 1F86-382 INSTALLATiON, Attach Thermostat Base to Wall, Hydronic HOT Water or Steam Heating Systems, Battery Location

1F86-382 specifications

The Sears 1F86-382 is a remarkable air conditioning unit that stands out in the realm of climate control solutions. Known for its efficient performance and user-friendly design, the 1F86-382 is ideal for both residential and commercial spaces, providing reliable cooling throughout the warmer months.

One of the primary features of the Sears 1F86-382 is its impressive cooling capacity. With a BTU output that efficiently cools areas ranging from small to medium-sized rooms, the unit ensures comfortable temperatures even during the hottest days. Furthermore, the energy efficiency rating of the 1F86-382 is noteworthy, making it an eco-friendly choice for consumers looking to lower their electricity bills while maintaining a pleasant indoor environment.

The technology behind the 1F86-382 integrates advanced cooling mechanisms, including a multi-speed fan that allows users to tailor the airflow according to their needs. This feature not only enhances comfort but also helps in reducing noise levels, making it suitable for bedrooms and quiet spaces. The unit also comes equipped with a programmable timer, enabling users to set specific cooling schedules that align with their daily routines.

Another significant characteristic of the Sears 1F86-382 is its ease of installation. The design includes a user-friendly installation process, often requiring minimal tools and expertise. This accessibility means that many users can set up the unit themselves without the need for a professional technician. Additionally, the sleek design of the air conditioning unit ensures that it fits seamlessly into any décor, enhancing the aesthetic appeal of a room.

Moreover, the Sears 1F86-382 features a user-focused interface with intuitive controls. The digital display allows users to monitor and adjust settings effortlessly, providing real-time feedback on temperature and system performance. The availability of remote control adds an extra layer of convenience, allowing users to operate the unit from anywhere in the room.

Lastly, the durability and longevity of the Sears 1F86-382 are commendable. Constructed from high-quality materials, the unit is designed to withstand regular wear and tear, ensuring that it remains a reliable source of cooling for years to come. With routine maintenance and care, homeowners can expect the 1F86-382 to deliver consistent performance throughout its lifespan.

In conclusion, the Sears 1F86-382 air conditioning unit combines advanced technology, user-friendly features, and durable construction, making it a top choice for anyone seeking an efficient and effective cooling solution.