6.Connect the clamp to the battery post and twist or rock back and forth to make a solid connection. This will help keep the clamps from slipping off the posts and causing sparks.

7.Select the charge rate with the Selector Switch then plug the power cord into a grounded AC outlet to begin charging.

8.The charger will not stop when the battery is fully charged. For this reason it is important to check charging progress frequently. Overcharging can damage a battery, you must monitor and unplug charger when battery is fully charged.

9.When the battery is fully charged, the AMMETER pointer will fall to about half the charge rate selected. For specific positions, refer to the "Ammeter" section

in “Using your battery charger" on page 6.

10.When the battery is fully charged, unplug the charger power cord before attempting to disconnect charger clamps.

11.Standing away from the battery, remove the charger clamps in this order: (1) from the chassis connection and, (2) from the battery post or terminal.

12.Clean and store the battery charger in a dry location.

Charging your battery outside the vehicle:

1.Remove the battery from vehicle, making sure to disconnect grounded terminal first with all accessories and lights turned off in the vehicle.

2.Check the polarity of the battery posts as indicated on the battery case: POSITIVE (POS, P, +) and NEGATIVE (NEG, N, -).

NOTE: On top-post batteries, the positive battery terminal usually has a larger diameter post than the negative one.

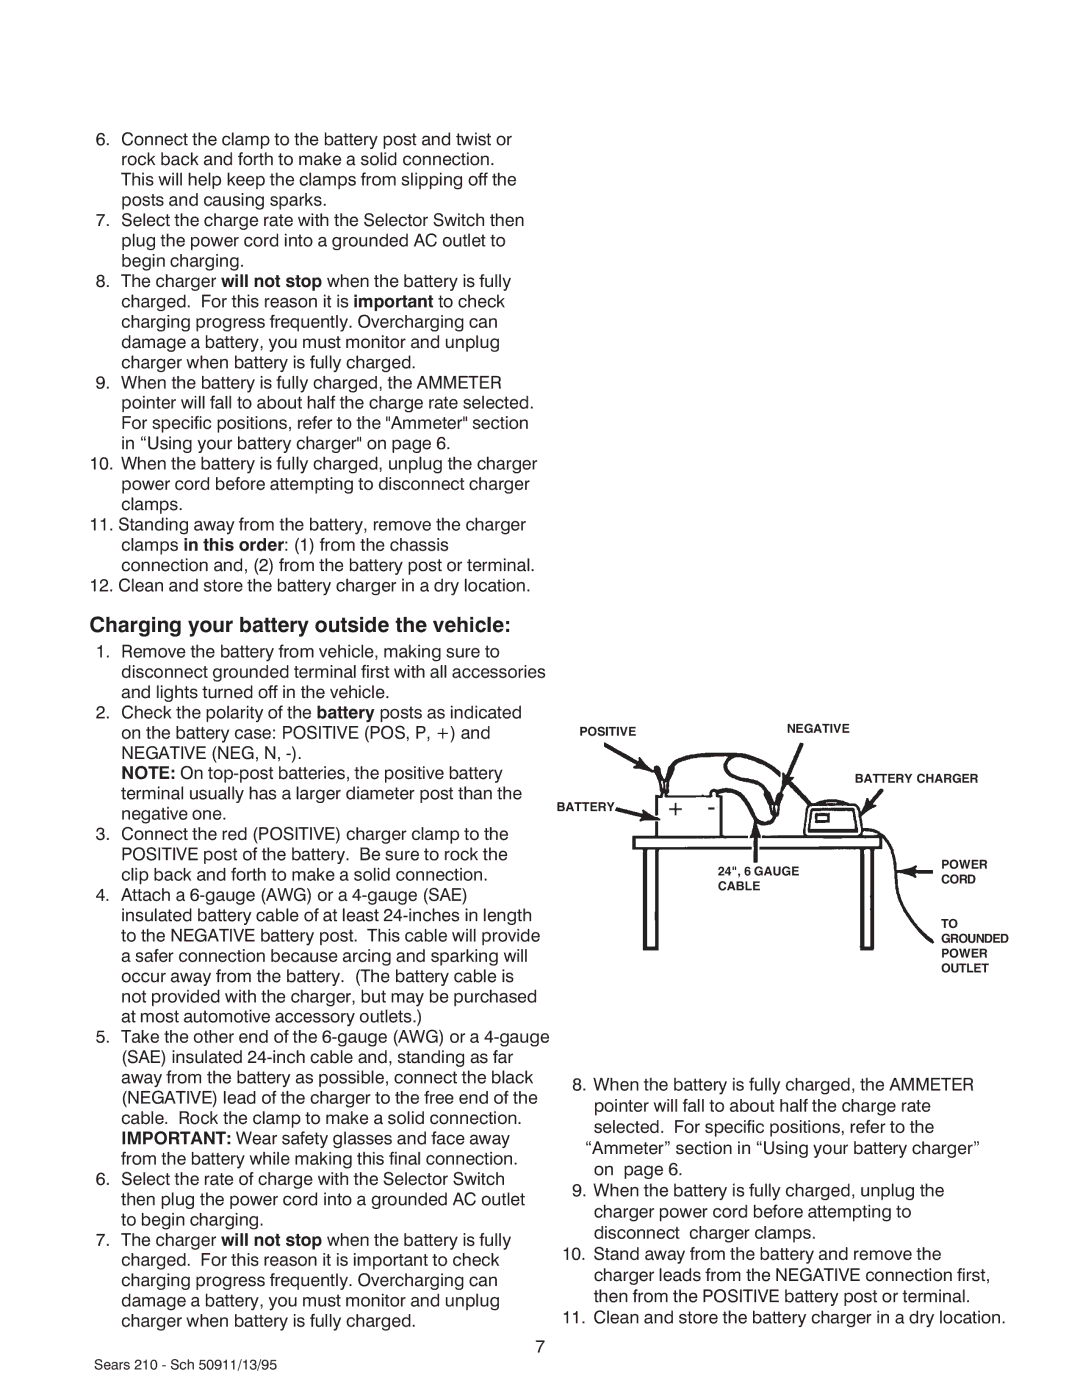
3.Connect the red (POSITIVE) charger clamp to the POSITIVE post of the battery. Be sure to rock the clip back and forth to make a solid connection.

4.Attach a 6-gauge (AWG) or a 4-gauge (SAE) insulated battery cable of at least 24-inches in length to the NEGATIVE battery post. This cable will provide a safer connection because arcing and sparking will occur away from the battery. (The battery cable is not provided with the charger, but may be purchased at most automotive accessory outlets.)

5.Take the other end of the 6-gauge (AWG) or a 4-gauge (SAE) insulated 24-inch cable and, standing as far away from the battery as possible, connect the black (NEGATIVE) lead of the charger to the free end of the cable. Rock the clamp to make a solid connection. IMPORTANT: Wear safety glasses and face away from the battery while making this final connection.

6.Select the rate of charge with the Selector Switch then plug the power cord into a grounded AC outlet to begin charging.

7.The charger will not stop when the battery is fully charged. For this reason it is important to check charging progress frequently. Overcharging can damage a battery, you must monitor and unplug charger when battery is fully charged.

7

POSITIVENEGATIVE

BATTERY CHARGER

BATTERY + -

24", 6 GAUGE

POWER

CORD

CABLE


TO


GROUNDED


POWER


OUTLET

8.When the battery is fully charged, the AMMETER pointer will fall to about half the charge rate selected. For specific positions, refer to the

“Ammeter” section in “Using your battery charger” on page 6.

9.When the battery is fully charged, unplug the charger power cord before attempting to disconnect charger clamps.

10.Stand away from the battery and remove the charger leads from the NEGATIVE connection first, then from the POSITIVE battery post or terminal.

11.Clean and store the battery charger in a dry location.

Sears 210 - Sch 50911/13/95

Page 8
Image 8
Sears 200.71210 owner manual Charging your battery outside the vehicle

200.71210 specifications

The Sears 200.71210 is a versatile and powerful tool designed for a variety of home and professional tasks, particularly in the realm of electrical and electronic repair. Its standout features and innovative technologies make it a preferred choice among DIY enthusiasts and professionals alike.

One of the main characteristics of the Sears 200.71210 is its ergonomic design, which ensures user comfort during prolonged use. The tool is lightweight yet durable, allowing for easy handling while maintaining the necessary strength to perform demanding tasks. The grip is thoughtfully constructed to prevent slippage, which enhances precision and control when working in tight or awkward spaces.

Equipped with a robust digital display, the Sears 200.71210 provides users with clear and accurate readings, promoting efficiency and reducing the margin for error. This feature is particularly invaluable when measuring voltage, current, and resistance, as accurate readings can be the difference between a successful repair and prolonged troubleshooting.

The Sears 200.71210 also includes a range of advanced technologies designed to enhance its functionality. One of the most notable is its auto-ranging capability, which automatically adjusts measurement scales based on the detected values, saving users the hassle of manually selecting the correct range. This feature makes it suitable for both beginners and seasoned professionals, as it simplifies the measurement process.

Additionally, this tool boasts a variety of measurement functions. It can handle AC and DC voltage measurements, current measurements, resistance checks, and even continuity tests. This multifunctionality makes it an invaluable asset for a diverse array of projects, from household electrical repairs to more complex electronic diagnostics.

Safety is another critical aspect of the Sears 200.71210. It is designed with built-in protective features to prevent overloads, ensuring the longevity of the tool while safeguarding the user. The device typically incorporates a fuse that protects sensitive components from spikes in voltage, making it a reliable option in various working conditions.

In summary, the Sears 200.71210 stands out for its ergonomic design, advanced digital display, auto-ranging capabilities, multifunctionality, and safety features. Whether tackling home improvement projects or professional electrical work, the Sears 200.71210 provides the reliability and efficiency that users expect from a trusted brand.