iNSTALLATiON iNSTRUCTiONS
Stock No. 42=34713, 42=34714, 42=34715 Faucet
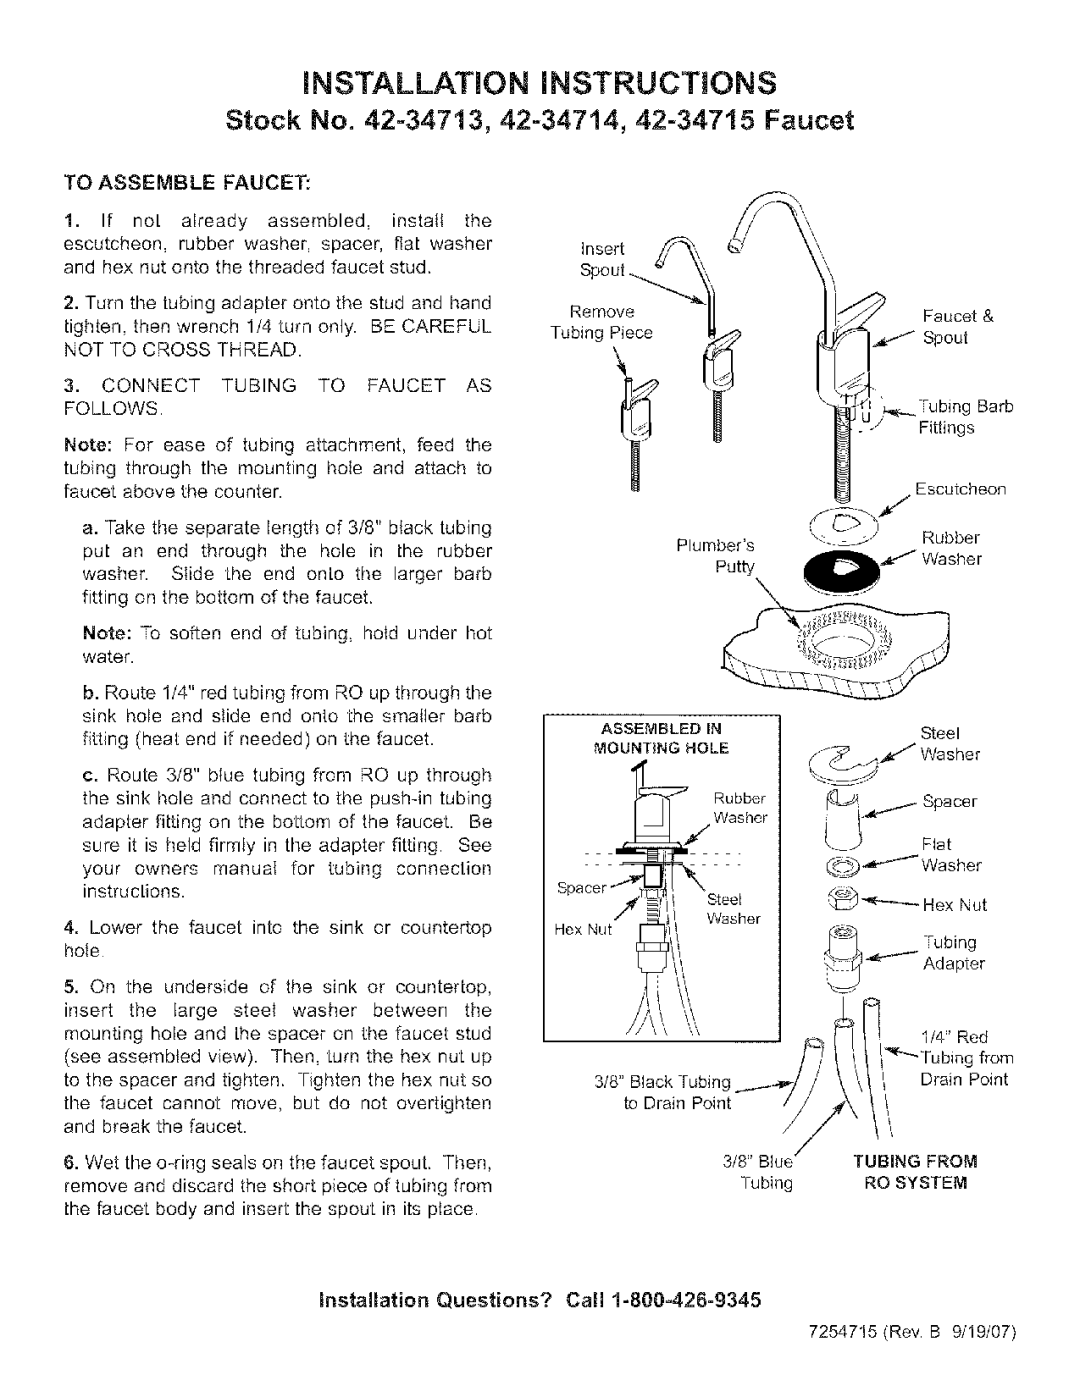
TO ASSEMBLE FAUCET:
1. If not already assembled, install the escutcheon, rubber washer, spacer, flat washer and hex nut onto the threaded faucet stud.
2. Turn the tubing adapter onto the stud and hand tighten, then wrench 1/4 turn only. BE CAREFUL NOT TO CROSS THREAD.
3. CONNECT TUBING TO FAUCET AS FOLLOWS.
Note: For ease of tubing attachment, feed the tubing through the mounting hole and attach to faucet above the counter.
a. Take the separate length of 3/8" black tubing put an end through the hole in the rubber
washer. Slide the end onto the larger barb fitting on the bottom of the faucet.
Note: To soften end of tubing, hold under hot water.
b. Route 1/4" red tubing from RO up through the sink hole and slide end onto the smaller barb
fitting (heat end if needed) on the faucet.
c. Route 3/8" blue tubing from RO up through the sink hole and connect to the
4. Lower the faucet into the sink or countertop |
hole. |
Insert
Spout __.._ _ Remove
Tubing Piece T
Plumber's
ASSEMBLED iN
MOUNTING HOLE
Rubber
Washer
Steel
Washer
Hex Nut
Faucet &
Spout
Tubing Barb
Fittings
Escutcheon
Rubber
Steel
_'/Washer
I.- Spacer
Flat
(_ _'_"_ Washer
5. On | the | underside of | the | sink | or | countertop, | |||
insert | the | large | steel |
| washer | between | the | ||
mounting | hole and | the | spacer | on | the | faucet | stud | ||
(see assembled view). Then, turn the hex nut up | |||||||||
to the spacer and tighten. Tighten the hex nut so | |||||||||
the faucet | cannot | move, | but | do | not | overtighten | |||
and break | the faucet. |
|
|
|
|
|
| ||
6. Wet | the | the | faucet spout. Then, | ||||||
remove | and discard | the | short | piece | of | tubing | from | ||
the faucet body and insert the spout in its place. | |||||||||
|
|
| / | Adapter |
|
|
|
| Tubing |
|
| _ | _ | 1/4" Red |
,, | /l | / | ||
3/8 Black | \\// |
| Drain Point | |
to Drain | Poinl/8, 'Blu/e_//_.I.!!NG | FROM | ||
| Tubing |
| RO SYSTEM | |
Installation Questions? Call 1=800=426=9345
7254715 (Rev. B 9/19/07)