1 |
| |
2 |
| |
3 | 10 | |
11 | ||
| ||
| 12 | |
4 | 13 | |
5 | 14 | |
| 15 | |
6 | 16 | |
7 | 17 | |
| ||
8 | 18 | |
| ||
| 19 | |
9 |
| |
11 | 12 | |
3 |
| |
22 | 15 | |
24 | ||
23 | ||
4 | ||
| ||
6 |
| |
| 16 | |
| 17 | |
8 |
| |
20 | 21 | |
| ||
9 |
|
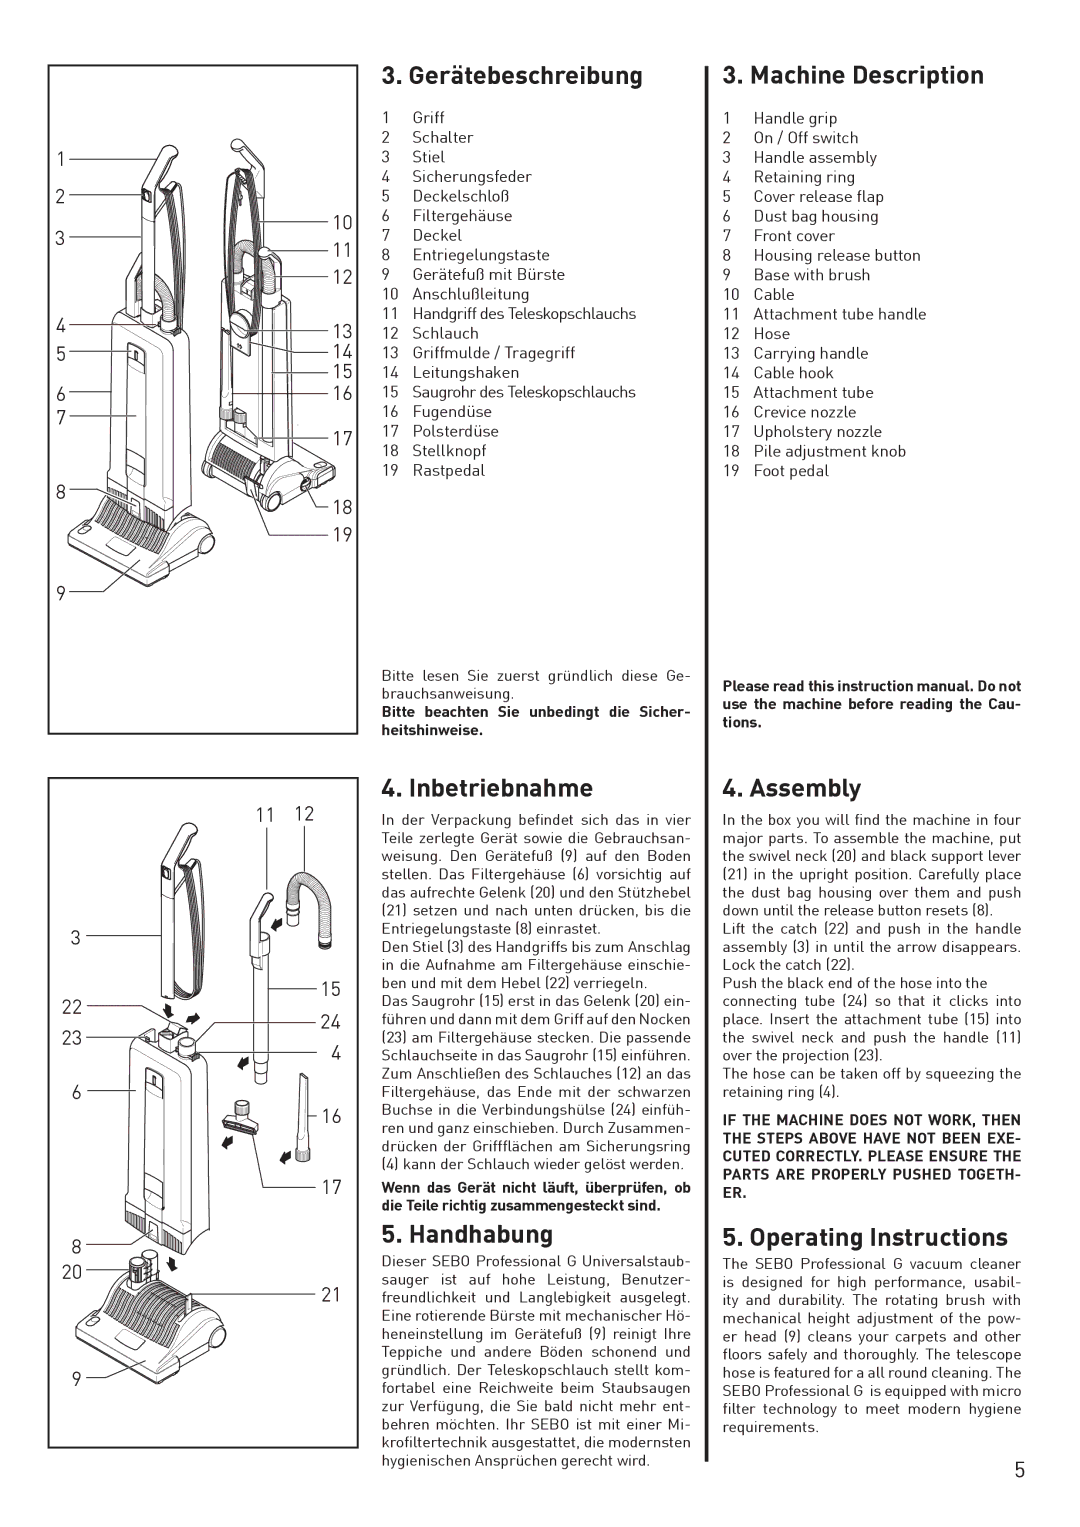
3. Gerätebeschreibung
1Griff
2Schalter
3Stiel
4Sicherungsfeder
5Deckelschloß
6Filtergehäuse
7Deckel
8Entriegelungstaste
9Gerätefuß mit Bürste
10Anschlußleitung
11Handgriff des Teleskopschlauchs
12Schlauch
13Griffmulde / Tragegriff
14Leitungshaken
15Saugrohr des Teleskopschlauchs
16Fugendüse
17Polsterdüse
18Stellknopf
19Rastpedal
Bitte lesen Sie zuerst gründlich diese Ge- brauchsanweisung.
Bitte beachten Sie unbedingt die Sicher- heitshinweise.
4. Inbetriebnahme
In der Verpackung befindet sich das in vier Teile zerlegte Gerät sowie die Gebrauchsan- weisung. Den Gerätefuß (9) auf den Boden stellen. Das Filtergehäuse (6) vorsichtig auf das aufrechte Gelenk (20) und den Stützhebel
(21)setzen und nach unten drücken, bis die Entriegelungstaste (8) einrastet.
Den Stiel (3) des Handgriffs bis zum Anschlag in die Aufnahme am Filtergehäuse einschie- ben und mit dem Hebel (22) verriegeln.
Das Saugrohr (15) erst in das Gelenk (20) ein- führen und dann mit dem Griff auf den Nocken
(23)am Filtergehäuse stecken. Die passende Schlauchseite in das Saugrohr (15) einführen. Zum Anschließen des Schlauches (12) an das Filtergehäuse, das Ende mit der schwarzen Buchse in die Verbindungshülse (24) einfüh- ren und ganz einschieben. Durch Zusammen- drücken der Griffflächen am Sicherungsring
(4)kann der Schlauch wieder gelöst werden.
Wenn das Gerät nicht läuft, überprüfen, ob die Teile richtig zusammengesteckt sind.
5. Handhabung
Dieser SEBO Professional G Universalstaub- sauger ist auf hohe Leistung, Benutzer- freundlichkeit und Langlebigkeit ausgelegt. Eine rotierende Bürste mit mechanischer Hö- heneinstellung im Gerätefuß (9) reinigt Ihre Teppiche und andere Böden schonend und gründlich. Der Teleskopschlauch stellt kom- fortabel eine Reichweite beim Staubsaugen zur Verfügung, die Sie bald nicht mehr ent- behren möchten. Ihr SEBO ist mit einer Mi- krofiltertechnik ausgestattet, die modernsten hygienischen Ansprüchen gerecht wird.
3. Machine Description
1Handle grip
2On / Off switch
3Handle assembly
4Retaining ring
5Cover release flap
6Dust bag housing
7Front cover
8Housing release button
9Base with brush
10Cable
11Attachment tube handle
12Hose
13Carrying handle
14Cable hook
15Attachment tube
16Crevice nozzle
17Upholstery nozzle
18Pile adjustment knob
19Foot pedal
Please read this instruction manual. Do not use the machine before reading the Cau- tions.
4. Assembly
In the box you will find the machine in four major parts. To assemble the machine, put the swivel neck (20) and black support lever
(21)in the upright position. Carefully place the dust bag housing over them and push down until the release button resets (8).
Lift the catch (22) and push in the handle assembly (3) in until the arrow disappears. Lock the catch (22).
Push the black end of the hose into the connecting tube (24) so that it clicks into place. Insert the attachment tube (15) into the swivel neck and push the handle (11) over the projection (23).
The hose can be taken off by squeezing the retaining ring (4).
IF THE MACHINE DOES NOT WORK, THEN THE STEPS ABOVE HAVE NOT BEEN EXE- CUTED CORRECTLY. PLEASE ENSURE THE PARTS ARE PROPERLY PUSHED TOGETH- ER.
5. Operating Instructions
The SEBO Professional G vacuum cleaner is designed for high performance, usabil- ity and durability. The rotating brush with mechanical height adjustment of the pow- er head (9) cleans your carpets and other floors safely and thoroughly. The telescope hose is featured for a all round cleaning. The SEBO Professional G is equipped with micro filter technology to meet modern hygiene requirements.
5