NVD Bullet Cameras

Overview:

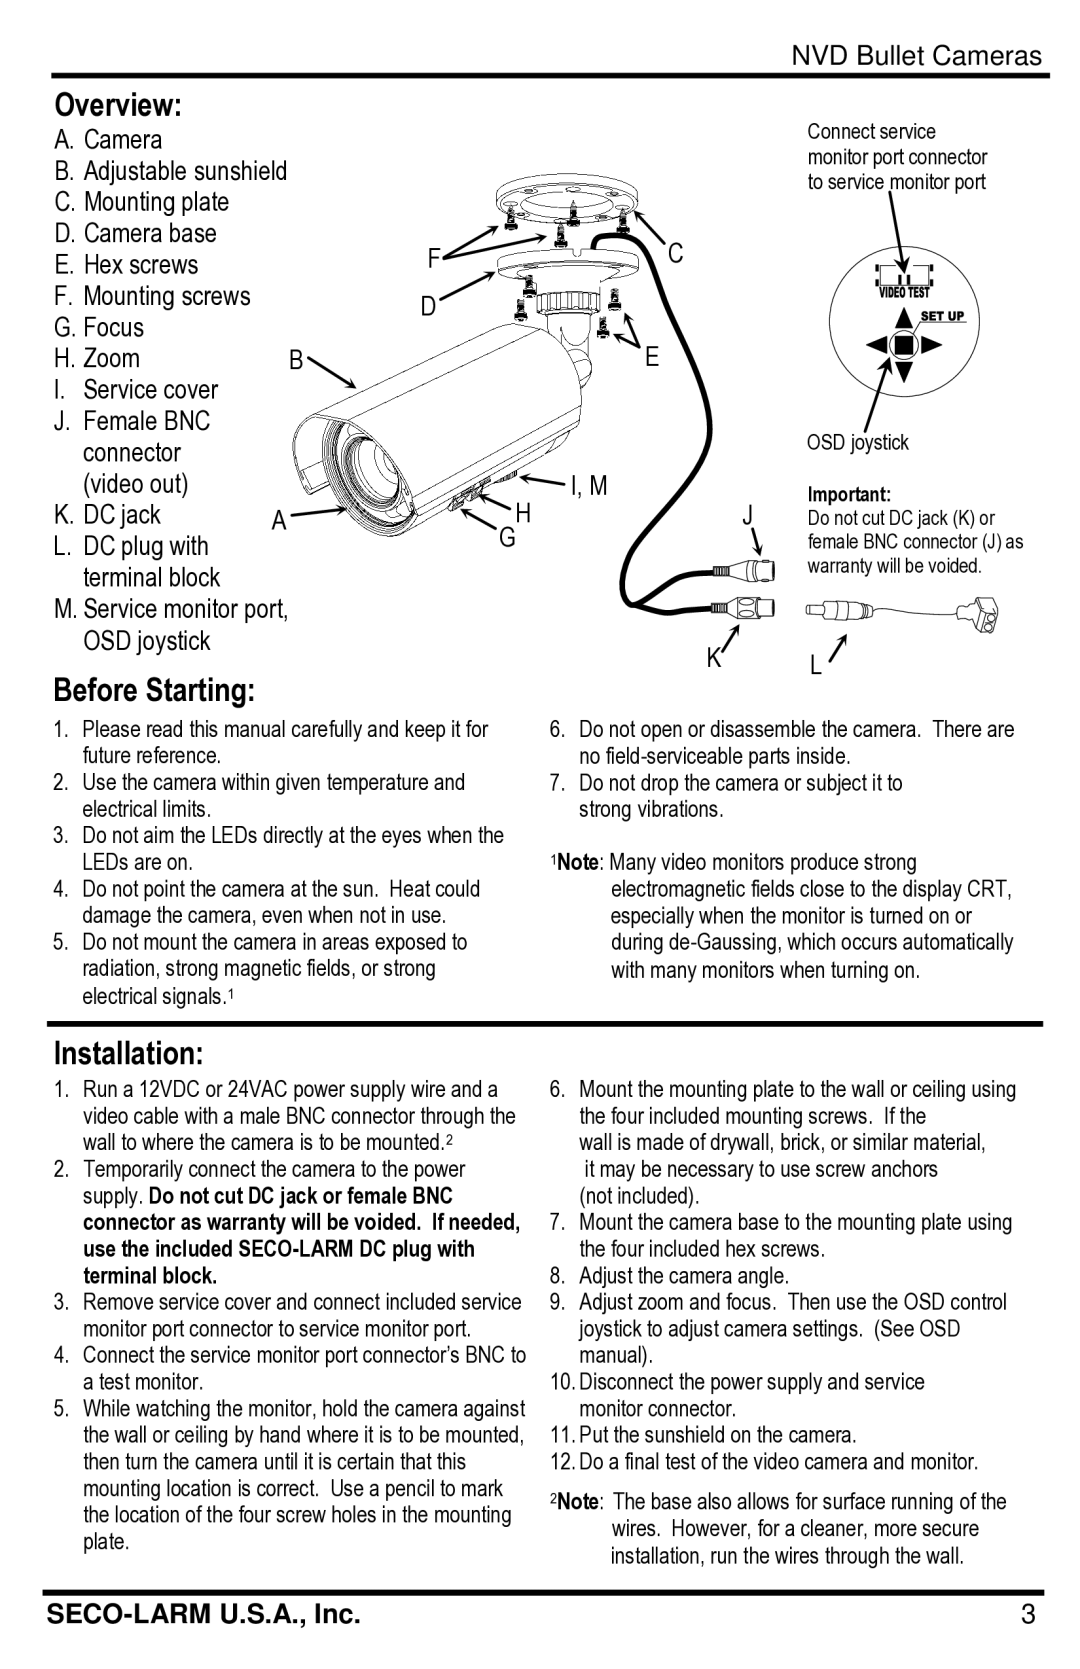
A. Camera


B. Adjustable sunshield


C. Mounting plate


D. Camera base


F

C

E. Hex screws


F. Mounting screws


D


G. Focus


E

H. Zoom

B


I. Service cover


J. Female BNC


connector


(video out)


I, M

K. DC jack

A


H

L. DC plug with


G


terminal block

M. Service monitor port, OSD joystick

Before Starting:

Connect service monitor port connector to service monitor port

OSD joystick

Important:

J Do not cut DC jack (K) or female BNC connector (J) as warranty will be voided.

K L

1.Please read this manual carefully and keep it for future reference.

2.Use the camera within given temperature and electrical limits.

3.Do not aim the LEDs directly at the eyes when the LEDs are on.

4.Do not point the camera at the sun. Heat could damage the camera, even when not in use.

5.Do not mount the camera in areas exposed to radiation, strong magnetic fields, or strong electrical signals.1

6.Do not open or disassemble the camera. There are no field-serviceable parts inside.

7.Do not drop the camera or subject it to strong vibrations.

1Note: Many video monitors produce strong electromagnetic fields close to the display CRT, especially when the monitor is turned on or during de-Gaussing, which occurs automatically with many monitors when turning on.

Installation:

1.Run a 12VDC or 24VAC power supply wire and a video cable with a male BNC connector through the wall to where the camera is to be mounted.2

2.Temporarily connect the camera to the power supply. Do not cut DC jack or female BNC connector as warranty will be voided. If needed, use the included SECO-LARM DC plug with terminal block.

3.Remove service cover and connect included service monitor port connector to service monitor port.

4.Connect the service monitor port connector’s BNC to a test monitor.

5.While watching the monitor, hold the camera against the wall or ceiling by hand where it is to be mounted, then turn the camera until it is certain that this mounting location is correct. Use a pencil to mark the location of the four screw holes in the mounting plate.

6.Mount the mounting plate to the wall or ceiling using the four included mounting screws. If the

wall is made of drywall, brick, or similar material, it may be necessary to use screw anchors (not included).

7.Mount the camera base to the mounting plate using the four included hex screws.

8.Adjust the camera angle.

9.Adjust zoom and focus. Then use the OSD control joystick to adjust camera settings. (See OSD manual).

10.Disconnect the power supply and service monitor connector.

11.Put the sunshield on the camera.

12.Do a final test of the video camera and monitor.

2Note: The base also allows for surface running of the wires. However, for a cleaner, more secure installation, run the wires through the wall.

SECO-LARM U.S.A., Inc.

3

Page 3
Image 3
SECO-LARM USA EV-1626-NKGQ, EV-1626-PWGQ, EV-1626-NWGQ, EV-1626-PKGQ Overview, Before Starting, Installation

EV-1626-PWGQ, EV-1626-NKGQ, EV-1626-PKGQ, EV-1626-NWGQ specifications

SECO-LARM USA offers a wide range of advanced access control and security solutions, and among their standout products are the EV-1626 series. This series includes four models: EV-1626-PKGQ, EV-1626-NKGQ, EV-1626-NWGQ, and EV-1626-PWGQ, each designed to cater to specific security needs while ensuring reliability and ease of use.

The EV-1626 series is characterized by its robust construction and high-quality materials, ensuring durability against various environmental factors. These models employ a variety of technologies to enhance security. One of the main features is their use of proximity card technology, which allows for seamless access control. Users can simply present their card near the reader, simplifying the entry process and reducing wait times.

Each model in the series is equipped with a durable, weatherproof design suited for both indoor and outdoor installations. This versatility makes them an excellent choice for a multitude of applications, from office buildings and commercial properties to residential spaces. The EV-1626 models mitigate the risk of unauthorized access, enhancing overall safety and security for users.

Another significant characteristic of the EV-1626 series is their compatibility with various access control systems. Whether it's integration with existing infrastructure or building a new system from the ground up, these readers can align with diverse configurations, making them flexible for various setups.

The EV-1626-PKGQ model is particularly noteworthy for its capacity to support multiple card formats and its ability to contact a specific control panel, facilitating efficient monitoring and control. On the other hand, the EV-1626-NKGQ model emphasizes enhanced encryption for data protection, which is crucial in today's digital age where security breaches are common.

For those in need of visual confirmation along with secure access, the EV-1626-NWGQ incorporates a camera feature allowing for video monitoring of the entry point. Meanwhile, the EV-1626-PWGQ model offers an integrated keypad for added security, allowing for PIN code access alongside card scanning.

Overall, SECO-LARM’s EV-1626 series exemplifies the perfect blend of functionality, reliability, and security. With a variety of models tailored to different security needs, each designed for ease of installation and user-friendliness, the EV-1626 series stands out as a reliable solution for modern access control challenges. Whether for commercial or residential applications, these models effectively enhance security measures while providing convenience and peace of mind for users.