MODEL
HT-SB20
HT-SB30
SOUND BAR HOME THEATER SYSTEM
OPERATION MANUAL
Remote control x 1 | AC/DC adaptor x 1 | AC power cord x 1 |
(RRMCGA326AWSA: HT-SB20) | (RADPAA096AWZZ) | (QACCDA005AWZZ) |
(RRMCGA322AWSA: HT-SB30) | | |
Audio cable x 1 | Pattern paper x 1 | |
(QCNWGA087AWPZ) | (TCAUHA034AWZZ) | |
The illustrations printed in this manual are for the model HT-SB30.
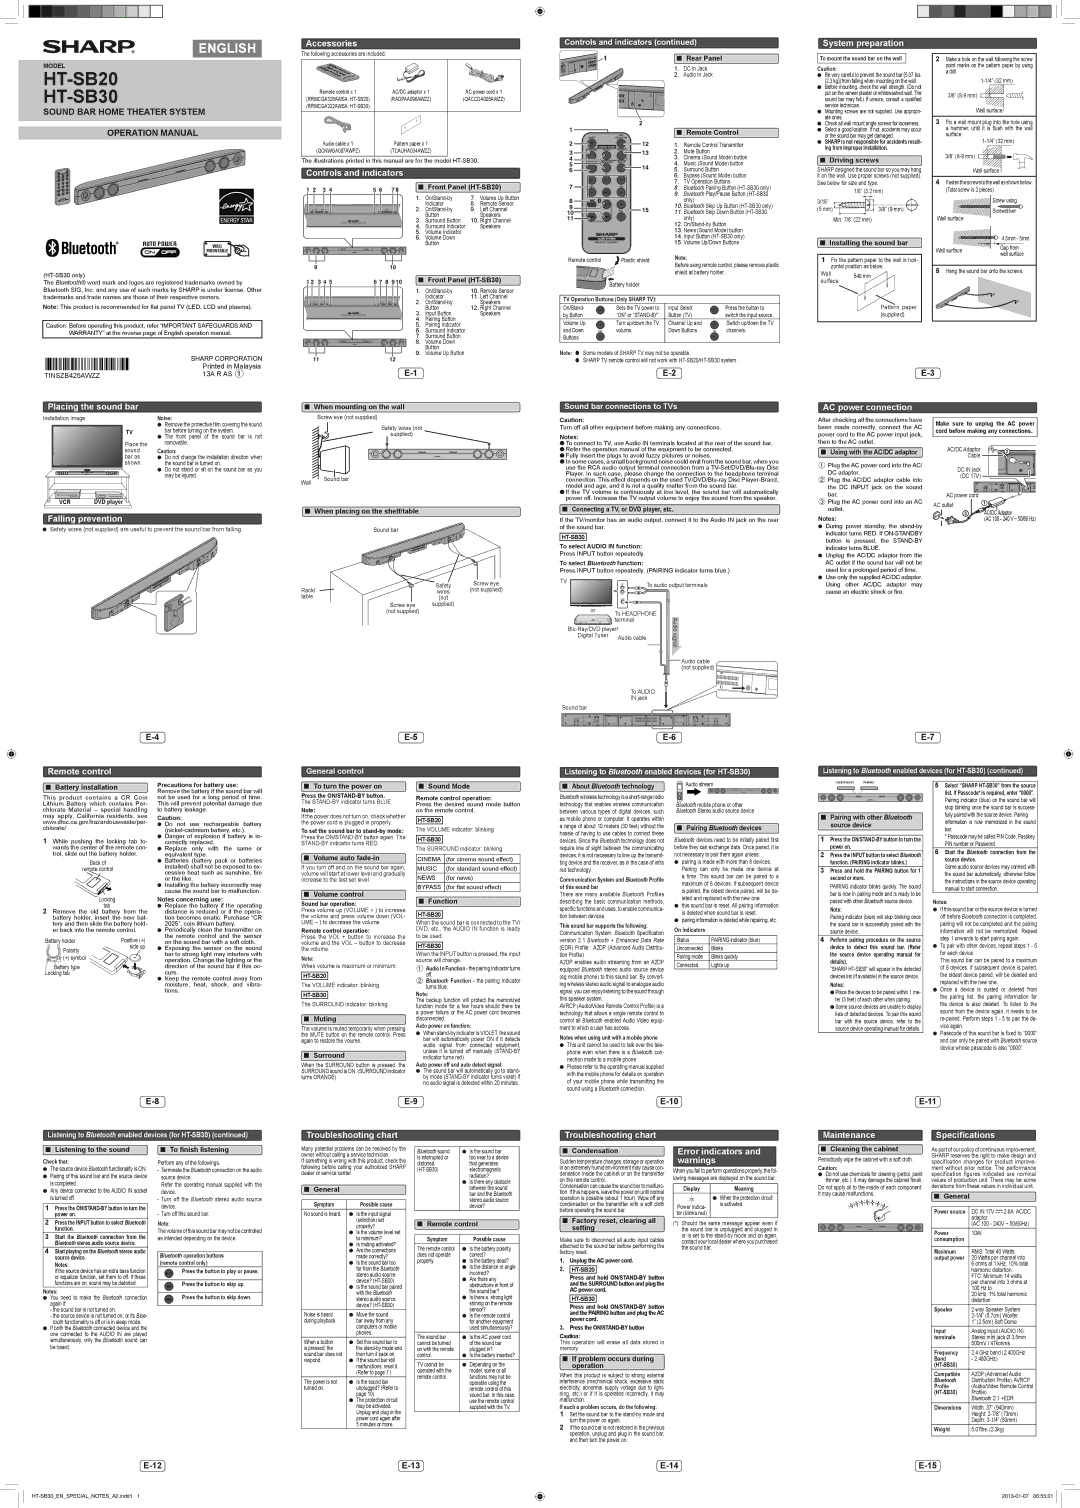
Controls and indicators
1 2 3 4 | 5 6 7 8 | ■ Front Panel (HT-SB20) |
| | | | | | | | | | | | 1. | On/Stand-by | 7. | Volume Up Button |
| | | | | | | | | | | | 2. | Indicator | 8. | Remote Sensor |
| | | | | | | | | | | | On/Stand-by | 9. | Left Channel |
| | | | | | | | | | | | 3. | Button | | Speakers |
| | | | | | SOUND BAR HOME THEATER SYSTEM HT-SB20 | Surround Button | 10. Right Channel |
| | | | | | | | | | | | 4. | Surround Indicator | | Speakers |
| | | | | | | | | | | | 5. | Volume Indicator | | |
| | | | | | | | | | | | 6. | Volume Down | | |
| | | | | | | | | | | | | Button | | |
1
1 | | | | 2 |
| | | |
| MUTE | | ON/ | |
| | STAND-BY | |
2 | | SOUND MODE | | 12 |
3 | CINEMA | MUSIC | NEWS | 13 |
| | |
4 | BYPASS | SURROUND | INPUT | |
5 | |
| | | 14 |
6 | | | |
| TV | | |
| | | |
8 | | |
9 | | 15 |
10 | VOL |
| |
11 | | |
| RRMCGA322AWSA | |
■Rear Panel
1.DC In Jack
2.Audio In Jack
■Remote Control
1.Remote Control Transmitter
2.Mute Button
3.Cinema (Sound Mode) button
4.Music (Sound Mode) button
5.Surround Button
6.Bypass (Sound Mode) button
7.TV Operation Buttons
8.Bluetooth Pairing Button (HT-SB30 only)
9.Bluetooth Play/Pause Button (HT-SB30 only)
10.Bluetooth Skip Up Button (HT-SB30 only)
11.Bluetooth Skip Down Button (HT-SB30 only)
12.On/Stand-by Button
13.News (Sound Mode) button
14.Input Button (HT-SB30 only)
15.Volume Up/Down Buttons
To mount the sound bar on the wall
Caution:
●Be very careful to prevent the sound bar [5.07 lbs. (2.3 kg)] from falling when mounting on the wall.
●Before mounting, check the wall strength. (Do not put on the veneer plaster or whitewashed wall. The sound bar may fall.) If unsure, consult a qualified service technician.
●Mounting screws are not supplied. Use appropri- ate ones.
●Check all wall mount angle screws for looseness.
●Select a good location. If not, accidents may occur or the sound bar may get damaged.
●SHARP is not responsible for accidents result- ing from improper installation.
■Driving screws
SHARP designed the sound bar so you may hang it on the wall. Use proper screws (not supplied). See below for size and type.
| 1/8” (3.2 mm) |
3/16” | |
(5 mm) | 3/8” (9 mm) |
| Min. 7/8” (22 mm) |
■Installing the sound bar
2Make a hole on the wall following the screw point marks on the pattern paper by using a drill.
1-1/4” (32 mm)
3/8” (8-9 mm) 
Wall surface
3Fix a wall mount plug into the hole using a hammer, until it is flush with the wall surface.
1-1/4” (32 mm)
3/8” (8-9 mm) 
Wall surface
4Fastenthescrewstothewallasshownbelow. (Total screw is 2 pieces)
| Screw using |
Wall surface | Screwdriver |
|
| 4.5mm - 5mm |
Wall surface | Gap from |
wall surface |
Installation image:
TV
Place the sound bar as shown.
Notes:
●Remove the protective film covering the sound bar before turning on the system.
●The front panel of the sound bar is not removable.
Caution:
●Do not change the installation direction when the sound bar is turned on.
●Do not stand or sit on the sound bar as you may be injured.
Safety wires (not
supplied)
■When placing on the shelf/table
Caution:
Turn off all other equipment before making any connections.
Notes:
●To connect to TV, use Audio IN terminals located at the rear of the sound bar.
●Refer the operation manual of the equipment to be connected.
●Fully insert the plugs to avoid fuzzy pictures or noises.
●In some cases, a small background noise could emit from the sound bar, when you use the RCA audio output terminal connection from a TV-Set/DVD/Blu-ray Disc Player. In such case, please change the connection to the headphone terminal connection. This effect depends on the used TV/DVD/Blu-ray Disc Player-Brand, model and age, and it is not a quality matter from the sound bar.
●If the TV volume is continuously at low level, the sound bar will automatically power off. Increase the TV output volume to enjoy the sound from the speaker.
■Connecting a TV, or DVD player, etc.
After checking all the connections have been made correctly, connect the AC power cord to the AC power input jack, then to the AC outlet.
■Using with the AC/DC adaptor
1 Plug the AC power cord into the AC/ DC adaptor.
2Plug the AC/DC adaptor cable into
the DC INPUT jack on the sound bar.
3Plug the AC power cord into an AC outlet.
Make sure to unplug the AC power cord before making any connections.
AC/DC Adaptor | 2 |
Cable | |
DC IN jack | |
(DC 17V) | |
AC power cord | |
AC outlet | 1 |
AC/DC Adaptor
■Battery installation
This product contains a CR Coin Lithium Battery which contains Per- chlorate Material – special handling may apply, California residents, see www.dtsc.ca.gov/hazardouswaste/per- chlorate/
1While pushing the locking tab to- wards the center of the remote con- trol, slide out the battery holder.
Back of
remote control
Locking
tab
2Remove the old battery from the battery holder, insert the new bat- tery and then slide the battery hold- er back into the remote control.
Battery holder | Positive (+) |
Polarity | side up |
|
(+) symbol | |
Battery type | |
Locking tab | |
Precautions for battery use: Remove the battery if the sound bar will not be used for a long period of time. This will prevent potential damage due to battery leakage.
Caution:
●Do not use rechargeable battery (nickel-cadmium battery, etc.).
●Danger of explosion if battery is in- correctly replaced.
●Replace only with the same or equivalent type.
●Batteries (battery pack or batteries installed) shall not be exposed to ex- cessive heat such as sunshine, fire or the like.
●Installing the battery incorrectly may cause the sound bar to malfunction.
Notes concerning use:
●Replace the battery if the operating distance is reduced or if the opera- tion becomes erratic. Purchase “CR 2025”, coin lithium battery.
●Periodically clean the transmitter on the remote control and the sensor on the sound bar with a soft cloth.
●Exposing the sensor on the sound bar to strong light may interfere with operation. Change the lighting or the direction of the sound bar if this oc- curs.
●Keep the remote control away from moisture, heat, shock, and vibra- tions.
■To turn the power on
Press the ON/STAND-BY button. The STAND-BY indicator turns BLUE.
Note:
If the power does not turn on, check whether the power cord is plugged in properly.
To set the sound bar to stand-by mode: Press the ON/STAND-BY button again. The STAND-BY indicator turns RED.
■Volume auto fade-in
If you turn off and on the sound bar again, volume will start at lower level and gradually increase to the last set level.
■Volume control
Sound bar operation:
Press volume up (VOLUME + ) to increase the volume and press volume down (VOL- UME – ) to decrease the volume.
Remote control operation:
Press the VOL + button to increase the volume and the VOL – button to decrease the volume.
Note:
When volume is maximum or minimum:
HT-SB20
The VOLUME indicator: blinking
HT-SB30
The SURROUND indicator: blinking
■Muting
The volume is muted temporarily when pressing the MUTE button on the remote control. Press again to restore the volume.
■Surround
When the SURROUND button is pressed, the SURROUND sound is ON. (SURROUND indicator turns ORANGE)
■Sound Mode
Remote control operation:
Press the desired sound mode button on the remote control.
HT-SB20
The VOLUME indicator: blinking
HT-SB30
The SURROUND indicator: blinking
CINEMA | (for cinema sound effect) |
MUSIC | (for standard sound effect) |
NEWS | (for news) |
BYPASS | (for flat sound effect) |
■Function
HT-SB20
When the sound bar is connected to the TV/ DVD, etc., the AUDIO IN function is ready to be used.
HT-SB30
When the INPUT button is pressed, the input source will change.
1Audio In Function - the pairing indicator turns off.
2Bluetooth Function - the pairing indicator turns blue.
Note:
The backup function will protect the memorized function mode for a few hours should there be a power failure or the AC power cord becomes disconnected.
Auto power on function:
●When stand-by indicator is VIOLET, the sound bar will automatically power ON if it detects audio signal from connected equipment, unless it is turned off manually (STAND-BY indicator turns red).
Auto power off and auto detect signal:
●The sound bar will automatically go to stand- by mode (STAND-BY indicator turns violet) if no audio signal is detected within 20 minutes.
■About Bluetooth technology
Bluetooth wireless technology is a short-range radio technology that enables wireless communication between various types of digital devices, such as mobile phone or computer. It operates within a range of about 10 meters (30 feet) without the hassle of having to use cables to connect these devices. Since the Bluetooth technology does not require line of sight between the communicating devices, it is not necessary to line up the transmit- ting device and the receiver, as in the case of infra red technology.
Communication System and Bluetooth Profile of this sound bar
There are many available Bluetooth Profiles describing the basic communication methods, specific functions and uses, to enable communica- tion between devices.
This sound bar supports the following:
Communication System: Bluetooth Specification
version 2.1 Bluetooth + Enhanced Data Rate
(EDR) Profile : A2DP (Advanced Audio Distribu- tion Profile)
A2DP enables audio streaming from an A2DP equipped Bluetooth stereo audio source device (eg mobile phone) to this sound bar. By convert- ing wireless stereo audio signal to analogue audio signal, you can enjoy listening to the sound through this speaker system.
AVRCP (Audio/Video Remote Control Profile) is a technology that allows a single remote control to control all Bluetooth enabled Audio Video equip- ment to which a user has access.
Notes when using unit with a mobile phone
●This unit cannot be used to talk over the tele- phone even when there is a Bluetooth con- nection made to a mobile phone.
●Please refer to the operating manual supplied with the mobile phone for details on operation of your mobile phone while transmitting the sound using a Bluetooth connection.
Audio stream
Bluetooth mobile phone or other
Bluetooth Stereo audio source device
■Pairing Bluetooth devices
Bluetooth devices need to be initially paired first before they can exchange data. Once paired, it is not necessary to pair them again unless:
●pairing is made with more than 8 devices. Pairing can only be made one device at a time. This sound bar can be paired to a maximum of 8 devices. If subsequent device is paired, the oldest device paired, will be de- leted and replaced with the new one.
●this sound bar is reset. All pairing information is deleted when sound bar is reset.
●pairing information is deleted while repairing, etc.
On indicators
Status | PAIRING indicator (blue) |
Unconnected | Blinks |
Pairing mode | Blinks quickly |
Connected | Lights up |
ON/STAND-BY PAIRING
■Pairing with other Bluetooth source device
1Press the ON/STAND-BY button to turn the power on.
2Press the INPUT button to select Bluetooth function. (PAIRING indicator blinks.)
3Press and hold the PAIRING button for 1 second or more.
PAIRING indicator blinks quickly. The sound bar is now in pairing mode and is ready to be paired with other Bluetooth source device.
Note:
Pairing indicator (blue) will stop blinking once the sound bar is successfully paired with the source device.
4Perform pairing procedure on the source device to detect this sound bar. (Refer the source device operating manual for details).
“SHARP HT-SB30” will appear in the detected devices list (if available) in the source device.
Notes:
●Place the devices to be paired within 1 me- ter (3 feet) of each other when pairing.
●Some source devices are unable to display lists of detected devices. To pair this sound bar with the source device, refer to the source device operating manual for details.
5Select “SHARP HT-SB30” from the source list. If Passcode* is required, enter “0000”. Pairing indicator (blue) on the sound bar will stop blinking once the sound bar is success- fully paired with the source device. Pairing information is now memorized in the sound bar.
*Passcode may be called PIN Code, Passkey, PIN number or Password.
6Start the Bluetooth connection from the source device.
Some audio source devices may connect with the sound bar automatically, otherwise follow the instructions in the source device operating manual to start connection.
Notes:
●If this sound bar or the source device is turned off before Bluetooth connection is completed, pairing will not be completed and the pairing information will not be memorized. Repeat step 1 onwards to start pairing again.
●To pair with other devices, repeat steps 1 - 5 for each device.
This sound bar can be paired to a maximum of 8 devices. If subsequent device is paired, the oldest device paired, will be deleted and replaced with the new one.
●Once a device is ousted or deleted from the pairing list, the pairing information for the device is also deleted. To listen to the sound from the device again, it needs to be re-paired. Perform steps 1 - 5 to pair the de- vice again.
●Passcode of this sound bar is fixed to “0000” and can only be paired with Bluetooth source device whose passcode is also “0000”.
■Listening to the sound
Check that:
●The source device Bluetooth functionality is ON.
●Pairing of this sound bar and the source device is completed.
●Any device connected to the AUDIO IN socket is turned off.
1Press the ON/STAND-BY button to turn the power on.
2Press the INPUT button to select Bluetooth function.
3Start the Bluetooth connection from the Bluetooth stereo audio source device.
4Start playing on the Bluetooth stereo audio source device.
Notes:
If the source device has an extra bass function or equalizer function, set them to off. If these functions are on, sound may be distorted.
Notes:
●You need to make the Bluetooth connection again if:
-the sound bar is not turned on.
-the source device is not turned on, or its Blue- tooth functionality is off or is in sleep mode.
●If both the Bluetooth connected device and the one connected to the AUDIO IN are played simultaneously, only the Bluetooth sound can be heard.
■To finish listening
Perform any of the followings.
-Terminate the Bluetooth connection on the audio source device.
Refer the operating manual supplied with the device.
-Turn off the Bluetooth stereo audio source device.
-Turn off this sound bar.
Note:
The volume of this sound bar may not be controlled as intended depending on the device.
Bluetooth operation buttons (remote control only)
Press the button to play or pause.
Press the button to skip up.
Press the button to skip down.
Many potential problems can be resolved by the owner without calling a service technician.
If something is wrong with this product, check the following before calling your authorized SHARP dealer or service center.
■ General
Symptom | Possible cause |
No sound is heard. | ● Is the input signal |
| (selection) set |
| properly? |
| ● Is the volume level set |
| to minimum? |
| ● Is muting activated? |
| ● Are the connections |
| made correctly? |
| ● Is the sound bar too |
| far from the Bluetooth |
| stereo audio source |
| device? (HT-SB30) |
| ● Is the sound bar paired |
| with the Bluetooth |
| stereo audio source |
| device? (HT-SB30) |
Noise is heard | ● Move the sound |
during playback. | bar away from any |
| computers or mobile |
| phones. |
When a button | ● Set this sound bar to |
is pressed, the | the stand-by mode and |
sound bar does not | then turn it back on. |
respond. | ● If the sound bar still |
| malfunctions, reset it. |
| (Refer to page 7.) |
The power is not | ● Is the sound bar |
turned on. | unplugged? (Refer to |
| page 10) |
| ● The protection circuit |
| may be activated. |
| Unplug and plug in the |
| power cord again after |
| 5 minutes or more. |
Bluetooth sound | ● Is the sound bar |
is interrupted or | too near to a device |
distorted. | that generates |
(HT-SB30) | electromagnetic |
| radiation? |
●Is there any obstacle between the sound bar and the Bluetooth stereo audio source device?
■Remote control
Symptom | Possible cause |
The remote control | ● Is the battery polarity |
does not operate | correct? |
properly. | ● Is the battery dead? |
| ● Is the distance or angle |
| incorrect? |
| ● Are there any |
| obstructions in front of |
| the sound bar? |
| ● Is there a strong light |
| shining on the remote |
| sensor? |
| ● Is the remote control |
| for another equipment |
| used simultaneously? |
The sound bar | ● Is the AC power cord |
cannot be turned | of the sound bar |
on with the remote | plugged in? |
control. | ● Is the battery inserted? |
TV cannot be | ● Depending on the |
operated with the | model, some or all |
remote control. | functions may not be |
| operable using the |
| remote control of this |
| sound bar. In this case, |
| use the remote control |
| supplied with the TV. |
■Condensation
Sudden temperature changes, storage or operation in an extremely humid environment may cause con- densation inside the cabinet or on the transmitter on the remote control.
Condensation can cause the sound bar to malfunc- tion. If this happens, leave the power on until normal operation is possible (about 1 hour). Wipe off any condensation on the transmitter with a soft cloth before operating the sound bar.
■Factory reset, clearing all setting
Make sure to disconnect all audio input cables attached to the sound bar before performing the factory reset.
1.Unplug the AC power cord.
2.HT-SB20
Press and hold ON/STAND-BY button and the SURROUND button and plug the AC power cord.
HT-SB30
Press and hold ON/STAND-BY button and the PAIRING button and plug the AC power cord.
3. Press the ON/STAND-BY button Caution:
This operation will erase all data stored in memory.
■If problem occurs during operation
When this product is subject to strong external interference (mechanical shock, excessive static electricity, abnormal supply voltage due to light- ning, etc.) or if it is operated incorrectly, it may malfunction.
If such a problem occurs, do the following:
1Set the sound bar to the stand-by mode and turn the power on again.
2If the sound bar is not restored in the previous operation, unplug and plug in the sound bar, and then turn the power on.
Error indicators and warnings
When you fail to perform operations properly, the fol- lowing messages are displayed on the sound bar.
Display | Meaning |
| ● When the protection circuit |
Power indica- | is activated. |
tor (blinks red) | |
(*): Should the same message appear even if the sound bar is unplugged and plugged in or is set to the stand-by mode and on again, contact your local dealer where you purchased the sound bar.
■Cleaning the cabinet
Periodically wipe the cabinet with a soft cloth.
Caution:
●Do not use chemicals for cleaning (petrol, paint thinner, etc.). It may damage the cabinet finish.
Do not apply oil to the inside of each component. It may cause malfunctions.
As part of our policy of continuous improvement, SHARP reserves the right to make design and specification changes for product improve- ment without prior notice. The performance specification figures indicated are nominal values of production unit. There may be some deviations from these values in individual unit.
■General
Power source | DC IN 17V | | 2.8A: AC/DC |
|
| adaptor | |
| (AC 100 - 240V ~ 50/60Hz) |
Power | 10W | |
consumption | | | |
| | |
Maximum | RMS: Total 40 Watts |
output power | 20 Watts per channel into |
| 6 ohms at 1 kHz, 10% total |
| harmonic distortion |
| FTC: Minimum 14 watts |
| per channel into 3 ohms at |
| 100 Hz to | |
| 20 kHz, 1% total harmonic |
| distortion | |
Speaker | 2-way Speaker System |
| 2-1/4” (5.7cm) Woofer |
| 1” (2.5cm) Soft Dome |
Input | Analog input (AUDIO IN): |
terminals | Stereo mini jack Ø 3.5mm |
| 500mV / 47kohms |
Frequency | 2.4 GHz band (2,400GHz |
Band | - 2,480GHz) | |
(HT-SB30) | | | |
Compatible | A2DP (Advanced Audio |
Bluetooth | Distribution Profile), AVRCP |
Profile | (Audio/Video Remote Control |
(HT-SB30) | Profile) | |
| Bluetooth 2.1 +EDR |
Dimensions | Width: 37” (940mm) |
| Height: 2-7/8” (73mm) |
| Depth: 3-1/4” (83mm) |
Weight | 5.07lbs. (2.3kg) |
| | | |