Conexiones

Precaución

Asegúrese de apagar el interruptor primario y desconectar el enchufe de la toma de corriente antes de conectar/desconectar los cables. Asimismo, lea el manual del equipo que desea conectar.

Tenga cuidado de no confundir el terminal de entrada con el terminal de salida al conectar los cables. La inversión accidental de los cables conectados a los terminales de entrada y salida podría causar malfuncionamientos y otros problemas.

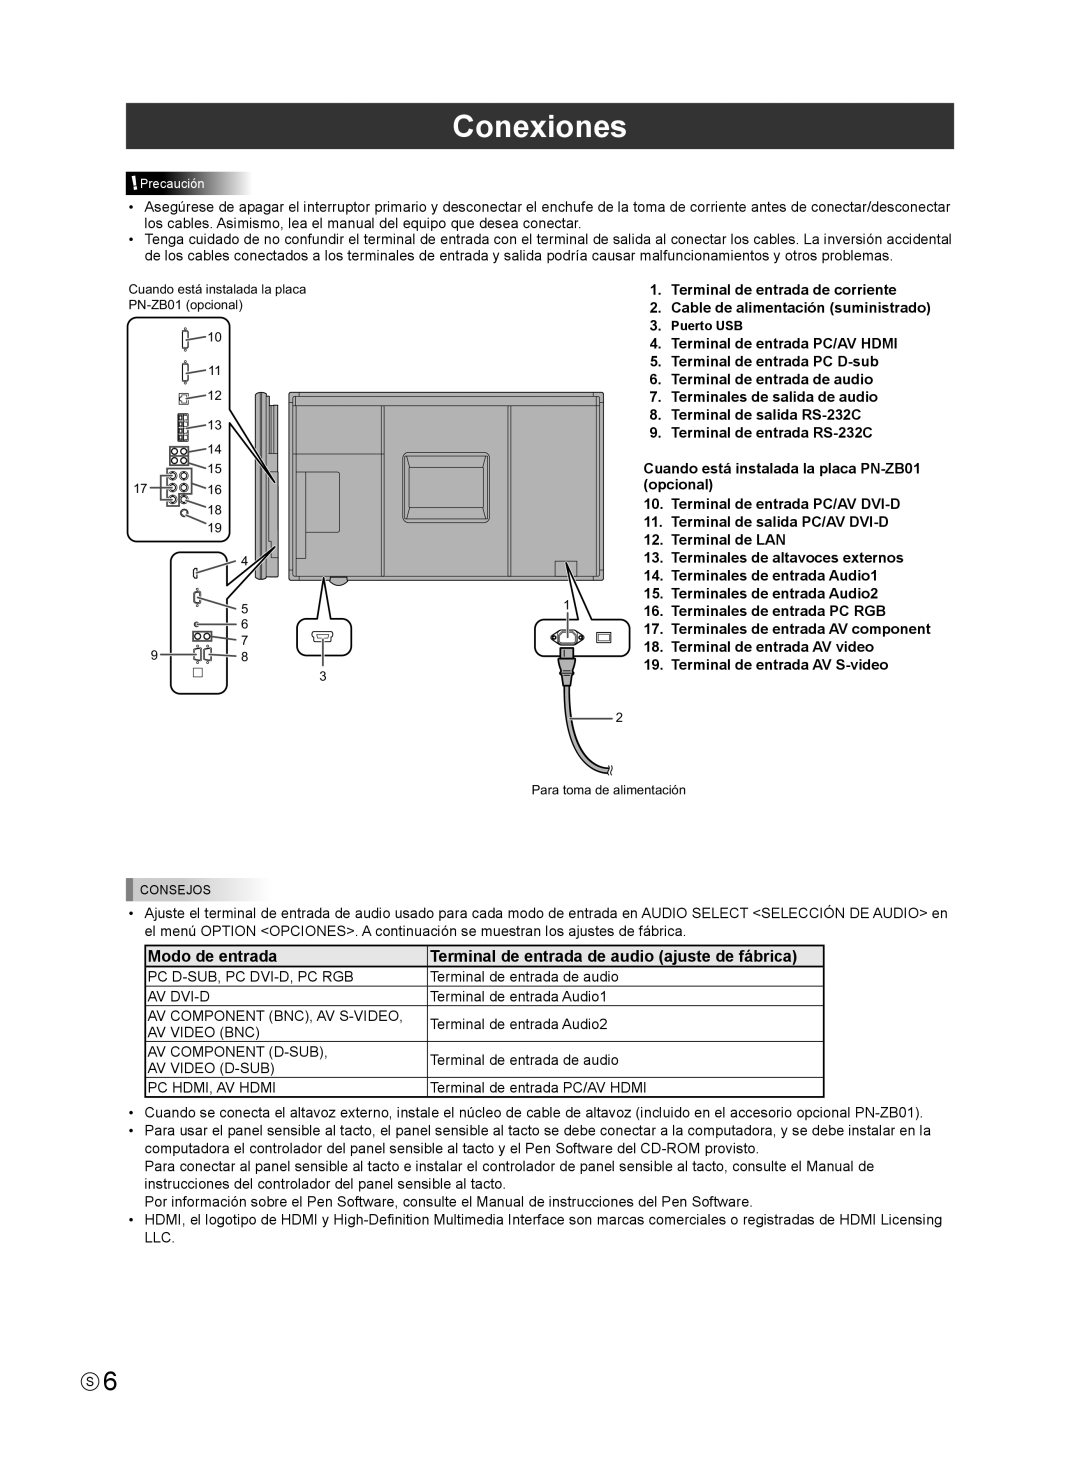
Cuando está instalada la placa PN-ZB01 (opcional)

10

11

12

13 14

15

17

16

18

19

4

5 6 7

9

8

3

1.Terminal de entrada de corriente

2.Cable de alimentación (suministrado)

3.Puerto USB

4.Terminal de entrada PC/AV HDMI

5.Terminal de entrada PC D-sub

6.Terminal de entrada de audio

7.Terminales de salida de audio

8.Terminal de salida RS-232C

9.Terminal de entrada RS-232C

Cuando está instalada la placa PN-ZB01 (opcional)


10. Terminal de entrada PC/AV DVI-D


11. Terminal de salida PC/AV DVI-D


12. Terminal de LAN


13. Terminales de altavoces externos


14. Terminales de entrada Audio1

1

15. Terminales de entrada Audio2

16. Terminales de entrada PC RGB


17. Terminales de entrada AV component


18. Terminal de entrada AV video


19. Terminal de entrada AV S-video

2

Para toma de alimentación

CONSEJOS

Ajuste el terminal de entrada de audio usado para cada modo de entrada en AUDIO SELECT <SELECCIÓN DE AUDIO> en el menú OPTION <OPCIONES>. A continuación se muestran los ajustes de fábrica.

Modo de entrada

Terminal de entrada de audio (ajuste de fábrica)

PC D-SUB, PC DVI-D, PC RGB

Terminal de entrada de audio

AV DVI-D

Terminal de entrada Audio1

AV COMPONENT (BNC), AV S-VIDEO,

Terminal de entrada Audio2

AV VIDEO (BNC)


AV COMPONENT (D-SUB),

Terminal de entrada de audio

AV VIDEO (D-SUB)


PC HDMI, AV HDMI

Terminal de entrada PC/AV HDMI

Cuando se conecta el altavoz externo, instale el núcleo de cable de altavoz (incluido en el accesorio opcional PN-ZB01).

Para usar el panel sensible al tacto, el panel sensible al tacto se debe conectar a la computadora, y se debe instalar en la computadora el controlador del panel sensible al tacto y el Pen Software del CD-ROM provisto.

Para conectar al panel sensible al tacto e instalar el controlador de panel sensible al tacto, consulte el Manual de instrucciones del controlador del panel sensible al tacto.

Por información sobre el Pen Software, consulte el Manual de instrucciones del Pen Software.

HDMI, el logotipo de HDMI y High-Definition Multimedia Interface son marcas comerciales o registradas de HDMI Licensing LLC.

S6

Page 24
Image 24
Sharp PN-L802B installation manual Conexiones

PN-L802B specifications

The Sharp PN-L802B, PN-L602B, PN-L702B, and PNL802B and PNL602B are a series of cutting-edge interactive displays that focus on enhancing collaboration and communication in various settings, including educational institutions, corporate environments, and creative studios. These models are designed to transform the way users engage with content, enabling seamless collaboration and improving overall productivity.

One of the standout features of the Sharp PN-L series is its large-sized display technology, with models such as the PN-L802B boasting an impressive 80-inch diagonal screen and the PN-L602B offering a 60-inch option. These expansive screens provide vivid visuals with 4K Ultra HD resolution, delivering stunning clarity and detail that captivates viewers. The enhanced brightness and wide viewing angles ensure that content is easily viewable from various positions in the room.

Touch technology is another defining characteristic of the Sharp PN-L series. The displays utilize advanced infrared touch technology, allowing for up to 10 points of simultaneous touch. This multi-touch capability enables multiple users to interact with the display at the same time, fostering a dynamic and interactive experience for collaboration and brainstorming sessions. The seamless touch responsiveness enhances user engagement, making it easier to navigate content and annotate directly on the screen.

The models also come equipped with Sharp's powerful software solutions, such as the easy-to-use Sharp Pen Software, which allows users to write and draw directly on the screen, making annotations and modifications in real-time. Additionally, the displays support various connectivity options, including HDMI, USB-C, and wireless sharing, facilitating easy integration with other devices and systems.

Moreover, the PN-L series is designed with a focus on durability and ease of use. The anti-glare surface reduces reflections and distractions, while the ergonomic design ensures that the displays can be easily installed at convenient heights for user interaction. Enhanced security features are also built in, safeguarding content and user data.

In summary, the Sharp PN-L802B, PN-L602B, PN-L702B, PNL802B, and PNL602B bring together large-scale interactive technology, rich visuals, and collaborative features that set a new standard for interactive displays. Their versatility and advanced capabilities make them an ideal choice for any environment where teamwork and communication are pivotal.