222 HARTREY AVE.. EVANSTON. IL. 60204 U.S.A
TWX: 910.231.0048 | TELEX: 72-4381 |
THE PREMIER FAMILY OF STEREO SOUND REPRODUCERS
STEREO DYNETIC@
'Io0PHONOGRAPH CARTRIDGE
CARTRIDGE AND STYLUS SPECIFICATIONS
@*
*&P
N75-6 | Beige | 6.2 mV | 20 t o | within | 20 dB | 1v2 | 400 | Hz - 18 cm/sec |
1 5 1 ~ | 20,000 | at | t o 3 | 1,000 | Hz - | 25 cm/sec |
(.0006 in.) | | | Hz | 2 dB | 1kHz | grams | 1 0 , W Hz - | 14 cm/sec |
Spher~cal | | | | - | | | at 2 grams | |
N75-3t | Dark | 6.2 mV | 20 t o | | 1% | | | |
6% | Green | | 20,000 | - t o 3 | | | |
(.0025 in.) | | | Hz | | | grams | | | |
Spherical | | | | | | | | | |
?Optional 78 rpm Stylus: Set amplifier to "MONO" or "A+B."
*Output voltages given for stereo cut record. For MONO cut record, output voltage at both left channel and right channel cartridge terminals will be 71% of figures above.
**Tracking forces greater than maximum indicated should not be used.
NET WEIGHT: 6.2 grams
INDUCTANCE: 720 millihenries
DC RESISTANCE: 630 ohms
OPTIMUM LOAD: 47,000 ohms resistance in parallel with 400 to 500 pico- farads total capacitance per channel. Load resistance can be up to 70,000 ohms with almost no audible change in frequency response. Total capaci- tance includes both tone arm wiring and amplifier input circuit.
FOUR-CHANNEL: This Stereo Dynetic@ cartridge is compatible with all four-channel matrix systems.
MONOPHONIC OPERATION: Set function switch on amplifier to "MONO" or "A+B." If amplifier is not equipped with this switch, connect left and right channels i n parallel.
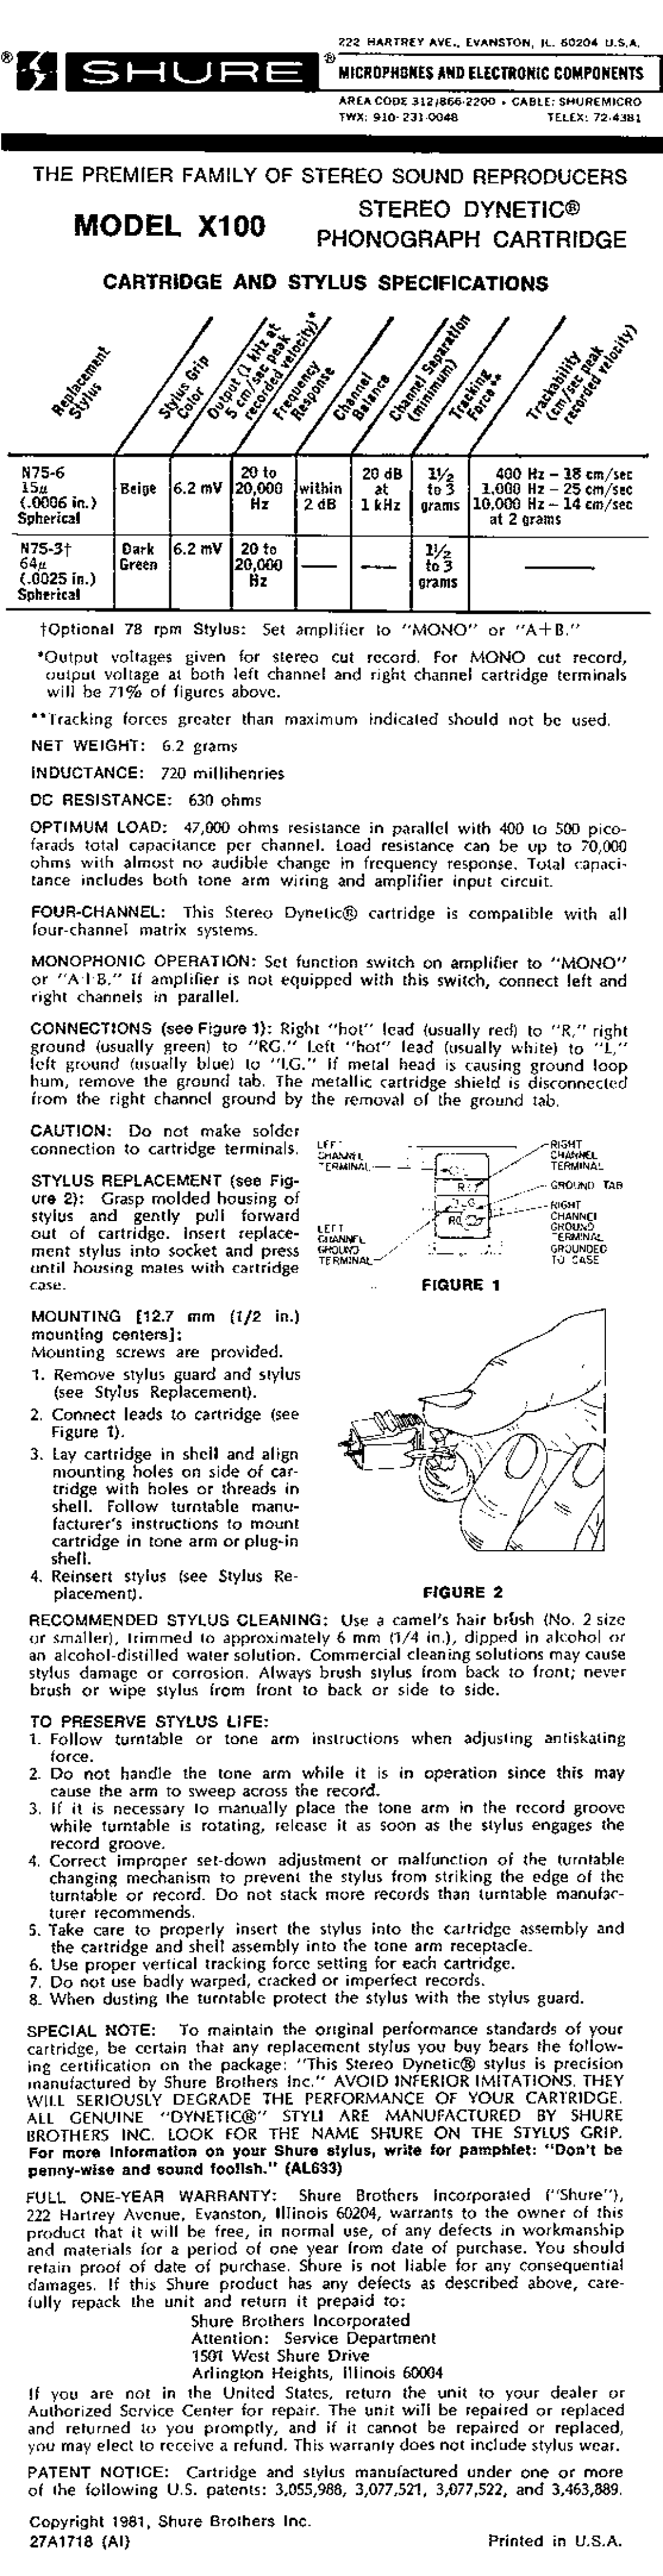
CONNECTIONS (see Figure 1): Right "hot" lead (usually red) to OR," right ground (usually green) to "RG." Left "hot" lead (usually white) to "L," left ground (usually blue) to "LG." I f metal head is causing ground loop hum, remove the ground tab. The metallic cartridge shield is disconnected from the right channel ground by the removal of the ground tab.
CAUTION: D o not make solder connection to cartridge terminals.
STYLUS REPLACEMENT (see Fig- ure 2): Grasp molded housing of stylus and gently pull forward out of cartridge. Insert replace- ment stylus into socket and press until housing mates with cartridge case.
MOUNTING [12.7 mm (1/2 in.) mounting centers]:
Mounting screws are provided.
1.Remove stylus guard and stylus (see Stylus Replacement).
2.Connect leads to cartridge (see Figure 1).
3.Lay cartridge i n shell and align mounting holes on side of car- tridge with holes or threads in shell. Follow turntable manu- facturer's instructions to mount cartridge in tone arm or plug-in shell.
4.Reinsert stylus (see Stylus Re- placement).
RECOMMENDED STYLUS CLEANING: Use a camel's hair brhsh (No. 2 size or smaller), trimmed to approximately 6 mm (1/4 in.), dipped in alcohol or an alcohol-distilled water solution. Commercial cleaning solutions may cause stylus damage or corrosion. Always brush stylus from back to front; never brush or wipe stylus from front to back or side to side.
TO PRESERVE STYLUS LIFE:
1.Follow turntable or tone arm instructions when adjusting antiskating force.
2.D o not handle the tone arm while it is in operation since this may cause the arm to sweep across the record.
3.If it is necessary to manually place the tone arm in the record groove while turntable is rotating, release it as soon as the stylus engages the record groove.
4.Correct improper set-down adjustment or malfunction of the turntable changing mechanism to prevent the stylus from striking the edge of the turntable or record. D o not stack more records than turntable manufac- turer recommends.
5.Take care to properly insert the stylus into the cartridge assembly and the cartridge and shell assembly into the tone arm receptacle.
6.Use proper vertical tracking force setting for each cartridge.
7.Do not use badly warped, cracked or imperfect records.
8.When dusting the turntable protect the stylus with the stylus guard.
SPECIAL NOTE: To maintain the ortginal performance standards of your cartridge, be certain that any replacement stylus you buy bears the follow- ing certification on the package: "This Stereo Dynetic@ stylus is precision manufactured by Shure Brothers Inc." AVOID INFERIOR IMITATIONS. THEY WILL SERIOUSLY DEGRADE THE PERFORMANCE OF YOUR CARTRIDGE. ALL GENUINE "DYNETIC@" STYLI ARE MANUFACTURED BY SHURE BROTHERS INC. LOOK FOR THE NAME SHURE O N THE STYLUS GRIP. For more information on your Shure stylus, write for pamphlet: "Don't be penny-wise and sound foolish." (AL633)
FULL ONE-YEAR WARRANTY: Shure Brothers lncorporated YShure"), 222 Hartrey Avenue, Evanston, Illinois 60204, warrants to the owner of this product that it will be free, i n normal use, of any defects in workmanship and materials for a period of one year from date of purchase. You should retain proof of date of purchase. Shure is not liable for any consequential damages. If this Shure product has any defects as described above, care- fully repack the unit and return it prepaid to:
Shure Brothers lncorporated Attention: Service Department 15W West Shure Drive Arlington Heights, Illinois 60004
If you are not in the United States, return the unit to your dealer or Authorized Service Center for repair. The unit will be repaired or replaced and returned to you promptly, and if it cannot be repaired or replaced, you may elect to receive a refund. This warranty does not include stylus wear.
PATENT NOTICE: Cartridge and stylus manufactured under one or more
of the following U.S. patents: 3,055,988, 3,077,521, 3,077,522, and 3,463,889.
Copyright 1981, Shure Brothers Inc. | |
27A1718 (Al) | Printed in U.S.A. |