Saving VoIP access data | 9 |
|
|
Before you can use the Internet (VoIP) to phone any other subscribers on the Internet, the fixed line network or the mobile phone network, you need a VoIP account.
> Set up a VoIP account with a VoIP provider. |
Saving VoIP access data | 10 |
|
|
7Starting the configuration process
When your handset is sufficiently charged (approx. 20 minutes after you have placed it in the charging cradle), the message key f on the handset flashes.
Saving VoIP access data | 11 |
|
|
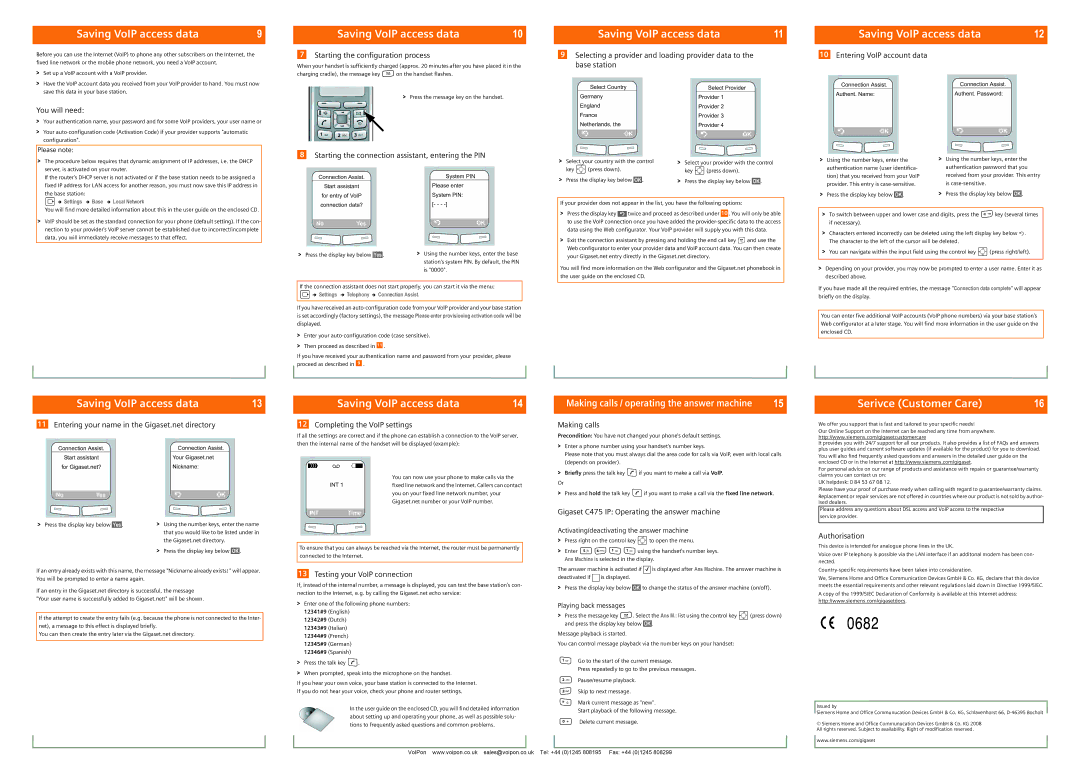
9Selecting a provider and loading provider data to the base station
Saving VoIP access data | 12 |
|
|
10Entering VoIP account data
> Have the VoIP account data you received from your VoIP provider to hand. You must now |
save this data in your base station. |
You will need:
>Your authentication name, your password and for some VoIP providers, your user name or
>Your
Please note:
>Press the message key on the handset.
8Starting the connection assistant, entering the PIN
Select Country
Germany
England
France
Netherlands, the
![]()
![]() ÝOK
ÝOK![]()
![]()
Select Provider
Provider 1
Provider 2
Provider 3
Provider 4
![]()
![]() ÝOK
ÝOK![]()
![]()
Connection Assist. |
| Connection Assist. |
Authent. Name: |
| Authent. Password: |
Ý | OK | Ý | OK |
>The procedure below requires that dynamic assignment of IP addresses, i.e. the DHCP server, is activated on your router.
If the router's DHCP server is not activated or if the base station needs to be assigned a fixed IP address for LAN access for another reason, you must now save this IP address in the base station:
Connection Assist.
Start assistant
for entry of VoIP
System PIN
Please enter
System PIN:
>Select your country with the control key p (press down).
>Press the display key below §OK§.
>Select your provider with the control key p (press down).
>Press the display key below §OK§.
> | Using the number keys, enter the | > | Using the number keys, enter the |
| authentication name (user identifica- |
| authentication password that you |
| tion) that you received from your VoIP |
| received from your provider. This entry |
| provider. This entry is |
| is |
> | Press the display key below §OK§. | > | Press the display key below §OK§. |
v ¢ Settings ¢ Base ¢ Local Network
You will find more detailed information about this in the user guide on the enclosed CD.
>VoIP should be set as the standard connection for your phone (default setting). If the con- nection to your provider's VoIP server cannot be established due to incorrect/incomplete data, you will immediately receive messages to that effect.
connection data?
![]()
![]() No Yes
No Yes ![]()
![]()
>Press the display key below §Yes§.
[- - -
![]()
![]() ÝOK
ÝOK![]()
![]()
>Using the number keys, enter the base station's system PIN. By default, the PIN is "0000".
If your provider does not appear in the list, you have the following options:
>Press the display key ” twice and proceed as described under 10 . You will only be able to use the VoIP connection once you have added the
>Exit the connection assistant by pressing and holding the end call key a and use the Web configurator to enter your provider data and VoIP account data. You can then create your Gigaset.net entry directly in the Gigaset.net directory.
You will find more information on the Web configurator and the Gigaset.net phonebook in the user guide on the enclosed CD.
>To switch between upper and lower case and digits, press the # key (several times if necessary).
>Characters entered incorrectly can be deleted using the left display key below Ý. The character to the left of the cursor will be deleted.
>You can navigate within the input field using the control key p (press right/left).
>Depending on your provider, you may now be prompted to enter a user name. Enter it as described above.
If the connection assistant does not start properly, you can start it via the menu:
v ¢ Settings ¢ Telephony ¢ Connection Assist.
If you have received an
>Enter your
>Then proceed as described in 11 .
If you have received your authentication name and password from your provider, please proceed as described in 9 .
If you have made all the required entries, the message "Connection data complete" will appear briefly on the display.
You can enter five additional VoIP accounts (VoIP phone numbers) via your base station's Web configurator at a later stage. You will find more information in the user guide on the enclosed CD.
Saving VoIP access data | 13 |
|
|
11Entering your name in the Gigaset.net directory
Saving VoIP access data | 14 |
|
|
12Completing the VoIP settings
If all the settings are correct and if the phone can establish a connection to the VoIP server, then the internal name of the handset will be displayed (example):
Making calls / operating the answer machine | 15 |
|
|
Making calls
Precondition: You have not changed your phone's default settings.
> |
Serivce (Customer Care) | 16 |
|
|
We offer you support that is fast and tailored to your specific needs!
Our Online Support on the Internet can be reached any time from anywhere. http://www.siemens.com/gigasetcustomercare
It provides you with 24/7 support for all our products. It also provides a list of FAQs and answers
Connection Assist.
Start assistant
for Gigaset.net?
![]()
![]() No Yes
No Yes![]()
![]()
>Press the display key below §Yes§.
Connection Assist.
Your Gigaset.net
Nickname:
![]()
![]() ÝOK
ÝOK![]()
![]()
>Using the number keys, enter the name that you would like to be listed under in the Gigaset.net directory.
>Press the display key below §OK§.
Ð Ã V
You can now use your phone to make calls via the
INT 1fixed line network and the Internet. Callers can contact you on your fixed line network number, your Gigaset.net number or your VoIP number.

 INT Time

To ensure that you can always be reached via the Internet, the router must be permanently connected to the Internet.
Enter a phone number using your handset's number keys. |
Please note that you must always dial the area code for calls via VoIP, even with local calls |
(depends on provider). |
> Briefly press the talk key c if you want to make a call via VoIP. |
Or
>Press and hold the talk key c if you want to make a call via the fixed line network.
Gigaset C475 IP: Operating the answer machine
Activating/deactivating the answer machine
>Press right on the control key p to open the menu.
>Enter 5 L ÊÊusing the handset's number keys. Ans Machine is selected in the display.
plus user guides and current software updates (if available for the product) for you to download.
You will also find frequently asked questions and answers in the detailed user guide on the enclosed CD or in the Internet at http://www.siemens.com/gigaset.
For personal advice on our range of products and assistance with repairs or guarantee/warranty claims you can contact us on:
UK helpdesk: 0 84 53 67 08 12.
Please have your proof of purchase ready when calling with regard to guarantee/warranty claims.
Replacement or repair services are not offered in countries where our product is not sold by author- ised dealers.
Please address any questions about DSL access and VoIP access to the respective service provider.
Authorisation
This device is intended for analogue phone lines in the UK.
Voice over IP telephony is possible via the LAN interface if an additonal modem has been con- nected.
If an entry already exists with this name, the message "Nickname already exists! " will appear. You will be prompted to enter a name again.
If an entry in the Gigaset.net directory is successful, the message "Your user name is successfully added to Gigaset.net!" will be shown.
If the attempt to create the entry fails (e.g. because the phone is not connected to the Inter- net), a message to this effect is displayed briefly.
You can then create the entry later via the Gigaset.net directory.
13Testing your VoIP connection
If, instead of the internal number, a message is displayed, you can test the base station's con- nection to the Internet, e.g. by calling the Gigaset.net echo service:
>Enter one of the following phone numbers: 12341#9 (English)
12342#9 (Dutch) 12343#9 (Italian) 12344#9 (French)
12345#9 (German) 12346#9 (Spanish)
>Press the talk key c.
>When prompted, speak into the microphone on the handset.
If you hear your own voice, your base station is connected to the Internet. If you do not hear your voice, check your phone and router settings.
In the user guide on the enclosed CD, you will find detailed information about setting up and operating your phone, as well as possible solu- tions to frequently asked questions and common problems.
The answer machine is activated if ‰ is displayed after Ans Machine. The answer machine is
deactivated if |
| is displayed. |
>Press the display key below §OK§ to change the status of the answer machine (on/off).
Playing back messages
>Press the message key f. Select the Ans M.: list using the control key p (press down) and press the display key below §OK§.
Message playback is started.
You can control message playback via the number keys on your handset:
ÊGo to the start of the current message.
Press repeatedly to go to the previous messages.
2Pause/resume playback.
3Skip to next message.
*Mark current message as "new".
Start playback of the following message.
QDelete current message.
We, Siemens Home and Office Communication Devices GmbH & Co. KG, declare that this device meets the essential requirements and other relevant regulations laid down in Directive 1999/5/EC.
A copy of the 1999/5/EC Declaration of Conformity is available at this Internet address:
http://www.siemens.com/gigasetdocs.
Issued by
Siemens Home and Office Communucation Devices GmbH & Co. KG, Schlavenhorst 66,
©Siemens Home and Office Communucation Devices GmbH & Co. KG 2008 All rights reserved. Subject to availability. Right of modification reserved.
www.siemens.com/gigaset
VoIPon www.voipon.co.uk sales@voipon.co.uk Tel: +44 (0)1245 808195 Fax: +44 (0)1245 808299