VCAUTION

CONDUCTING DIELECTRIC AND/OR HI-POTENTIAL TESTING WILL CAUSE INTERNAL DAMAGE TO TPS3 UNIT.

Do not perform dielectric or high potential

tests with the TPS3 unit installed.

V DANGER

Hazardous voltage.

Will cause death or serious injury.

Keep Out.

Qualified personnel only.

Disconnect and lock off all power before working on this equipment.

TPS3 09 Installation Instructions

Pre-Plan your installation. You need to accomplish the following:

• Meet all National and Local codes (NEC® Article 285 and UL

1449 address SPDs)

• Confirm System voltage to SPD voltage (120V SPD will fail

instantly on 240V, 277V, etc.)

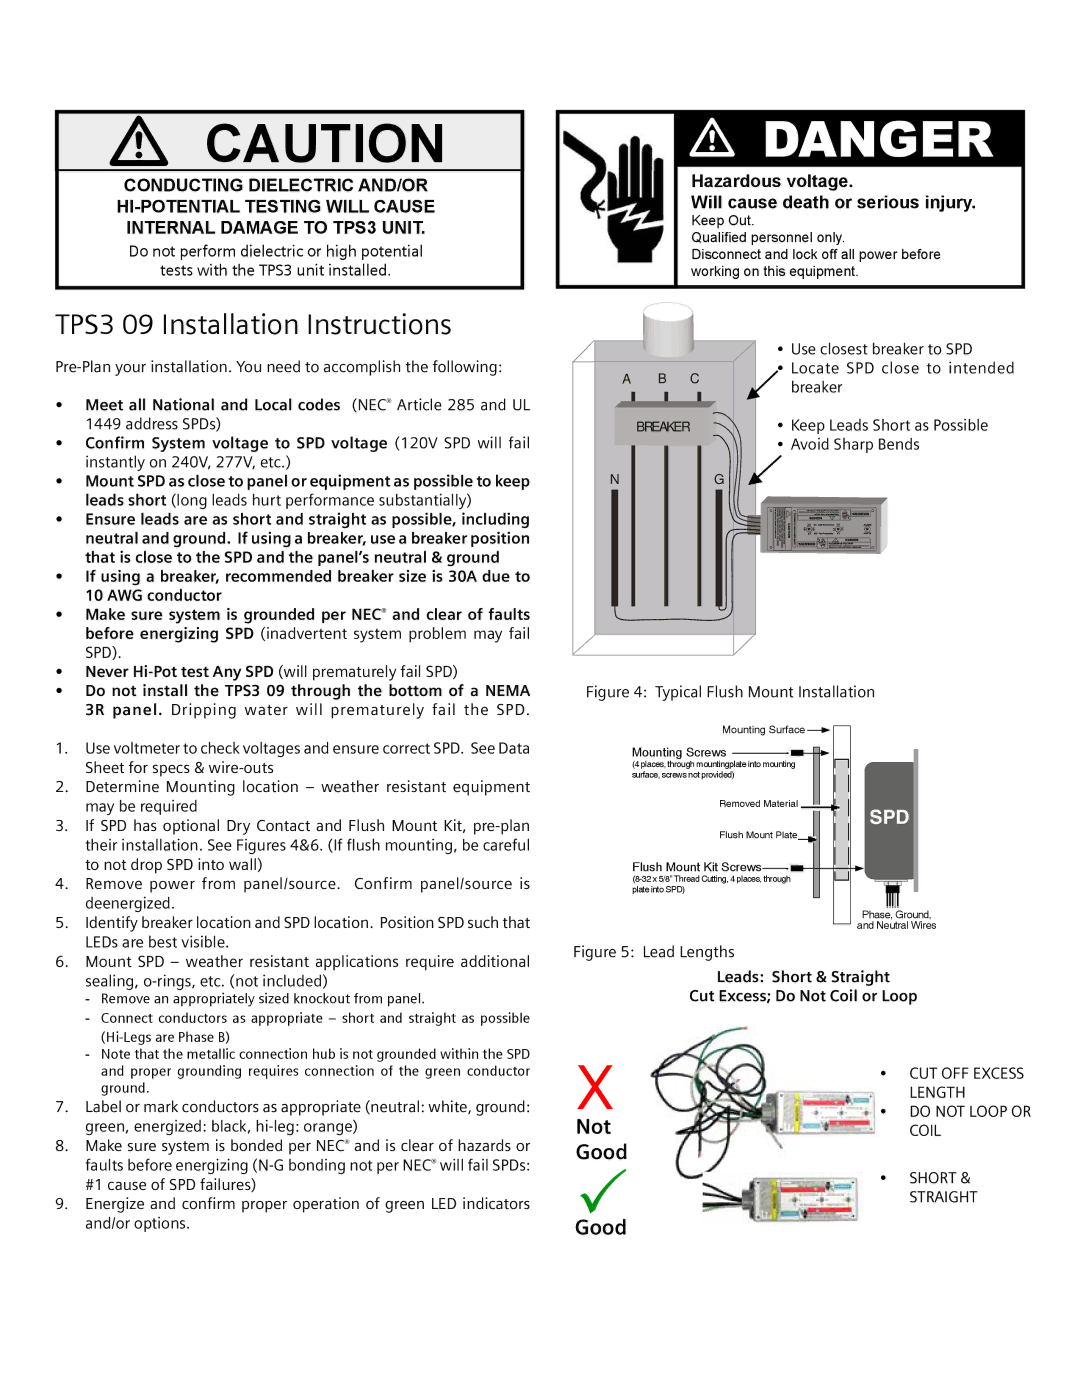
• Mount SPD as close to panel or equipment as possible to keep

leads short (long leads hurt performance substantially)

• Ensure leads are as short and straight as possible, including

neutral and ground. If using a breaker, use a breaker position

that is close to the SPD and the panel’s neutral & ground

• If using a breaker, recommended breaker size is 30A due to

10 AWG conductor

• Make sure system is grounded per NEC® and clear of faults

before energizing SPD (inadvertent system problem may fail

SPD).

• Never Hi-Pot test Any SPD (will prematurely fail SPD)

A B C

BREAKER

N

G

Use closest breaker to SPD

Locate SPD close to intended breaker

Keep Leads Short as Possible

Avoid Sharp Bends

• Do not install the TPS3 09 through the bottom of a NEMA

3R panel. Dripping water will prematurely fail the SPD.

1. Use voltmeter to check voltages and ensure correct SPD. See Data

Figure 4: Typical Flush Mount Installation

Mounting Surface

Mounting Screws


Sheet for specs & wire-outs

2.

Determine Mounting location – weather resistant equipment


may be required

3.

If SPD has optional Dry Contact and Flush Mount Kit, pre-plan


their installation. See Figures 4&6. (If flush mounting, be careful

(4 places, through mountingplate into mounting surface, screws not provided)

Removed Material

Flush Mount Plate

SPD


to not drop SPD into wall)

4.

Remove power from panel/source. Confirm panel/source is


deenergized.

5.

Identify breaker location and SPD location. Position SPD such that


LEDs are best visible.

6.

Mount SPD – weather resistant applications require additional


sealing, o-rings, etc. (not included)


--

Remove an appropriately sized knockout from panel.


--

Connect conductors as appropriate – short and straight as possible


--

(Hi-Legs are Phase B)


Note that the metallic connection hub is not grounded within the SPD


and proper grounding requires connection of the green conductor


ground.

7.

Label or mark conductors as appropriate (neutral: white, ground:


green, energized: black, hi-leg: orange)

8.

Make sure system is bonded per NEC® and is clear of hazards or


faults before energizing (N-G bonding not per NEC® will fail SPDs:


#1 cause of SPD failures)

9.

Energize and confirm proper operation of green LED indicators


and/or options.

Flush Mount Kit Screws

(8-32 x 5/8” Thread Cutting, 4 places, through plate into SPD)

Phase, Ground,

and Neutral Wires

Figure 5: Lead Lengths

Leads: Short & Straight

Cut Excess; Do Not Coil or Loop

X

CUT OFF EXCESS


LENGTH

DO NOT LOOP OR

Not


COIL

Good


Goodp

SHORT &


STRAIGHT


Page 5
Image 5
Siemens TPS3 09 Sheet for specs & wire-outs, Determine Mounting location weather resistant equipment, May be required

TPS3 09 specifications

Siemens TPS3 09 is a pioneering process automation technology that is widely recognized for its robust performance and innovative features. Developed by Siemens, a leader in automation and digitalization, the TPS3 09 is designed for industrial applications requiring precision and reliability. It serves various sectors, including manufacturing, energy, and logistics, enhancing productivity through intelligent automation solutions.

One of the main features of the TPS3 09 is its modular architecture, allowing users to customize their control systems according to their specific needs. This modularity enables the integration of various functions, such as process control, safety management, and data acquisition, all within a single platform. This flexibility significantly reduces the complexity and cost associated with implementing separate systems.

The TPS3 09 utilizes advanced technologies to ensure high performance and efficiency. It incorporates cutting-edge communication protocols such as PROFINET and Ethernet/IP, facilitating seamless integration with other devices and systems in a network. This capability allows for real-time data exchange, which is essential for effective decision-making in fast-paced industrial environments.

Another notable characteristic of the TPS3 09 is its enhanced user interface. The system features intuitive graphical displays that allow operators to monitor and control processes with ease. The user-friendly interface is customizable, helping to streamline operations and reduce training time for personnel.

In terms of safety, the TPS3 09 adheres to the highest industry standards. It includes comprehensive safety solutions such as fail-safe control systems and safety certified components. These features ensure that both equipment and personnel are protected, minimizing the risk of accidents and downtime.

Energy efficiency is another critical aspect of the TPS3 09. The system is designed to optimize energy consumption throughout the operational lifecycle, promoting sustainable practices within industries. This focus on energy efficiency not only reduces operational costs but also aligns with global efforts to minimize environmental impact.

In summary, Siemens TPS3 09 stands as a versatile, innovative solution for process automation. Its modular design, advanced communication technologies, user-friendly interface, rigorous safety features, and emphasis on energy efficiency make it a valuable asset for businesses looking to enhance their operational capabilities. As industries continue to evolve, the TPS3 09 remains at the forefront of automation technology, driving progress and efficiency.