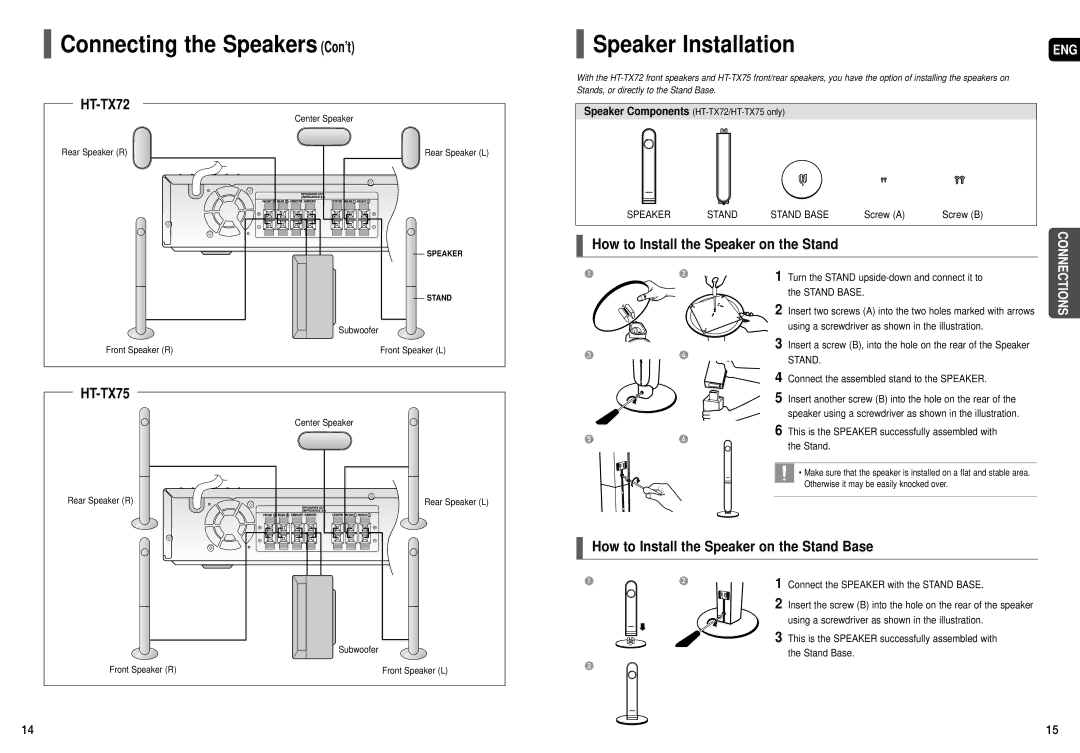
 Connecting the Speakers (Con’t)
|
|
| Center Speaker |
Rear Speaker (R) | Rear Speaker (L) |
| SPEAKER |
| STAND |
| Subwoofer |
Front Speaker (R) | Front Speaker (L) |
|
Center Speaker
Rear Speaker (R) | Rear Speaker (L) |
Subwoofer
Front Speaker (R) | Front Speaker (L) |
Speaker Installation | ENG |
With the
Speaker Components
SPEAKER | STAND | STAND BASE | Screw (A) | Screw (B) | CONNECTIONS | |
|
| 2 | Insert two screws (A) into the two holes marked with arrows | |||
How to Install the Speaker on the Stand |
|
|
| |||
1 | 2 | 1 | Turn the STAND |
| ||
|
|
| ||||
|
|
| the STAND BASE. |
|
| |
|
|
| using a screwdriver as shown in the illustration. |
| ||
3 | 4 | 3 | Insert a screw (B), into the hole on the rear of the Speaker |
| ||
| STAND. |
|
|
| ||
|
|
|
|
|
| |
|
| 4 | Connect the assembled stand to the SPEAKER. |
| ||
|
| 5 | Insert another screw (B) into the hole on the rear of the |
| ||
|
|
| speaker using a screwdriver as shown in the illustration. |
| ||
5 | 6 | 6 | This is the SPEAKER successfully assembled with |
| ||
| the Stand. |
|
|
| ||
|
|
|
|
|
| |
• Make sure that the speaker is installed on a flat and stable area. Otherwise it may be easily knocked over.
How to Install the Speaker on the Stand Base
1 | 2 | 1 | Connect the SPEAKER with the STAND BASE. |
|
| ||
|
| 2 | Insert the screw (B) into the hole on the rear of the speaker |
|
|
| using a screwdriver as shown in the illustration. |
|
| 3 | This is the SPEAKER successfully assembled with |
|
|
| the Stand Base. |
3 |
|
|
|
14 | 15 |
