SM 2610912499 2/03 2/10/03 1:43 PM Page 25

Instrucciones de funcionamiento

INTERRUPTOR GATILLO DE VELOCIDAD

VARIABLE CONTROLADA

La herramienta está equipada con un interruptor gatillo de velocidad variable. La herramienta se puede encender (posición "ON") o apagar (posición "OFF") apretando o soltando el gatillo. La velocidad se puede ajustar desde las RPM mínimas hasta las RPM máximas indicadas en la placa del fabricante por medio de la presión que usted ejerce sobre el gatillo. Ejerza más presión para aumentar la velocidad y disminuya la presión para reducir la velocidad (Fig. 1).

BOTON DE "FIJACION EN ON"

El botón de "Fijación en ON", ubicado en el mango de la herramienta, permite un funcionamiento continuo a RPM máximas sin tener que mantener apretado el gatillo (Fig. 1).

PARA FIJAR EL GATILLO EN LA POSICIÓN "ON": apriete el gatillo, oprima el botón y suelte el gatillo.

PARA DESBLOQUEAR EL GATILLO: apriete el gatillo y suéltelo sin oprimir el botón de "Fijación en ON".

Si se oprime continuamente el ! ADVERTENCIA botón de “Fijación en ON”, no se

puede soltar el gatillo.

PALANCA DE AVANCE/RETROCESO

Y CIERRE DEL GATILLO

La herramienta está equipada con una palanca de avan- ce/ retroceso y cierre del gatillo con ubicación encima del gatillo (Fig. 1). Esta palanca fue diseñada para invertir el sentido de rotación del mandril y para fijar el gatillo en una posición “OFF” a fin de ayudar a evitar arranques accidentales. Para la rotación de “Avance” (con el mandril orientado en sentido opuesto a usted), mueva la palanca completamente hacia la izquierda. Para la rotación inversa, mueva la palanca completamente hacia la derecha. Para activar el cierre del gatillo, mueva la palanca hasta la posición central “OFF”.

No cambie el sentido de giro ! PRECAUCION hasta que la herramienta se

haya detenido por completo. El cambio durante el giro del mandril puede causar daños a la herramienta.

COLOCACION DE LA BROCA

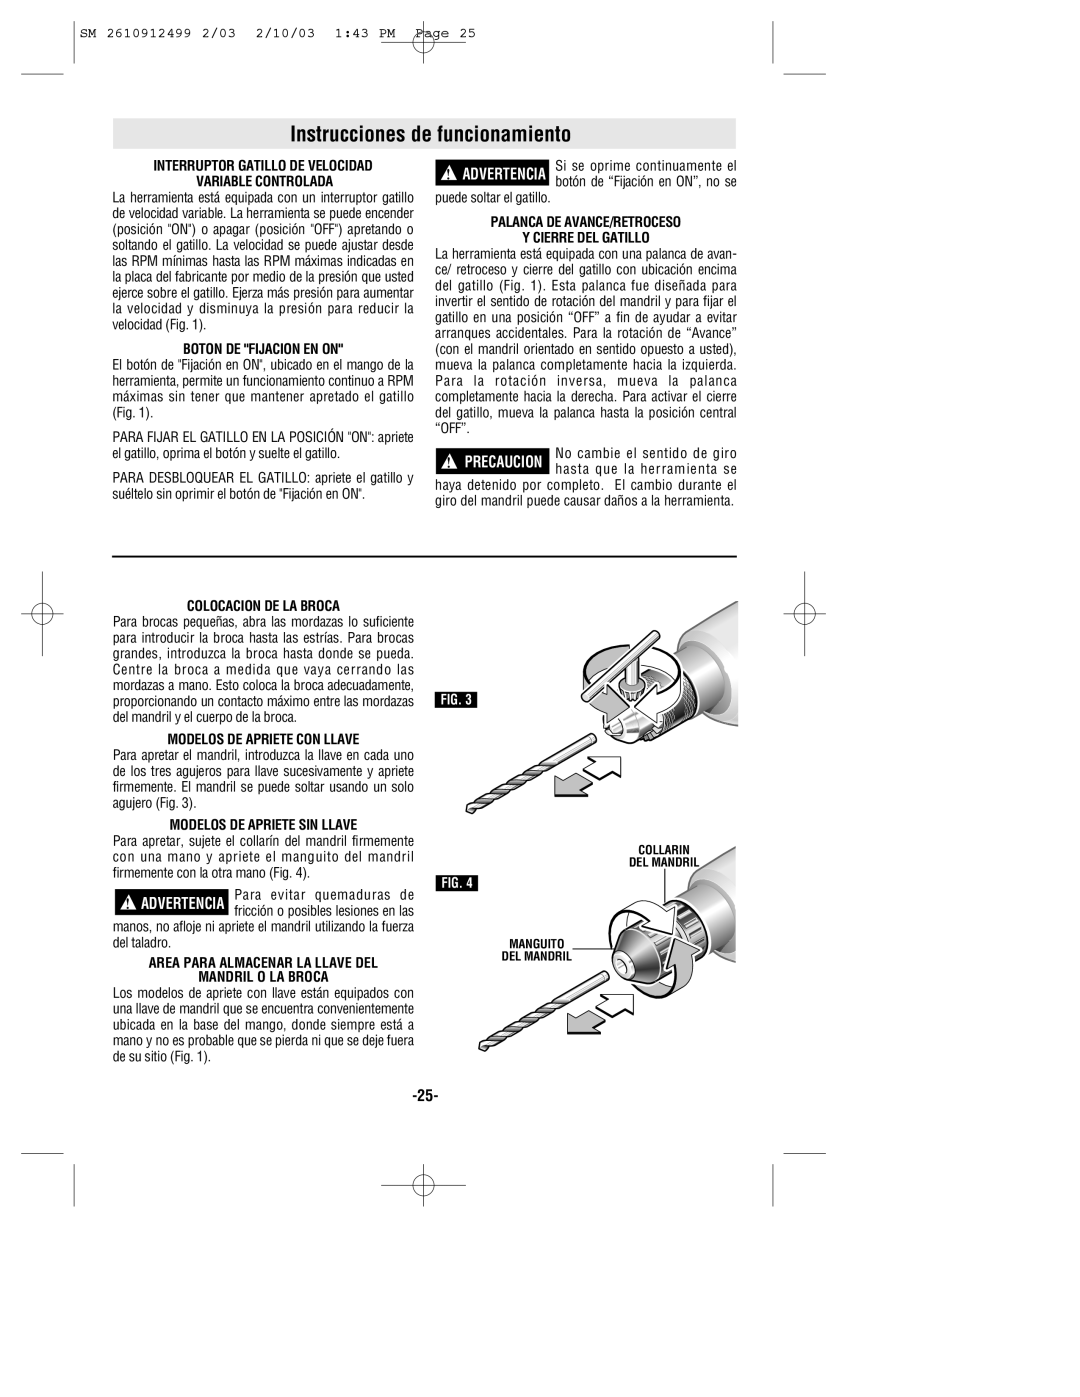
Para brocas pequeñas, abra las mordazas lo suficiente para introducir la broca hasta las estrías. Para brocas grandes, introduzca la broca hasta donde se pueda. Centre la broca a medida que vaya cerrando las mordazas a mano. Esto coloca la broca adecuadamente, proporcionando un contacto máximo entre las mordazas del mandril y el cuerpo de la broca.

MODELOS DE APRIETE CON LLAVE

Para apretar el mandril, introduzca la llave en cada uno de los tres agujeros para llave sucesivamente y apriete firmemente. El mandril se puede soltar usando un solo agujero (Fig. 3).

MODELOS DE APRIETE SIN LLAVE

Para apretar, sujete el collarín del mandril firmemente con una mano y apriete el manguito del mandril firmemente con la otra mano (Fig. 4).

Para evitar quemaduras de ! ADVERTENCIA fricción o posibles lesiones en las

manos, no afloje ni apriete el mandril utilizando la fuerza del taladro.

AREA PARA ALMACENAR LA LLAVE DEL

MANDRIL O LA BROCA

Los modelos de apriete con llave están equipados con una llave de mandril que se encuentra convenientemente ubicada en la base del mango, donde siempre está a mano y no es probable que se pierda ni que se deje fuera de su sitio (Fig. 1).

FIG. 3

FIG. 4

MANGUITO

DEL MANDRIL

COLLARIN

DEL MANDRIL

-25-

Page 25
Image 25
Skil 6325, 6330, 6230, 6210, 6260 manual Instrucciones de funcionamiento

6260, 6210, 6230, 6330, 6325 specifications

The Skil range of power tools, including models 6325, 6330, 6230, 6210, and 6260, is well-regarded for its innovative designs, durability, and versatility, making them popular choices for both DIY enthusiasts and professionals. Each model is engineered with specific features and technologies that cater to various applications, ensuring high-performance results.

The Skil 6325 is a robust rotary hammer drill known for its power and efficiency. It boasts a 7.0-amp motor, providing enough force for heavy-duty drilling tasks. Its two-mode operation allows users to switch between rotary and hammer modes, making it suitable for drilling into concrete, masonry, and wood. The advanced vibration control technology reduces hand fatigue, ensuring comfort during prolonged use.

The Skil 6330 is a compact and lightweight drill, ideal for tight spaces and overhead tasks. Featuring a 4.0-amp motor, it delivers ample power for various drilling and driving applications. The integrated LED light enhances visibility in dark environments, while the 3/8-inch keyless chuck allows for quick and easy bit changes. The ergonomic design focuses on user comfort, making it a favored choice among homeowners.

The Skil 6230 model excels in versatility as a multi-function sander. Equipped with a powerful motor and a dust collection system, it ensures a clean workspace while sanding various surfaces, including wood and metal. The unique hook-and-loop paper system allows for fast sandpaper changes, enhancing productivity for users.

For those seeking a powerful circular saw, the Skil 6210 offers impressive cutting capabilities. Its potent 15-amp motor delivers high RPMs, enabling smooth and quick cuts through tough materials. The laser guide feature ensures precision, while the built-in spindle lock facilitates easy blade changes. The lightweight design enhances maneuverability, making it suitable for both professionals and DIY users.

Lastly, the Skil 6260 is a dependable jigsaw that stands out for its versatility and precision cuts. Featuring a variable speed control, users can adjust the cutting speed for different materials, from wood to plastic and metal. The orbital action technology allows for faster cuts while minimizing splintering. Its ergonomic design and soft-grip handle enhance comfort, making it a reliable choice for intricate projects.

In summary, the Skil 6325, 6330, 6230, 6210, and 6260 models are standout power tools that deliver excellent performance and user-friendly features. Each tool is designed to meet specific needs, ensuring that both amateurs and professionals can achieve remarkable results in their projects.