Installation Instructions
Hitch & Tube Group
Mfg. No./Part No. 1694546
For Landlord / 2700 / 1700 / LT Series Lawn Tractors For Broadmoor / 2600 / 1600 / LT Series Lawn Tractors
|
| 1 | 4 |
|
|
| 10 |
|
| |
|
|
|
|
|
|
| 8 | |||
16 |
|
| 2 |
|
|
|
|
|
| |
|
| 6 | 3 |
|
|
|
|
|
| |
7 |
|
|
|
|
|
|
|
|
| |
15 |
|
| 5 |
| 12 |
|
|
|
| |
|
|
|
|
|
|
|
|
| ||
|
|
| 14 | 13 |
|
|
| 9 |
| |
|
|
|
|
|
|
|
| |||
|
|
|
|
|
|
|
|
| ||
|
|
|
|
|
|
|
| 11 |
| |
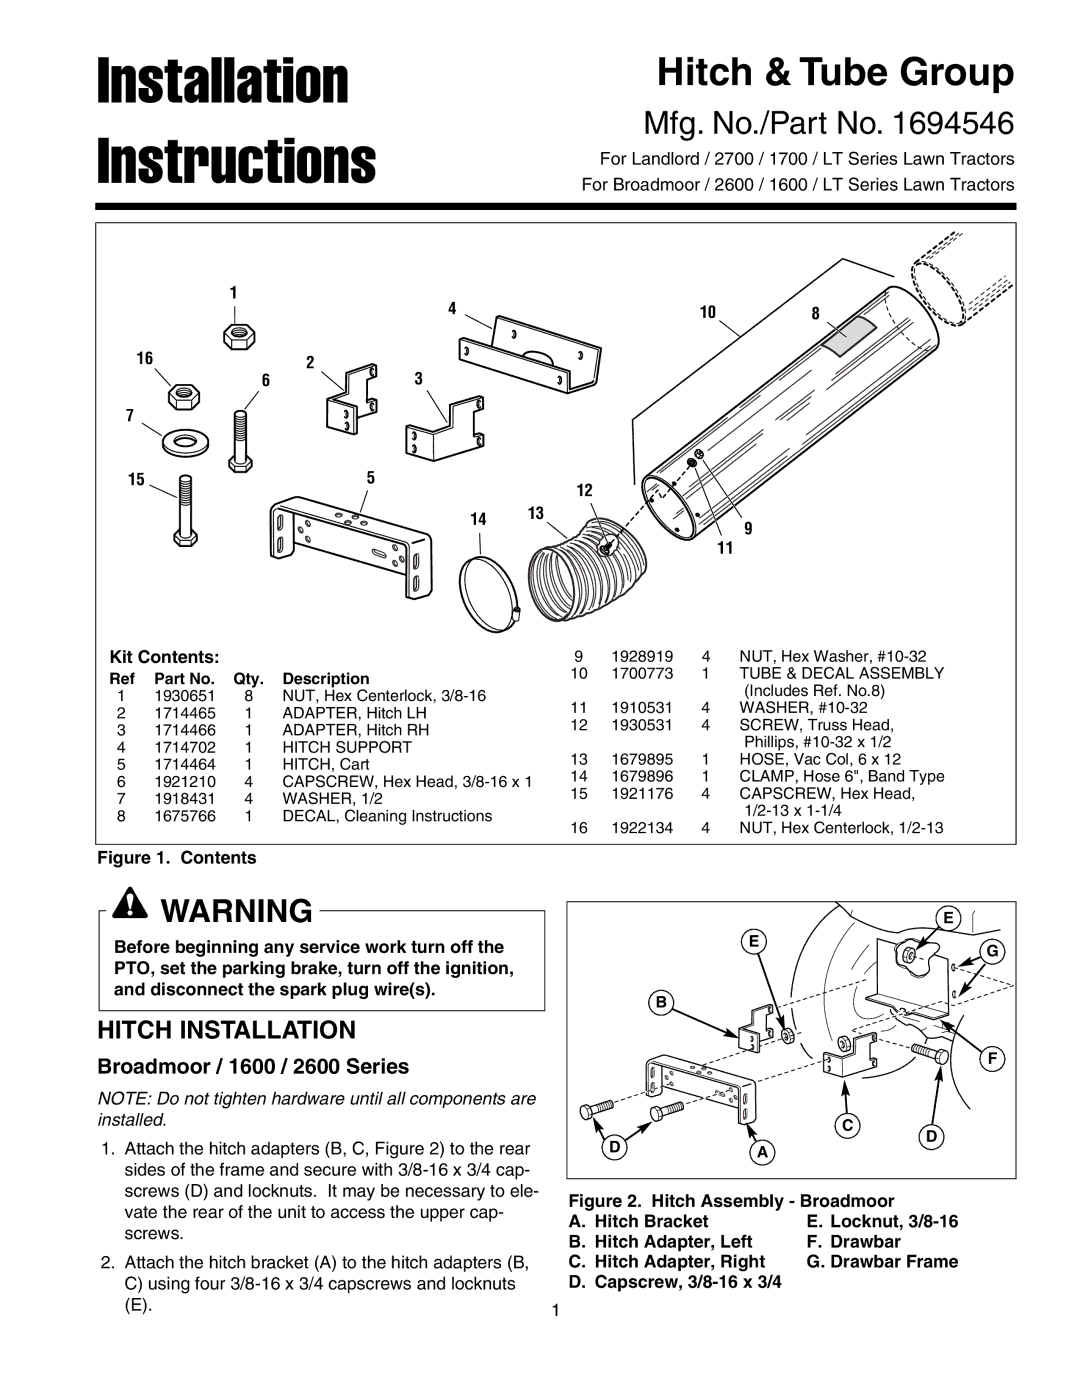
Kit Contents: |
|
|
| 9 | 1928919 | 4 | NUT, Hex Washer, | |||
Ref | Part No. | Qty. | Description |
| 10 | 1700773 | 1 | TUBE & DECAL ASSEMBLY | ||
|
|
|
| (Includes Ref. No.8) | ||||||
1 | 1930651 | 8 | NUT, Hex Centerlock, |
|
|
|
| |||
| 11 | 1910531 | 4 | WASHER, | ||||||
2 | 1714465 | 1 | ADAPTER, Hitch LH |
| ||||||
| 12 | 1930531 | 4 | SCREW, Truss Head, | ||||||
3 | 1714466 | 1 | ADAPTER, Hitch RH |
| ||||||
|
|
|
| Phillips, | ||||||
4 | 1714702 | 1 | HITCH SUPPORT |
|
|
|
| |||
| 13 | 1679895 | 1 | HOSE, Vac Col, 6 x 12 | ||||||
5 | 1714464 | 1 | HITCH, Cart |
| ||||||
| 14 | 1679896 | 1 | CLAMP, Hose 6", Band Type | ||||||
6 | 1921210 | 4 | CAPSCREW, Hex Head, | |||||||
15 | 1921176 | 4 | CAPSCREW, Hex Head, | |||||||
7 | 1918431 | 4 | WASHER, 1/2 |
| ||||||
|
|
|
| |||||||
8 | 1675766 | 1 | DECAL, Cleaning Instructions |
|
|
|
| |||
| 16 | 1922134 | 4 | NUT, Hex Centerlock, | ||||||
|
|
|
|
| ||||||
Figure 1. Contents |
|
|
|
|
|
|
| |||
| WARNING |
|
|
|
|
| E | |||
Before beginning any service work turn off the |
|
|
|
| E | G | ||||
|
|
|
|
| ||||||
PTO, set the parking brake, turn off the ignition, |
|
|
|
|
|
| ||||
and disconnect the spark plug wire(s). |
|
| B |
|
|
| ||||
|
|
|
|
|
|
|
|
| ||
HITCH INSTALLATION |
|
|
|
|
|
| ||||
Broadmoor / 1600 / 2600 Series |
|
|
|
|
| F | ||||
|
|
|
|
|
| |||||
NOTE: Do not tighten hardware until all components are |
|
|
|
|
| |||||
installed. |
|
|
|
|
|
|
| C | ||
1. Attach the hitch adapters (B, C, Figure 2) to the rear |
| D |
| A | D | |||||
|
|
| ||||||||
sides of the frame and secure with |
|
|
|
|
| |||||
screws (D) and locknuts. It may be necessary to ele- | Figure 2. Hitch Assembly - Broadmoor | |||||||||
vate the rear of the unit to access the upper cap- |
| |||||||||
| A. Hitch Bracket |
| E. Locknut, | |||||||
screws. |
|
|
|
| ||||||
|
|
| B. Hitch Adapter, Left | F. Drawbar | ||||||
|
|
|
|
| ||||||
2. Attach the hitch bracket (A) to the hitch adapters (B, | C. Hitch Adapter, Right | G. Drawbar Frame | ||||||||
C) using four |
| D. Capscrew, |
| |||||||
(E). |
|
|
|
| 1 |
|
|
|
| |
|
|
|
|
|
|
|
|
| ||