2 Open the battery charger lid on the transmitter.
3 Insert the supplied rechargeable battery
NC-AA (HJ), making sure to match battery polarity with the Ô and Õ marks on the charger case.
The CHARGE indicator then lights up and charging starts.
4 Close the battery charger lid on the transmitter.
Charging time and battery life
2 Insert the supplied rechargeable battery NC-AA (HJ) by matching the Ô and Õ on the battery to the Ô and Õ in the battery compartment.
Make sure that the battery is charged.
3 Close the battery compartment lid.
Using a dry cell battery
Insert the dry cell battery into the headphone battery compartment the same as when inserting the rechargeable battery.
Battery life
Battery | Approx. hours |
| |
Sony alkaline battery | 100 |
LR6/AM3 (N) | |
| |
Sony battery | 50 |
R6P/SUM-3 (NS) | |
| |
When to replace the battery
Replace the battery with a new one when the POWER indicator on the headphones dims, and a
system in a location subject to direct sunlight, |
heat or moisture. |
Notes on headphones
Preventing hearing damage
Avoid using headphones at high volume. Hearing experts advise against continuous, loud and extended play. If you experience a ringing in your ears, reduce the volume or discontinue use.
Caring for others
Keep the volume at a moderate level. This will allow you to hear outside sounds and to be considerate to the people around you.
If you have any questions or problems concerning the system that are not covered in this manual, please consult the nearest Sony dealer.
Be sure to bring the headphones and the transmitter to the Sony dealer when requiring repair work.
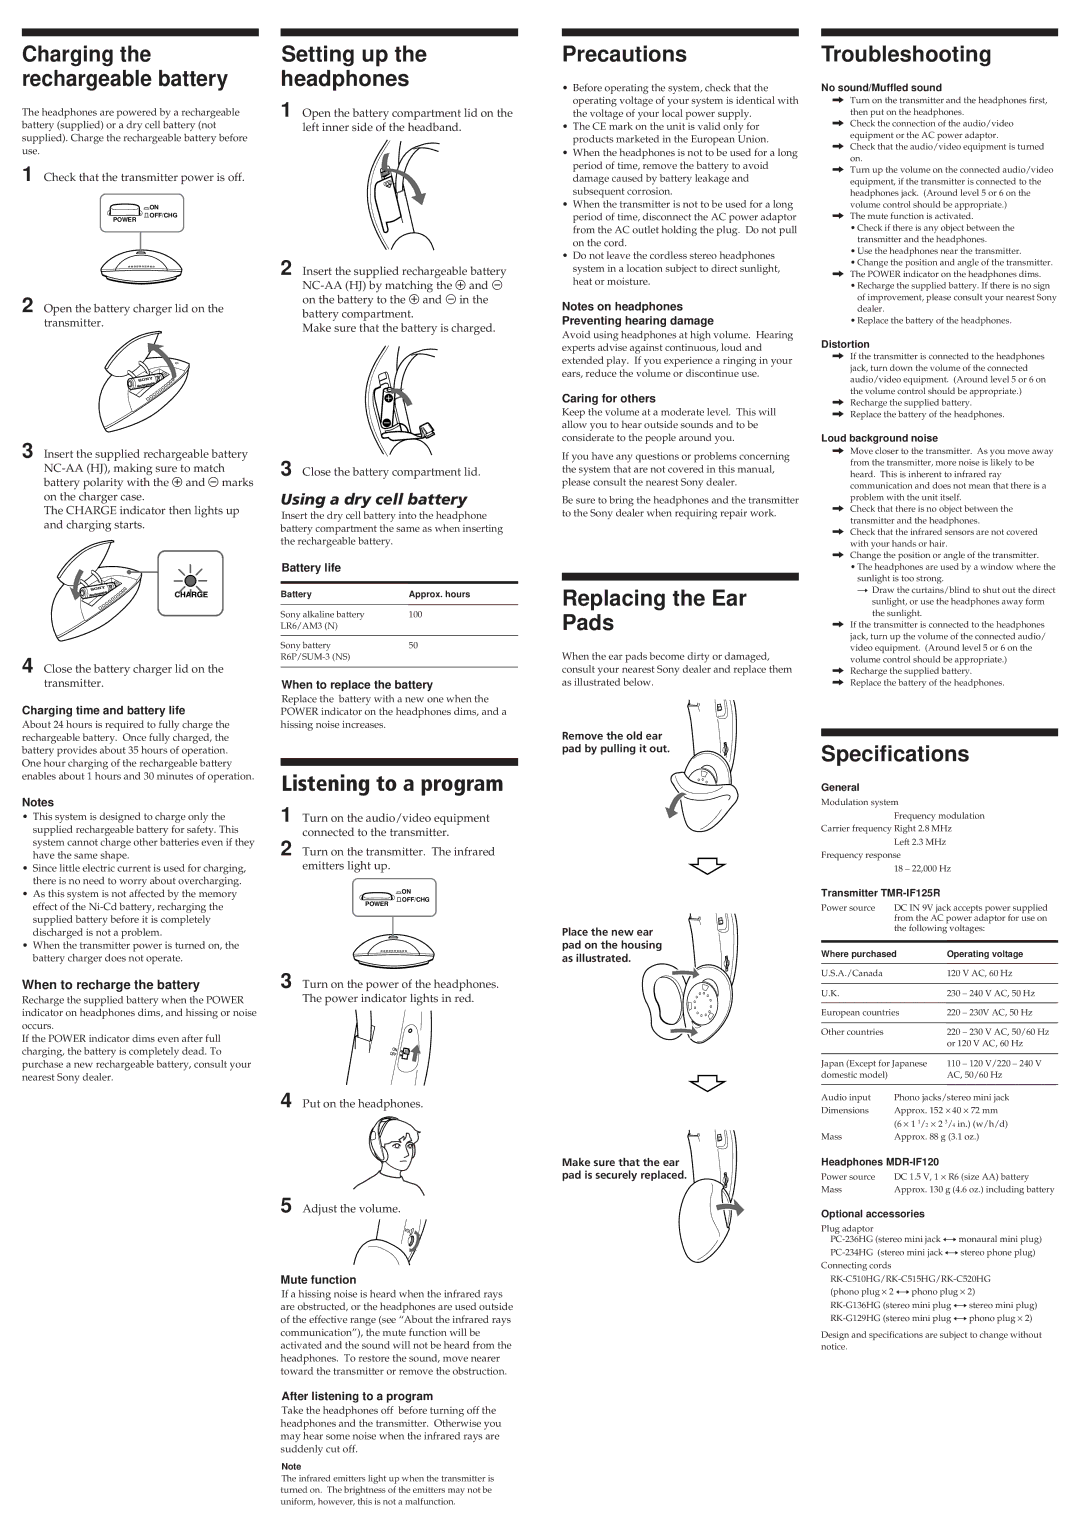
Replacing the Ear Pads
When the ear pads become dirty or damaged, consult your nearest Sony dealer and replace them as illustrated below.
• Change the position and angle of the transmitter. |
/ The POWER indicator on the headphones dims. |
• Recharge the supplied battery. If there is no sign |
of improvement, please consult your nearest Sony |
dealer. |
• Replace the battery of the headphones. |
Distortion
/If the transmitter is connectedÊ toÊ theÊ headphones jack, turn down the volume of the connected audio/video equipment. (Around level 5 or 6 on the volume control should be appropriate.)
/Recharge the supplied battery.
/Replace the battery of the headphones.
Loud background noise
/Move closer to the transmitter. As you move away from the transmitter, more noise is likely to be heard. This is inherent to infrared ray communication and does not mean that there is a problem with the unit itself.
/Check that there is no object between the transmitter and the headphones.
/Check that the infrared sensors are not covered with your hands or hair.
/Change the position or angle of the transmitter.
•The headphones are used by a window where the
sunlight is too strong.
n Draw the curtains/blind to shut out the direct sunlight, or use the headphones away form the sunlight.
/If the transmitter is connected to the headphones jack, turn up the volume of the connected audio/ video equipment. (Around level 5 or 6 on the volume control should be appropriate.)
/Recharge the supplied battery.
/Replace the battery of the headphones.
About 24 hours is required to fully charge the rechargeable battery. Once fully charged, the battery provides about 35 hours of operation. One hour charging of the rechargeable battery enables about 1 hours and 30 minutes of operation.
Notes
• This system is designed to charge only the |
supplied rechargeable battery for safety. This |
system cannot charge other batteries even if they |
have the same shape. |
• Since little electric current is used for charging, |
there is no need to worry about overcharging. |
• As this system is not affected by the memory |
hissing noise increases.
Listening to a program
1 Turn on the audio/video equipment connected to the transmitter.
2 Turn on the transmitter. The infrared emitters light up.
¯ON
Remove the old ear pad by pulling it out.
Specifications
General
Modulation system
Frequency modulation
Carrier frequency Right 2.8 MHz
Left 2.3 MHz
Frequency response
18 – 22,000 Hz
Transmitter TMR-IF125R
When to recharge the battery
Recharge the supplied battery when the POWER indicator on headphones dims, and hissing or noise occurs.
If the POWER indicator dims even after full charging, the battery is completely dead. To purchase a new rechargeable battery, consult your nearest Sony dealer.
3 Turn on the power of the headphones. The power indicator lights in red.
4 Put on the headphones.
5 Adjust the volume.
Mute function
If a hissing noise is heard when the infrared rays are obstructed, or the headphones are used outside of the effective range (see “About the infrared rays communication”), the mute function will be activated and the sound will not be heard from the headphones. To restore the sound, move nearer toward the transmitter or remove the obstruction.
After listening to a program
Take the headphones off before turning off the headphones and the transmitter. Otherwise you may hear some noise when the infrared rays are suddenly cut off.
Note
The infrared emitters light up when the transmitter is turned on. The brightness of the emitters may not be uniform, however, this is not a malfunction.
Make sure that the ear pad is securely replaced.
U.S.A./Canada | | 120 V AC, 60 Hz |
| | | |
U.K. | | 230 | – 240 V AC, 50 Hz |
| | |
European countries | 220 | – 230V AC, 50 Hz |
| | | |
Other countries | | 220 | – 230 V AC, 50/60 Hz |
| | or 120 V AC, 60 Hz |
| | |
Japan (Except for Japanese | 110 | – 120 V/220 – 240 V |
domestic model) | | AC, 50/60 Hz |
| |
Audio input | Phono jacks/stereo mini jack |
Dimensions | Approx. 152 × 40 × 72 mm |
| (6 × 1 1/2 × 2 3/4 in.) (w/h/d) |
Mass | Approx. 88 g (3.1 oz.) |
Headphones MDR-IF120
Power source | DC 1.5 V, 1 × R6 (size AA) battery |
Mass | Approx. 130 g (4.6 oz.) including battery |
Optional accessories
Plug adaptor
PC-236HG (stereo mini jack ÷monaural mini plug) PC-234HG (stereo mini jack ÷stereo phone plug)
Connecting cords RK-C510HG/RK-C515HG/RK-C520HG (phono plug × 2 ÷phono plug × 2)
RK-G136HG (stereo mini plug ÷stereo mini plug) RK-G129HG (stereo mini plug ÷phono plug × 2)
Design and specifications are subject to change without notice.