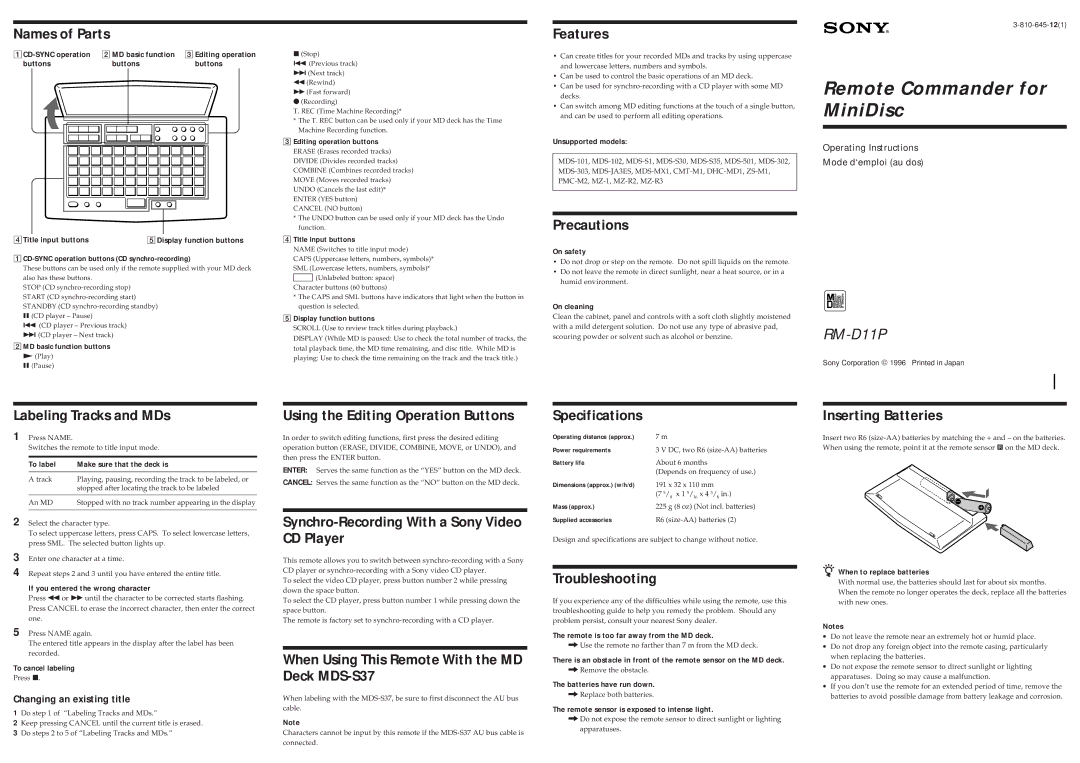
Names of Parts
2 MD basic function | 3 Editing operation | |||||||||||||||||
buttons |
| buttons | buttons | |||||||||||||||
|
|
|
|
|
|
|
|
|
|
|
|
|
|
|
|
|
|
|
|
|
|
|
|
|
|
|
|
|
|
|
|
|
|
|
|
|
|
|
|
|
|
|
|
|
|
|
|
|
|
|
|
|
|
|
|
|
|
|
|
|
|
|
|
|
|
|
|
|
|
|
|
|
|
|
|
|
|
|
|
|
|
|
|
|
|
|
|
|
|
|
|
|
|
|
|
|
|
|
|
|
|
|
|
|
|
|
|
|
|
|
|
|
|
|
|
|
|
|
|
|
|
|
|
|
|
|
|
|
|
|
|
|
|
|
|
|
|
|
|
|
|
|
|
|
|
|
|
|
|
|
|
4Title input buttons | 5Display function buttons |
1CD-SYNC operation buttons (CD synchro-recording)
These buttons can be used only if the remote supplied with your MD deck also has these buttons.
STOP (CD
= (CD player – Previous track)
+(CD player – Next track)
2MD basic function buttons
( (Play) P (Pause)
p(Stop)
=(Previous track) +(Next track)
0(Rewind)
)(Fast forward) r(Recording)
T. REC (Time Machine Recording)*
* The T. REC button can be used only if your MD deck has the Time Machine Recording function.
3Editing operation buttons
ERASE (Erases recorded tracks) DIVIDE (Divides recorded tracks) COMBINE (Combines recorded tracks) MOVE (Moves recorded tracks) UNDO (Cancels the last edit)* ENTER (YES button)
CANCEL (NO button)
*The UNDO button can be used only if your MD deck has the Undo function.
4Title input buttons
NAME (Switches to title input mode)
CAPS (Uppercase letters, numbers, symbols)* SML (Lowercase letters, numbers, symbols)*
(Unlabeled button: space)
Character buttons (60 buttons)
*The CAPS and SML buttons have indicators that light when the button in question is selected.
5Display function buttons
SCROLL (Use to review track titles during playback.)
DISPLAY (While MD is paused: Use to check the total number of tracks, the total playback time, the MD time remaining, and disc title. While MD is playing: Use to check the time remaining on the track and the track title.)
Features
•Can create titles for your recorded MDs and tracks by using uppercase and lowercase letters, numbers and symbols.
•Can be used to control the basic operations of an MD deck.
•Can be used for
•Can switch among MD editing functions at the touch of a single button, and can be used to perform all editing operations.
Unsupported models:
Precautions
On safety
•Do not drop or step on the remote. Do not spill liquids on the remote.
•Do not leave the remote in direct sunlight, near a heat source, or in a humid environment.
On cleaning
Clean the cabinet, panel and controls with a soft cloth slightly moistened with a mild detergent solution. Do not use any type of abrasive pad, scouring powder or solvent such as alcohol or benzine.
Remote Commander for MiniDisc
Operating Instructions
Mode d‘emploi (au dos)
Sony Corporation © 1996 Printed in Japan
Labeling Tracks and MDs
1 Press NAME.
Switches the remote to title input mode.
To label | Make sure that the deck is |
|
|
A track | Playing, pausing, recording the track to be labeled, or |
| stopped after locating the track to be labeled |
|
|
An MD | Stopped with no track number appearing in the display |
|
|
2 Select the character type.
To select uppercase letters, press CAPS. To select lowercase letters, press SML. The selected button lights up.
3 Enter one character at a time.
4 Repeat steps 2 and 3 until you have entered the entire title.
If you entered the wrong character
Press 0or ) until the character to be corrected starts flashing. Press CANCEL to erase the incorrect character, then enter the correct one.
5 Press NAME again.
The entered title appears in the display after the label has been recorded.
To cancel labeling
Press p.
Changing an existing title
1Do step 1 of “Labeling Tracks and MDs.”
2Keep pressing CANCEL until the current title is erased.
3Do steps 2 to 5 of “Labeling Tracks and MDs.”
Using the Editing Operation Buttons
In order to switch editing functions, first press the desired editing operation button (ERASE, DIVIDE, COMBINE, MOVE, or UNDO), and then press the ENTER button.
ENTER: Serves the same function as the “YES” button on the MD deck.
CANCEL: Serves the same function as the “NO” button on the MD deck.
Synchro-Recording With a Sony Video CD Player
This remote allows you to switch between
To select the video CD player, press button number 2 while pressing down the space button.
To select the CD player, press button number 1 while pressing down the space button.
The remote is factory set to
When Using This Remote With the MD Deck MDS-S37
When labeling with the
Note
Characters cannot be input by this remote if the
Specifications
Operating distance (approx.) | 7 m |
|
|
|
Power requirements | 3 V DC, two R6 | |||
Battery life | About 6 months |
| ||
| (Depends on frequency of use.) | |||
Dimensions (approx.) (w/h/d) | 191 x 32 x 110 mm | |||
| (7 5/ | 8 | x 1 5/ x 4 | 3/ in.) |
|
| 16 | 8 | |
Mass (approx.) | 225 g (8 oz) (Not incl. batteries) | |||
Supplied accessories | R6 | |||
Design and specifications are subject to change without notice.
Troubleshooting
If you experience any of the difficulties while using the remote, use this troubleshooting guide to help you remedy the problem. Should any problem persist, consult your nearest Sony dealer.
The remote is too far away from the MD deck.
/Use the remote no farther than 7 m from the MD deck.
There is an obstacle in front of the remote sensor on the MD deck.
/Remove the obstacle.
The batteries have run down.
/Replace both batteries.
The remote sensor is exposed to intense light.
/Do not expose the remote sensor to direct sunlight or lighting apparatuses.
Inserting Batteries
Insert two R6
![]() }
}
]
zWhen to replace batteries
With normal use, the batteries should last for about six months. When the remote no longer operates the deck, replace all the batteries with new ones.
Notes
∙Do not leave the remote near an extremely hot or humid place.
∙Do not drop any foreign object into the remote casing, particularly when replacing the batteries.
∙Do not expose the remote sensor to direct sunlight or lighting apparatuses. Doing so may cause a malfunction.
∙If you don’t use the remote for an extended period of time, remove the batteries to avoid possible damage from battery leakage and corrosion.