
VGX-XL2A specifications
The Sony VGX-XL2A is a high-capacity media server that was designed to meet the growing demand for digital storage and multimedia playback in the home entertainment landscape. Launched in the mid-2000s, the VGX-XL2A stands out as a pioneering device that allows users to store and manage a vast array of digital content in a convenient and efficient manner.One of the most notable features of the VGX-XL2A is its extensive storage capacity. The device is equipped with a robust hard drive that offers several hundred gigabytes of space, providing sufficient room for an impressive collection of movies, music, photos, and other forms of digital media. This feature caters to users who have a large library of files, allowing them to store and access their media in a centralized location.
The VGX-XL2A supports a range of multimedia formats, making it incredibly versatile. Users can enjoy playback of DVDs, CDs, and various audio formats, as well as video playback in different resolutions. The device is equipped with advanced codecs that ensure smooth playback and high-quality audio, catering to audiophiles and home theater enthusiasts alike.
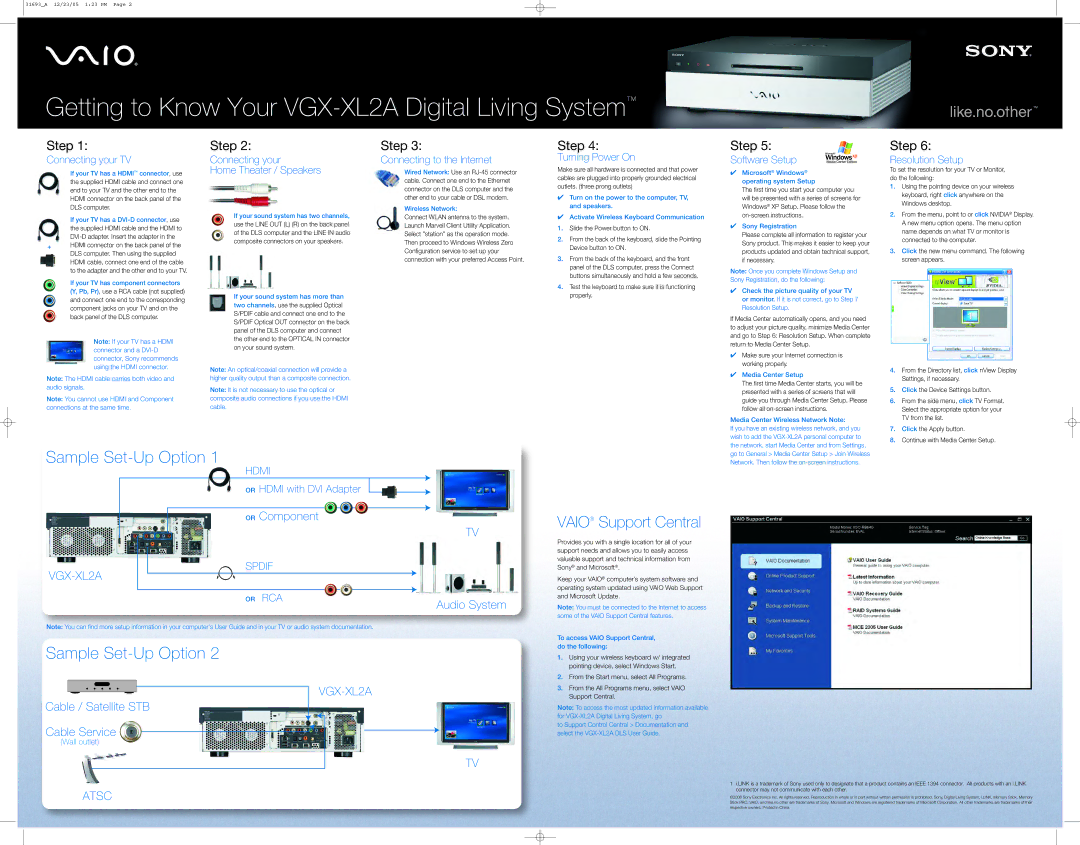
In terms of connectivity, the VGX-XL2A offers multiple options to ensure easy integration into existing home entertainment setups. The device includes both HDMI and component outputs for video, alongside optical and RCA connections for audio. These options allow users to easily connect the VGX-XL2A to televisions, projectors, and audio receivers, ensuring optimal image and sound quality.
Another impressive aspect of the VGX-XL2A is its user-friendly interface, which simplifies the navigation of stored media. Users can quickly browse through their libraries and create playlists, making it easy to enjoy their favorite content at any time. Additionally, the inclusion of remote control functionality enhances the overall user experience, allowing for seamless operation from across the room.
The VGX-XL2A also features network capabilities, enabling users to connect to their local area network and access media files stored on other devices. This functionality expands the reach of the media server, allowing for easier sharing and streaming of content across multiple devices throughout the home.
In summary, the Sony VGX-XL2A represents an innovative solution for digital media management, offering substantial storage capacity, versatile playback options, and user-friendly features that cater to a wide range of multimedia needs. Its connectivity options and network capabilities also ensure that it can easily fit into any modern home entertainment system, making it a notable choice for early adopters of digital media technology.