SY-7VCMQuick Start Guide

Install the Motherboard

To perform the installation of your new SY-7VCMMotherboard, follow the steps below:


Step 1.

CPU Installation


Mark your CPU Frequency: Record the working frequency of your CPU that


should be clearly marked on the CPU cover.


FSB 66MHz


400MHz(66x6.0)


466MHz(66x7.0)


533MHz(66x8.0)


600MHz(66x9.0)


667MHz(66x10.0)


433MHz(66x6.5)


500MHz(66x7.5)


566MHz(66x8.5)


633MHz(66x9.5)


700MHz(66x10.5)


FSB 100MHz


500MHz(100x5.0)


600MHz(100x6.0)


700MHz(100x7.0)


800MHz(100x8.0)


550MHz(100x5.5)


650MHz(100x6.5)


750MHz(100x7.5)


850MHz(100x8.5)


FSB 133MHz


533MHz(133x4.0)


667MHz(133x5.0)


800MHz(133x6.0)


933MHz(133x7.0)


600MHz(133x4.5)


733MHz(133x5.5)


866MHz(133x6.5)


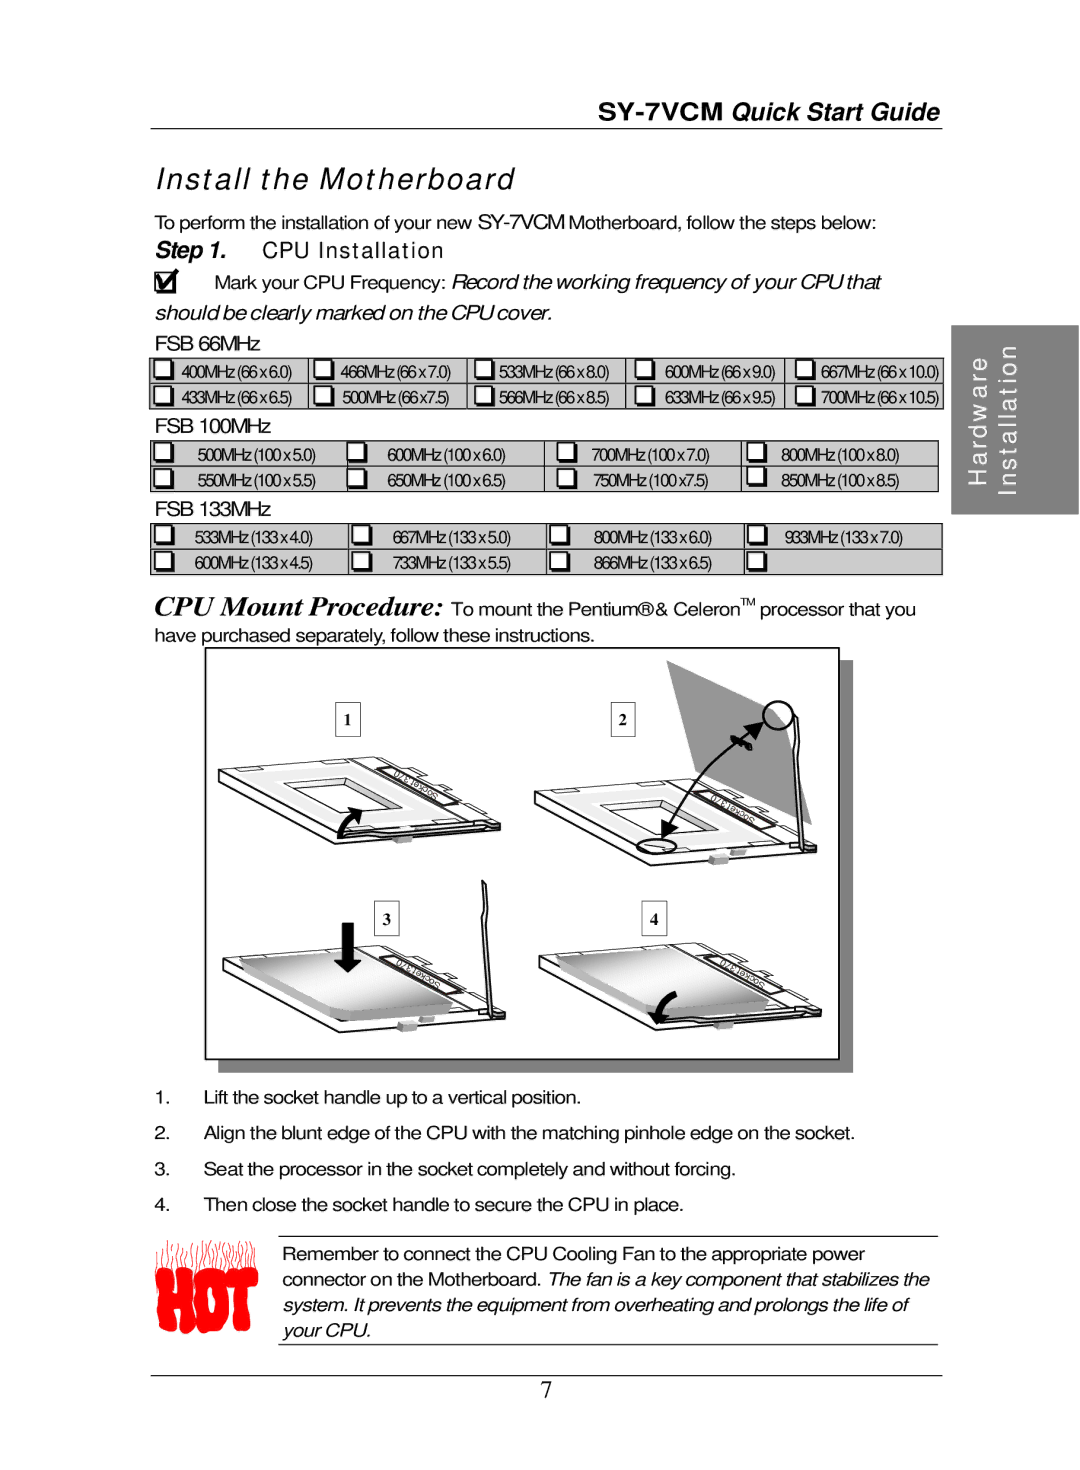
CPU Mount Procedure: To mount the Pentium® & CeleronTM processor that you have purchased separately, follow these instructions.

1


2


0


7


3


t


e


kc


o

0


S


7


3


t


e


kc


o


S


3


4


0


0


7


7


3t


3t


e


e


kc


kc


o


o


S


S

1.Lift the socket handle up to a vertical position.

2.Align the blunt edge of the CPU with the matching pinhole edge on the socket.

3.Seat the processor in the socket completely and without forcing.

4.Then close the socket handle to secure the CPU in place.

Remember to connect the CPU Cooling Fan to the appropriate power connector on the Motherboard. The fan is a key component that stabilizes the system. It prevents the equipment from overheating and prolongs the life of your CPU.

Hardware

Installation


7

Page 7
Image 7
SOYO SY-7VCM quick start CPU Installation, FSB 66MHz, FSB 100MHz, FSB 133MHz

SY-7VCM specifications

The SOYO SY-7VCM is a highly regarded motherboard that targets users looking for a reliable and efficient platform for their computing needs. Launched in the late 1990s, this ATX motherboard was primarily designed for the Socket 370 processor, accommodating various Intel Pentium III and Celeron CPUs. Its architecture offers a perfect blend of performance and feature set, making it a popular choice among enthusiasts and budget builders alike.

One of the standout features of the SY-7VCM is its chipset, the VIA Apollo Pro 133, which provides robust support for a range of processors and is known for delivering solid performance. The motherboard supports a front-side bus speed of up to 133 MHz and can accommodate a maximum of 1.5 GB of SDRAM in its three DIMM slots. This flexibility in memory configuration allows users to tailor their systems to their specific performance requirements, whether for gaming, multimedia, or general productivity tasks.

In terms of connectivity, the SY-7VCM is equipped with an Integrated VIA 686B IDE controller that supports two ATA/66 IDE channels, enabling fast data transfer rates for attached devices. Additionally, the motherboard features integrated AC'97 audio, providing decent onboard sound for casual users without the need for external sound cards. The presence of two USB 1.1 ports expands connectivity options for peripherals, although users seeking more USB options might need a hub or additional cards.

Another remarkable aspect of the SOYO SY-7VCM is its flexibility when it comes to expansion. It features five PCI slots and one AGP slot, allowing users to incorporate various expansion cards, such as graphics cards, network cards, and additional storage controllers. The AGP 4x slot gives users access to enhanced graphics performance, suitable for light gaming and multimedia consumption.

The motherboard also boasts user-friendly features, including jumperless setup and a BIOS interface that allows for easy adjustments and overclocking options. The SY-7VCM’s durability and solid build quality mean that it has stood the test of time, with many users continuing to rely on it for everyday computing tasks.

In conclusion, the SOYO SY-7VCM motherboard combines performance, flexibility, and user-friendliness, making it a well-rounded device for its era. Its support for various processors, ample expansion capabilities, and integrated technologies provide an excellent platform for users who prioritize reliability and efficiency in their computing experience. While it may be considered outdated by contemporary standards, the SY-7VCM remains a testament to the enduring legacy of solid motherboard design.