— — — FOLD — — — | — — — FOLD — — — | — — — FOLD — — — |
| FEATURES OF YOUR STAND MIXER | CARACTÉRISTIQUES DU BATTEUR SUR SOCLE | |||
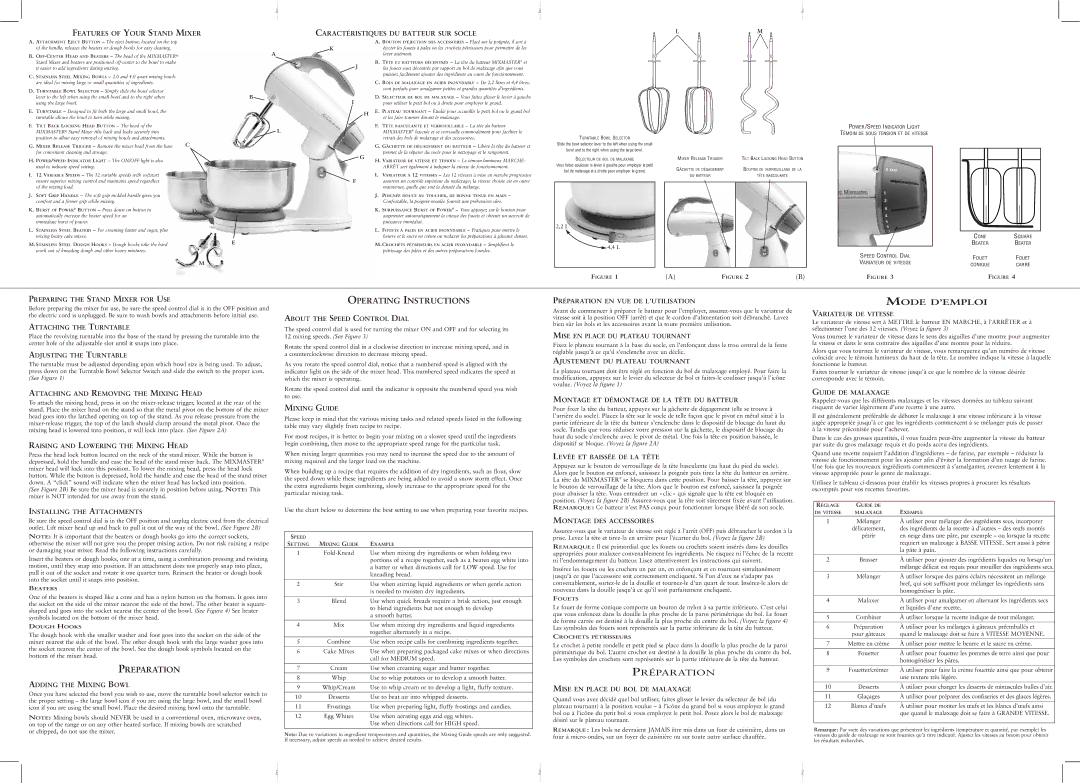
A. ATTACHMENT EJECT BUTTON – The eject button, located on the top |
|
|
| A. BOUTON D’ÉJECTION DES ACCESSOIRES – Placé sur la poignée, il sert à | |
| of the handle, releases the beaters or dough hooks for easy cleaning. |
| K |
| éjecter les fouets à pales ou les crochets pétrisseurs pour permettre de les |
B. |
| A |
| laver aisément. | |
| Stand Mixer and beaters are positioned |
| J |
| B. TÊTE ET BATTEURS DÉCENTRÉS – La tête du batteur MIXMASTER® et |
| it easier to add ingredients during mixing. |
|
| les fouets sont décentrés par rapport au bol de malaxage afin que vous | |
|
|
|
| ||
C. STAINLESS STEEL MIXING BOWLS – 2.0 and 4.0 quart mixing bowls |
|
|
| puissiez facilement ajouter des ingrédients au cours du fonctionnement. | |
|
|
|
| ||
| are ideal for mixing large or small quantities of ingredients. |
|
|
| C. BOLS DE MALAXAGE EN ACIER INOXYDABLE – De 2,2 litres et 4,4 litres, |
D. TURNTABLE BOWL SELECTOR – Simply slide the bowl selector |
|
|
| sont parfaits pour amalgamer petites et grandes quantités d’ingrédients. | |
| B |
|
| ||
| lever to the left when using the small bowl and to the right when |
|
| D. SÉLECTEUR DE BOL DE MALAXAGE – Vous faites glisser le levier à gauche | |
| using the large bowl. |
| I |
| pour utiliser le petit bol ou à droite pour employer le grand. |
E. TURNTABLE – Designed to fit both the large and small bowl, the |
|
| H | E. PLATEAU TOURNANT – Étudié pour accueillir le petit bol ou le grand bol | |
| turntable allows the bowl to turn while mixing. |
|
| et les faire tourner durant le malaxage. | |
|
|
|
| ||
F. TILT BACK LOCKING HEAD BUTTON – The head of the |
| L |
| F. TÊTE BASCULANTE ET VERROUILLABLE – La tête du batteur | |
| MIXMASTER® Stand Mixer tilts back and locks securely into |
|
| MIXMASTER® bascule et se verrouille commodément pour faciliter le | |
| position to allow easy removal of mixing bowls and attachments. |
|
|
| retrait des bols de malaxage et des accessoires. |
G. MIXER RELEASE TRIGGER – Remove the mixer head from the base | C |
|
| G. GÂCHETTE DE DÉGAGEMENT DU BATTEUR – Libère la tête du batteur et | |
| for convenient cleaning and storage. |
|
| G | permet de la séparer du socle pour le nettoyage et le rangement. |
H. POWER/SPEED INDICATOR LIGHT – The ON/OFF light is also |
|
| H. VARIATEUR DE VITESSE ET TÉMOIN – Le témoin lumineux MARCHE- | ||
|
|
| |||
| used to indicate speed setting. |
|
|
| ARRÊT sert également à indiquer la vitesse de fonctionnement. |
I. | 12 VARIABLE SPEEDS – The 12 variable speeds with softstart |
|
|
| I. VARIATEUR À 12 VITESSES – Les 12 vitesses à mise en marche progressive |
| ensure superior mixing control and maintains speed regardless |
| F |
| assurent un contrôle supérieur du malaxage; la vitesse choisie est en outre |
| of the mixing load. |
|
|
| maintenue, quelle que soit la densité du mélange. |
J. | SOFT GRIP HANDLE – The soft grip molded handle gives you |
|
|
| J. POIGNÉE DOUCE AU TOUCHER, DE BONNE TENUE EN MAIN – |
| comfort and a firmer grip while mixing. |
|
|
| Confortable, la poignée moulée fournit une préhension sûre. |
K. BURST OF POWER® BUTTON – Press down on button to | D |
|
| K. SURPUISSANCE BURST OF POWER® – Vous appuyez sur le bouton pour | |
| automatically increase the beater speed for an |
|
|
| augmenter automatiquement la vitesse des fouets et obtenir un surcroît de |
| immediate burst of power. |
|
|
| puissance immédiat. |
L. STAINLESS STEEL BEATERS – For creaming butter and sugar, plus |
|
|
| L. FOUETS À PALES EN ACIER INOXYDABLE – Pratiques pour mettre le | |
| mixing heavy cake mixes. |
|
|
| beurre et le sucre en crème ou malaxer les préparations à gâteaux denses. |
M. STAINLESS STEEL DOUGH HOOKS – Dough hooks take the hard |
| E |
| M. CROCHETS PÉTRISSEURS EN ACIER INOXYDABLE – Simplifient le | |
|
|
| |||
| work out of kneading dough and other heavy mixtures. |
|
|
| pétrissage des pâtes et des autres préparations lourdes. |
M
LM
TURNTABLE BOWL SELECTOR
Slide the bowl selector lever to the left when using the small
bowl and to the right when using the large bowl.
SÉLECTEUR DE BOL DE MALAXAGE | MIXER RELEASE TRIGGER | TILT BACK LOCKING HEAD BUTTON | |
Vous faites coulisser le levier à gauche pour employer le petit | GÂCHETTE DE DÉGAGEMENT | BOUTON DE VERROUILLAGE DE LA | |
bol de malaxage et à droite pour employer le grand. | |||
DU BATTEUR | TÊTE BASCULANTE | ||
|
2,2 L
4,4 L
FIGURE 1 | (A) | FIGURE 2 | (B) |
POWER /SPEED INDICATOR LIGHT
TÉMOIN DE SOUS TENSION ET DE VITESSE
|
|
|
|
|
|
|
|
|
|
|
|
|
|
|
|
|
|
|
|
|
|
|
|
|
|
|
|
|
|
|
|
|
|
|
|
|
|
|
|
|
|
|
|
|
|
|
|
|
|
|
|
|
|
|
|
|
|
|
|
|
|
|
|
|
|
|
|
|
|
|
|
|
|
|
|
|
|
|
| CONE | SQUARE | ||||||
|
|
| BEATER | BEATER | ||||||
SPEED CONTROL DIAL |
|
| FOUET | FOUET | ||||||
VARIATEUR DE VITESSE |
|
| ||||||||
|
| CONIQUE | CARRÉ | |||||||
|
|
| ||||||||
FIGURE 3 |
|
|
|
|
| FIGURE 4 | ||||
PREPARING THE STAND MIXER FOR USE
Before preparing the mixer for use, be sure the speed control dial is in the OFF position and the electric cord is unplugged. Be sure to wash bowls and attachments before initial use.
ATTACHING THE TURNTABLE
Place the revolving turntable into the base of the stand by pressing the turntable into the center hole of the adjustable slot until it snaps into place.
ADJUSTING THE TURNTABLE
The turntable must be adjusted depending upon which bowl size is being used. To adjust, press down on the Turntable Bowl Selector Switch and slide the switch to the proper icon. (See Figure 1)
ATTACHING AND REMOVING THE MIXING HEAD
To attach the mixing head, press in on the
RAISING AND LOWERING THE MIXING HEAD
Press the head lock button located on the neck of the stand mixer. While the button is depressed, hold the handle and ease the head of the stand mixer back. The MIXMASTER® mixer head will lock into this position. To lower the mixing head, press the head lock button. While the button is depressed, hold the handle and ease the head of the stand mixer down. A “click” sound will indicate when the mixer head has locked into position.
(See Figure 2B) Be sure the mixer head is securely in position before using. NOTE: This mixer is NOT intended for use away from the stand.
INSTALLING THE ATTACHMENTS
Be sure the speed control dial is in the OFF position and unplug electric cord from the electrical outlet. Lift mixer head up and back to pull it out of the way of the bowl. (See Figure 2B)
NOTE: It is important that the beaters or dough hooks go into the correct sockets,
otherwise the mixer will not give you the proper mixing action. Do not risk ruining a recipe or damaging your mixer. Read the following instructions carefully.
Insert the beaters or dough hooks, one at a time, using a combination pressing and twisting motion, until they snap into position. If an attachment does not properly snap into place, pull it out of the socket and rotate it one quarter turn. Reinsert the beater or dough hook into the socket until it snaps into position.
BEATERS
One of the beaters is shaped like a cone and has a nylon button on the bottom. It goes into the socket on the side of the mixer nearest the side of the bowl. The other beater is square- shaped and goes into the socket nearest the center of the bowl. (See Figure 4) See beater symbols located on the bottom of the mixer head.
DOUGH HOOKS
The dough hook with the smaller washer and foot goes into the socket on the side of the mixer nearest the side of the bowl. The other dough hook with the large washer goes into the socket nearest the center of the bowl. See the dough hook symbols located on the bottom of the mixer head.
PREPARATION
ADDING THE MIXING BOWL
Once you have selected the bowl you wish to use, move the turntable bowl selector switch to the proper setting – the large bowl icon if you are using the large bowl, and the small bowl icon if you are using the small bowl. Place the desired mixing bowl onto the turntable.
NOTE: Mixing bowls should NEVER be used in a conventional oven, microwave oven, on top of the range or on any other heated surface. If mixing bowls are scratched
or chipped, do not use the mixer.
OPERATING INSTRUCTIONS
ABOUT THE SPEED CONTROL DIAL
The speed control dial is used for turning the mixer ON and OFF and for selecting its 12 mixing speeds. (See Figure 3)
Rotate the speed control dial in a clockwise direction to increase mixing speed, and in a counterclockwise direction to decrease mixing speed.
As you rotate the speed control dial, notice that a numbered speed is aligned with the indicator light on the side of the mixer head. This numbered speed indicates the speed at which the mixer is operating.
Rotate the speed control dial until the indicator is opposite the numbered speed you wish to use.
MIXING GUIDE
Please keep in mind that the various mixing tasks and related speeds listed in the following table may vary slightly from recipe to recipe.
For most recipes, it is better to begin your mixing on a slower speed until the ingredients begin combining, then move to the appropriate speed range for the particular task.
When mixing larger quantities you may need to increase the speed due to the amount of mixing required and the larger load on the machine.
When building up a recipe that requires the addition of dry ingredients, such as flour, slow the speed down while these ingredients are being added to avoid a snow storm effect. Once the extra ingredients begin combining, slowly increase to the appropriate speed for the particular mixing task.
Use the chart below to determine the best setting to use when preparing your favorite recipes.
SPEED |
|
|
SETTING | MIXING GUIDE | EXAMPLE |
1 | Use when mixing dry ingredients or when folding two | |
|
| portions of a recipe together, such as a beaten egg white into |
|
| a batter or when directions call for LOW speed. Use for |
|
| kneading bread. |
|
|
|
2 | Stir | Use when stirring liquid ingredients or when gentle action |
|
| is needed to moisten dry ingredients. |
|
|
|
3 | Blend | Use when quick breads require a brisk action, just enough |
|
| to blend ingredients but not enough to develop |
|
| a smooth batter. |
|
|
|
4 | Mix | Use when mixing dry ingredients and liquid ingredients |
|
| together alternately in a recipe. |
|
|
|
5 | Combine | Use when recipe calls for combining ingredients together. |
|
|
|
6 | Cake Mixes | Use when preparing packaged cake mixes or when directions |
|
| call for MEDIUM speed. |
|
|
|
7 | Cream | Use when creaming sugar and butter together. |
|
|
|
8 | Whip | Use to whip potatoes or to develop a smooth batter. |
|
|
|
9 | Whip/Cream | Use to whip cream or to develop a light, fluffy texture. |
|
|
|
10 | Desserts | Use to beat air into whipped desserts. |
|
|
|
11 | Frostings | Use when preparing light, fluffy frostings and candies. |
|
|
|
12 | Egg Whites | Use when aerating eggs and egg whites. |
|
| Use when directions call for HIGH speed. |
|
|
|
Note: Due to variations in ingredient temperatures and quantities, the Mixing Guide speeds are only suggested. If necessary, adjust speeds as needed to achieve desired results.
PRÉPARATION EN VUE DE L’UTILISATION
Avant de commencer à préparer le batteur pour l’employer,
MISE EN PLACE DU PLATEAU TOURNANT
Fixez le plateau tournant à la base du socle, en l’enfonçant dans le trou central de la fente réglable jusqu’à ce qu’il s’enclenche avec un déclic.
AJUSTEMENT DU PLATEAU TOURNANT
Le plateau tournant doit être réglé en fonction du bol de malaxage employé. Pour faire la modification, appuyez sur le levier du sélecteur de bol et
MONTAGE ET DÉMONTAGE DE LA TÊTE DU BATTEUR
Pour fixer la tête du batteur, appuyez sur la gâchette de dégagement (elle se trouve à l’arrière du socle). Placez la tête sur le socle de telle façon que le pivot en métal situé à la partie inférieure de la tête du batteur s’enclenche dans le dispositif de blocage du haut du socle. Tandis que vous réduisez votre pression sur la gâchette, le dispositif de blocage du haut du socle s’enclenche avec le pivot de métal. Une fois la tête en position baissée, le dispositif se bloque. (Voyez la figure 2A)
LEVÉE ET BAISSÉE DE LA TÊTE
Appuyez sur le bouton de verrouillage de la tête basculante (au haut du pied du socle). Alors que le bouton est enfoncé, saisissez la poignée puis tirez la tête du batteur en arrière. La tête du MIXMASTER® se bloquera dans cette position. Pour baisser la tête, appuyez sur le bouton de verrouillage de la tête. Alors que le bouton est enfoncé, saisissez la poignée pour abaisser la tête. Vous entendrez un «clic» qui signale que la tête est bloquée en position. (Voyez la figure 2B)
MONTAGE DES ACCESSOIRES
REMARQUE : Il est primordial que les fouets ou crochets soient insérés dans les douilles appropriées pour malaxer convenablement les ingrédients. Ne risquez ni l’échec de la recette ni l’endommagement du batteur. Lisez attentivement les instructions qui suivent.
Insérez les fouets ou les crochets un par un, en enfonçant et en tournant simultanément jusqu’à ce que l’accessoire soit correctement encliqueté. Si l’un d’eux ne s’adapte pas convenablement,
FOUETS
Le fouet de forme conique comporte un bouton de nylon à sa partie inférieure. C’est celui que vous enfoncez dans la douille la plus proche de la paroi périmétrique du bol. Le fouet de forme carrée est destiné à la douille la plus proche du centre du bol. (Voyez la figure 4) Les symboles des fouets sont représentés sur la partie inférieure de la tête du batteur.
CROCHETS PÉTRISSEURS
Le crochet à petite rondelle et petit pied se place dans la douille la plus proche de la paroi périmétrique du bol. L’autre crochet est destiné à la douille la plus proche du centre du bol. Les symboles des crochets sont représentés sur la partie inférieure de la tête du batteur.
PRÉPARATION
MISE EN PLACE DU BOL DE MALAXAGE
Quand vous avez décidé quel bol utiliser, faites glisser le levier du sélecteur de bol (du plateau tournant) à la position voulue – à l’icône du grand bol si vous employez le grand bol ou à l’icône du petit bol si vous employez le petit bol. Posez alors le bol de malaxage désiré sur le plateau tournant.
REMARQUE : Les bols ne devraient JAMAIS être mis dans un four de cuisinière, dans un four à
MODE D’EMPLOI
VARIATEUR DE VITESSE
Le variateur de vitesse sert à METTRE le batteur EN MARCHE, à l’ARRÊTER et à sélectionner l’une des 12 vitesses. (Voyez la figure 3)
Vous tournez le variateur de vitesse dans le sens des aiguilles d’une montre pour augmenter la vitesse et dans le sens contraire des aiguilles d’une montre pour la réduire.
Alors que vous tournez le variateur de vitesse, vous remarquerez qu’un numéro de vitesse coïncide avec le témoin lumineux du haut de la tête. Le nombre indique la vitesse à laquelle fonctionne le batteur.
Faites tourner le variateur de vitesse jusqu’à ce que le nombre de la vitesse désirée corresponde avec le témoin.
GUIDE DE MALAXAGE
Il est généralement préférable de débuter le malaxage à une vitesse inférieure à la vitesse jugée appropriée jusqu’à ce que les ingrédients commencent à se mélanger puis de passer à la vitesse préconisée pour l’achever.
Dans le cas des grosses quantités, il vous faudra
Quand une recette requiert l’addition d’ingrédients – de farine, par exemple – réduisez la vitesse de fonctionnement pour les ajouter afin d’éviter la formation d’un nuage de farine. Une fois que les nouveaux ingrédients commencent à s’amalgamer, revenez lentement à la vitesse appropriée pour le genre de malaxage.
Utilisez le tableau
RÉGLAGE | GUIDE DE |
|
DE VITESSE | MALAXAGE | EXEMPLE |
1 | Mélanger | À utiliser pour mélanger des ingrédients secs, incorporer |
| délicatement, | des ingrédients de la recette à d’autres – des œufs montés |
| pétrir | en neige dans une pâte, par exemple – ou lorsque la recette |
|
| requiert un malaxage à BASSE VITESSE. Sert aussi à pétrir |
|
| la pâte à pain. |
|
|
|
2 | Brasser | À utiliser pour ajouter des ingrédients liquides ou lorsqu’un |
|
| mélange délicat est requis pour mouiller des ingrédients secs. |
|
|
|
3 | Mélanger | À utiliser lorsque des pains éclairs nécessitent un mélange |
|
| bref, qui soit suffisant pour mélanger les ingrédients sans |
|
| homogénéiser la pâte. |
|
|
|
4 | Malaxer | À utiliser pour amalgamer en alternant les ingrédients secs |
|
| et liquides d’une recette. |
|
|
|
5 | Combiner | À utiliser lorsque la recette indique de tout mélanger. |
|
|
|
6 | Préparation | À utiliser pour les mélanges à gâteaux préemballés et |
| pour gâteaux | quand le malaxage doit se faire à VITESSE MOYENNE. |
|
|
|
7 | Mettre en crème | À utiliser pour mettre le beurre et le sucre en crème. |
|
|
|
8 | Fouetter | À utiliser pour fouetter les pommes de terre ainsi que pour |
|
| homogénéiser les pâtes. |
|
|
|
9 | Fouetter/crémer | À utiliser pour faire la crème fouettée ainsi que pour obtenir |
|
| une texture très légère. |
|
|
|
10 | Desserts | À utiliser pour charger les desserts de minuscules bulles d’air. |
|
|
|
11 | Glaçages | À utiliser pour préparer des confiseries et des glaces légères. |
|
|
|
12 | Blancs d’œufs | À utiliser pour monter les œufs et les blancs d’œufs ainsi |
|
| que quand le malaxage doit se faire à GRANDE VITESSE. |
|
|
|
Remarque: Par suite des variations que présentent les ingrédients (température et quantité, par exemple) les vitesses du guide de malaxage ne sont fournies qu’à titre indicatif. Ajustez les vitesses au besoin pour obtenir les résultats recherchés.
— — — FOLD — — — | — — — FOLD — — — | — — — FOLD — — — |