| | | | 239864_2630_compact_iron_IB.qxd 10/30/08 8:45 AM Page 2 | (Black plate) |
| | | | | | |
| | | | | | |
| | | | | | |
| | | | | | |
| | | | | | |
IMPORTANT SAFEGUARDS
When using electrical appliances, basic safety precautions should always be followed including the following:
READ ALL INSTRUCTIONS BEFORE USE
•Use iron only for its intended use.
•To protect against risk of electric shock, do not immerse the iron in water or other liquids.
•The Steam Switch should always be turned OFF before plugging or unplugging from outlet. Never yank cord to disconnect from outlet; instead, grasp plug and pull to disconnect.
•Do not allow cord to touch hot surfaces. Let iron cool completely before putting away. Loop cord loosely around iron when storing.
•Always disconnect iron from electrical outlet when filling with water or emptying and when not in use.
•Do not operate iron with a damaged cord or if the iron has been dropped or damaged. To avoid the risk of electric shock, do not disassemble the iron. Take it to an authorized service center for examination and/or repair. Incorrect reassembly can cause a risk of electric shock when the iron is used.
•Close supervision is necessary for any appliance being used by or near children. Do not leave iron unattended while plugged in or turned on or on an ironing board.
•Burns can occur from touching hot metal parts, hot water or steam. Use caution when you turn a steam iron upside down – there may be hot water in the reservoir.
•If the iron is not operating normally, disconnect from the power supply and have the iron serviced by an authorized service center. Or call Customer Service at 1.800.667.8623.
•Your Sunbeam® iron is designed to rest on the heel rest. Do not leave the iron unattended. Do not set the iron on an unprotected surface, even if it is on its heel rest.
SPECIAL INSTRUCTIONS
•To avoid a circuit overload, do not operate another high wattage appliance on the same circuit.
•If an extension cord is absolutely necessary, a 15-ampere cord should be used. Cords rated for less amperage may overheat. Care should be taken to arrange the extension cord so that it cannot be pulled or tripped over.
FOR PRODUCTS PURCHASED IN THE UNITED STATES AND CANADA
To reduce the risk of electrical shock, this appliance has a polarized plug (one blade is wider than the other). This plug fits a polarized outlet only one way; if the plug does not fit fully into the outlet, reverse the plug. If it still does not fit, contact a qualified electrician. Do not attempt to defeat this safety feature.
SAVE THESE INSTRUCTIONS
CONSIGNES IMPORTANTES
L’utilisation de tout appareil électroménager exige l’observation de précautions fondamentales, y compris des suivantes :
LISEZ LES INSTRUCTIONS AVANT L’EMPLOI
•N’utilisez le fer à repasser qu’aux fins auxquelles il est destiné.
•Pour éviter les chocs électriques, n’immergez jamais le fer dans l’eau ou dans un autre liquide.
•Réglez toujours le sélecteur de vapeur à SEC avant de brancher ou de débrancher le fer. Ne débranchez pas le cordon d’un coup sec – tirez posément la fiche hors de la prise de courant.
•Veillez à ce que le cordon ne soit pas en contact avec les surfaces chaudes. Rangez le fer complètement froid, après avoir enroulé le cordon sans le tendre.
•Débranchez toujours le fer avant de remplir ou de vider le réservoir et quand il ne sert pas.
•N’utilisez pas un fer à repasser équipé d’un cordon abîmé, qui a été échappé ou endommagé. Pour éviter tout risque de choc électrique, ne démontez pas le fer. Faites-le vérifier et réparer au besoin par un centre de service agréé. Un remontage incorrect peut être une source de secousses lors de l’utilisation.
•Redoublez de vigilance lorsque le fer est utilisé par des enfants ou près d’eux. Surveillez assidûment le fer s’il est branché, s’il chauffe ou est posé sur une planche à repasser.
•Pièces chaudes en métal, eau chaude et vapeur peuvent causer des brûlures. Mettez le fer à vapeur sens dessus dessous prudemment – il pourrait rester de l’eau chaude dans le réservoir.
•En cas d’anomalie de fonctionnement, débranchez aussitôt le fer et faites-le réparer à un centre de service agréé. Ou appelez le service à la clientèle au 1 800 667.8623.
•Le fer SunbeamMD est conçu pour être posé sur son talon d’appui. Ne laissez pas le fer branché sans surveillance. Ne le posez pas sur une surface non protégée, même s’il est sur son talon.
INSTRUCTIONS SPÉCIALES
•Pour ne pas causer de surcharge, ne branchez pas un autre appareil de haute consommation en watts sur le même circuit.
•S’il est indispensable d’employer un cordon prolongateur, utilisez-en un de 15 ampères. Une rallonge d’une intensité inférieure risquerait de surchauffer. Disposez le prolongateur de façon à ce qu’il ne puisse ni être tiré ni faire trébucher.
PRODUITS ACHETÉS AUX ÉTATS-UNIS ET AU CANADA
Pour réduire les risques de choc électrique, cet appareil est pourvu d’une fiche polarisée (une lame est plus large que l’autre). La fiche n’enfonce dans les prises polarisées que dans un sens; si elle ne rentre pas complètement dans la prise, inversez-la. Si elle n’enfonce toujours pas, demandez à un électricien compétent de la remplacer. N’essayez surtout pas de neutraliser le dispositif de sécurité de la fiche.
GARDEZ CES INSTRUCTIONS
1
7
8
9
10
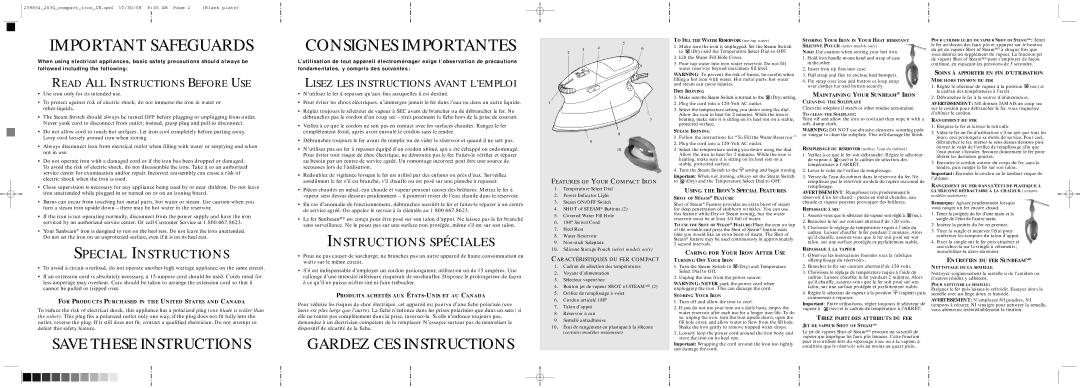
FEATURES OF YOUR COMPACT IRON
1.Temperature Select Dial
2.Power Indicator Light
3.Steam ON/OFF Switch
4.SHOT of STEAM® Buttons (2)
5.Covered Water Fill Hole
6.180º Swivel Cord
7.Heel Rest
8.Water Reservoir
9.Non-stick Soleplate
10.Silicone Storage Pouch (select models only)
CARACTÉRISTIQUES DU FER COMPACT
1.Cadran de sélection des températures
2.Voyant d’alimentation
3.Sélecteur vapeur/sec
4.Bouton jet de vapeur SHOT of STEAMMD (2)
5.Orifice de remplissage à volet
6.Cordon articulé 180º
7.Talon d’appui
8.Réservoir à eau
9.Semelle antiadhésive
10.Étui de rangement en plastique à la silicone (certains modèles seulement)
TO FILL THE WATER RESERVOIR (use tap water)
1.Make sure the iron is unplugged. Set the Steam Switch to 

 (Dry) and the Temperature Select Dial to OFF.
2.Lift the Water Fill Hole Cover.
3.Pour tap water into iron water reservoir. Do not fill water reservoir beyond maximum fill level.
WARNING: To prevent the risk of burns, be careful when filling a hot iron with water. Hot metal parts, hot water and steam can cause injuries.
DRY IRONING
1.Make sure the Steam Switch is turned to the 

 (Dry) setting.
2.Plug the cord into a 120-Volt AC outlet.
3.Select the temperature setting you desire using the dial. Allow the iron to heat for 2 minutes. While the iron is heating, make sure it is sitting on its heel rest on a stable, protected surface.
STEAM IRONING
1.Follow the instructions for “To Fill the Water Reservoir.”
2.Plug the cord into a 120-Volt AC outlet.
3.Select the temperature setting you desire using the dial. Allow the iron to heat for 2 minutes. While the iron is heating, make sure it is sitting on its heel rest on a stable, protected surface.
4.Turn the Steam Switch to the 


 setting and begin ironing.
Important: When not ironing, always set the Steam Switch to 
 (Dry) and the Temperature Select Dial to OFF.
USING THE IRON’S SPECIAL FEATURES
SHOT OF STEAM® FEATURE
Shot of Steam® Feature provides an extra burst of steam for deep penetration of stubborn wrinkles. You can use this feature while Dry or Steam ironing, but the water reservoir must be at least 1/4 full of water.
TO USE THE SHOT OF STEAM® FEATURE: Place the iron on top of the wrinkle and press the Shot of Steam® button each time you would like an extra burst of steam. The Shot of Steam® feature may be used continuously in approximately 3 second intervals.
CARING FOR YOUR IRON AFTER USE
TURNING OFF YOUR IRON
1.Turn the Steam Switch to 

 (Dry) and Temperature Select Dial to Off.
2.Unplug the iron from the power source.
WARNING: NEVER yank the power cord when unplugging the iron. This can damage the cord.
STORING YOUR IRON
1.Turn off and allow the iron to cool.
2.If you do not use your iron on a daily basis, empty the water reservoir after each use for a longer iron life. To do so, unplug the iron, turn the iron upside down, open the fill hole cover, and allow water to flow from the fill hole. Shake the iron gently to remove trapped water drops.
3.Loosely loop the power cord around the iron body and store the iron on its heel rest.
Important: Wrapping the cord around the iron too tightly can damage the cord.
STORING YOUR IRON IN YOUR HEAT RESISTANT SILICONE POUCH (select models only)
Note: Use caution when storing your hot iron.
1.Hold iron handle in one hand and strap of case in the other.
2.Insert iron tip first into case.
3.Pull strap and flex to enclose heel bumpers.
4.Fix strap over iron and button or loop strap over clothes bar and button securely.
MAINTAINING YOUR SUNBEAM® IRON
CLEANING THE SOLEPLATE
Clean the soleplate if starch or other residue accumulate.
TO CLEAN THE SOLEPLATE:
Turn off and allow the iron to cool and then wipe it with a soft, damp cloth.
WARNING: DO NOT use abrasive cleansers, scouring pads or vinegar to clean the soleplate. This will damage the finish.
REMPLISSAGE DU RÉSERVOIR (utilisez l’eau du robinet)
1.Veillez à ce que le fer soit débranché. Réglez le sélecteur
de vapeur à 

 (sec) et le cadran de sélection des températures à l’ARRÊT.
2.Levez le volet de l’orifice de remplissage.
3.Versez de l’eau du robinet dans le réservoir du fer. Ne remplissez pas le réservoir au-delà du repère maximal de remplissage.
AVERTISSEMENT: Remplissez très prudemment le réservoir d’un fer chaud – pièces en métal chaudes, eau chaude et vapeur peuvent provoquer des brûlures.
REPASSAGE À SEC
1.Assurez-vous que le sélecteur de vapeur soit réglé à 

 (sec).
2.Branchez le fer sur courant alternatif de 120 volts.
3.Choisissez le réglage de température requis à l’aide du cadran. Laissez chauffer le fer pendant 2 minutes. Alors qu’il chauffe, assurez-vous que le fer soit posé sur son talon, sur une surface protégée et parfaitement stable.
REPASSAGE À LA VAPEUR
1.Observez les instructions fournies sous la rubrique «Remplissage du réservoir».
2.Branchez le fer sur courant alternatif de 120 volts.
3.Choisissez le réglage de température requis à l’aide du cadran. Laissez chauffer le fer pendant 2 minutes. Alors qu’il chauffe, assurez-vous que le fer soit posé sur son talon, sur une surface protégée et parfaitement stable.
4.Réglez le sélecteur de vapeur à la position 


 (vapeur) puis commencez à repasser.
Important: Entre utilisations, réglez toujours le sélecteur de vapeur à 
 (sec) et le cadran de température à l’ARRÊT.
TIREZ PARTI DES ATTRIBUTS DU FER
JET DE VAPEUR SHOT OF STEAMMD
Le jet de vapeur Shot of SteamMD procure un surcroît de vapeur qui imprègne les faux plis tenaces. Cette fonction peut être utilisée lors du repassage à sec ou à la vapeur, à condition que le réservoir soit au moins au quart plein.
POUR UTILISER LE JET DE VAPEUR SHOT OF STEAMMD : Tenez
le fer au-dessus des faux plis et appuyez sur le bouton du jet de vapeur Shot of SteamMD à chaque fois que vous désirez un supplément de vapeur. La fonction jet de vapeur Shot of SteamMD peut s’employer de façon continue, en espaçant les pressions de 3 secondes.
SOINS À APPORTER EN FIN D’UTILISATION
MISE HORS TENSION DU FER
1.Réglez le sélecteur de vapeur à la position 

 (sec) et le cadran des températures à l’arrêt.
2.Débranchez le fer à la source d’alimentation.
AVERTISSEMENT: NE donnez JAMAIS un coup sec sur le cordon pour débrancher le fer, vous risqueriez d’abîmer le cordon.
RANGEMENT DU FER
1.Éteignez le fer et laissez-le refroidir.
2.Videz le fer en fin d’utilisation s’il ne sert pas tous les jours, ceci prolongera sa durée de service. Pour ceci, débranchez le fer, mettez-le sens dessus dessous puis ouvrez le volet de l’orifice de remplissage afin que l’eau puisse s’écouler. Secouez doucement le fer pour libérer les dernières gouttes.
3.Enroulez le cordon autour du corps du fer, sans le tendre, puis rangez le fer sur son talon.
Important: Enrouler le cordon en le tendant risque de l’abîmer.
RANGEMENT DU FER DANS L’ÉTUI DE PLASTIQUE À LA SILICONE RÉFRACTAIRE À LA CHALEUR (certains
modèles seulement)
Remarque: Agissez prudemment lorsque vous rangez un fer encore chaud.
1.Tenez la poignée du fer d’une main et la sangle de l’étui de l’autre main.
2.Insérez la pointe du fer en premier.
3.Tirez la sangle et incurvez l’étui pour renfermer les tampons du talon d’appui.
4.Fixez la sangle sur le fer puis attachez et accrochez-la sur la tringle à vêtements; immobilisez-la alors sûrement.
ENTRETIEN DU FER SUNBEAMMD
NETTOYAGE DE LA SEMELLE
Nettoyez soigneusement la semelle si de l’amidon ou d’autres résidus y adhèrent.
POUR NETTOYER LA SEMELLE :
Éteignez le fer puis laissez-le refroidir. Essuyez alors la semelle avec un linge doux et humide.
AVERTISSEMENT: N’employez NI poudres, NI tampons à récurer, NI vinaigre pour nettoyer la semelle, vous abîmeriez irrémédiablement la finition.