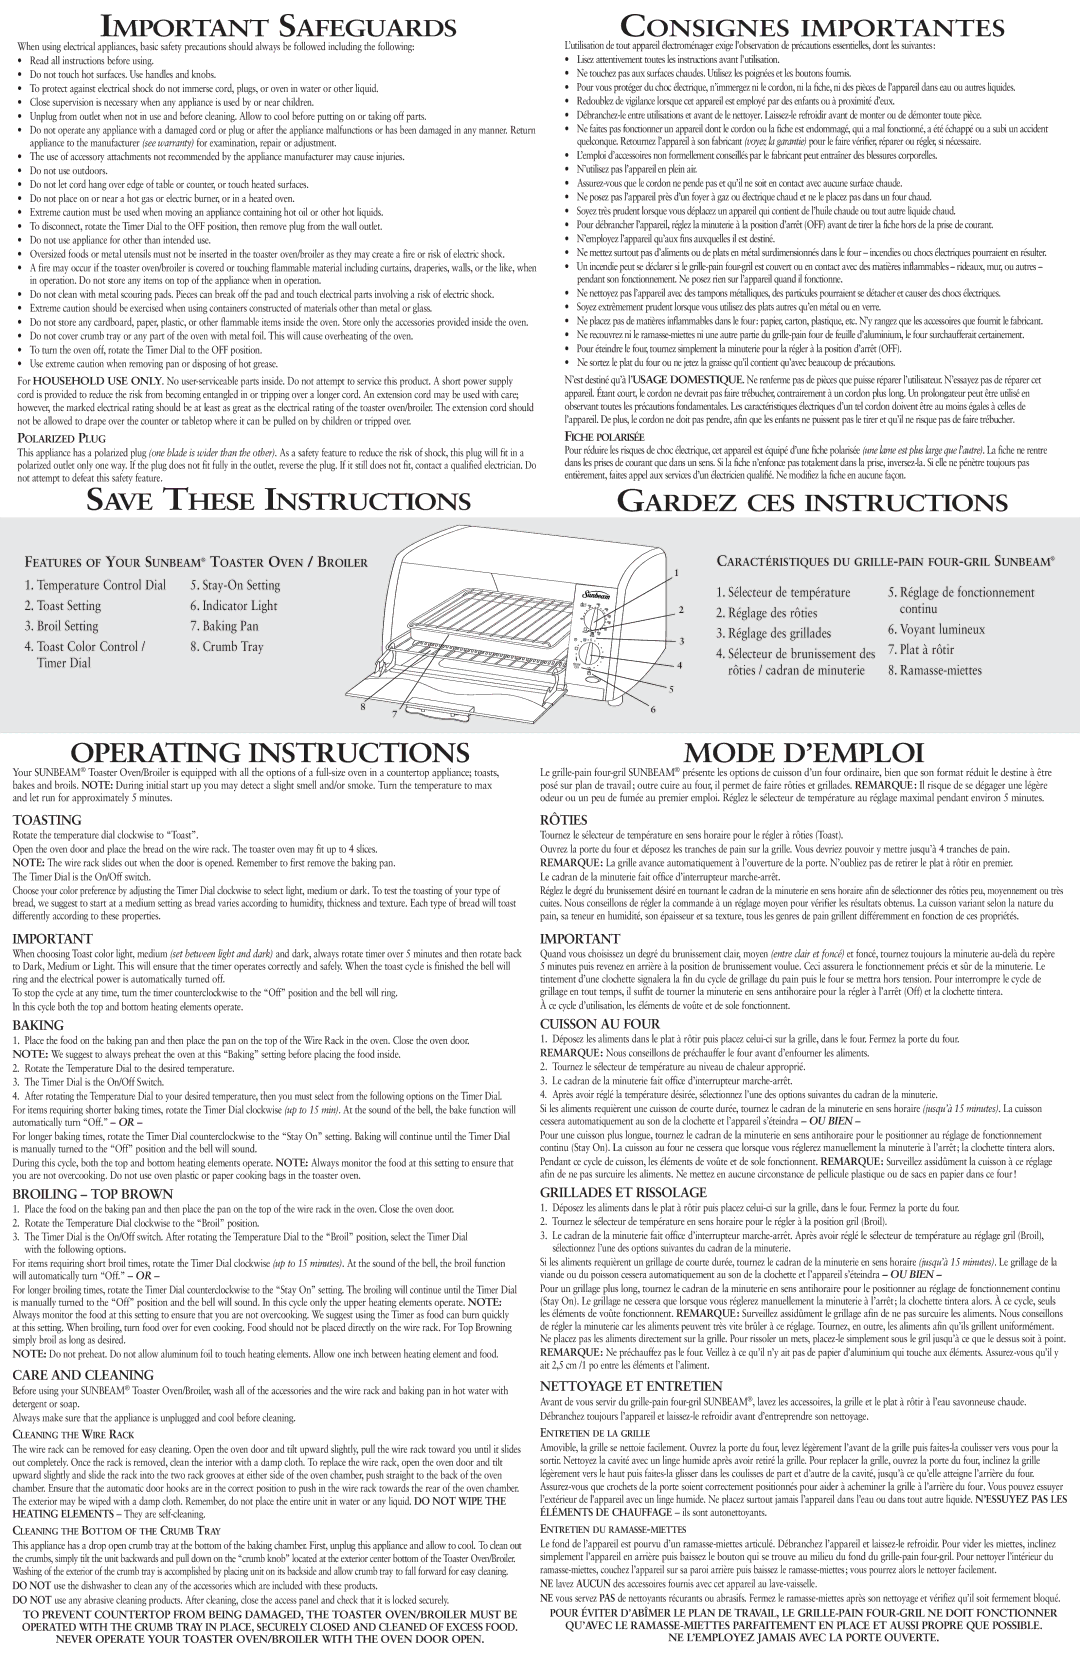
IMPORTANT
When choosing Toast color light, medium (set between light and dark) and dark, always rotate timer over 5 minutes and then rotate back to Dark, Medium or Light. This will ensure that the timer operates correctly and safely. When the toast cycle is finished the bell will ring and the electrical power is automatically turned off.
To stop the cycle at any time, turn the timer counterclockwise to the “Off” position and the bell will ring. In this cycle both the top and bottom heating elements operate.
BAKING
1.Place the food on the baking pan and then place the pan on the top of the Wire Rack in the oven. Close the oven door. NOTE: We suggest to always preheat the oven at this “Baking” setting before placing the food inside.
2.Rotate the Temperature Dial to the desired temperature.
3.The Timer Dial is the On/Off Switch.
4.After rotating the Temperature Dial to your desired temperature, then you must select from the following options on the Timer Dial. For items requiring shorter baking times, rotate the Timer Dial clockwise (up to 15 min). At the sound of the bell, the bake function will automatically turn “Off.” – OR –
For longer baking times, rotate the Timer Dial counterclockwise to the “Stay On” setting. Baking will continue until the Timer Dial is manually turned to the “Off” position and the bell will sound.
During this cycle, both the top and bottom heating elements operate. NOTE: Always monitor the food at this setting to ensure that you are not overcooking. Do not use oven plastic or paper cooking bags in the toaster oven.
BROILING – TOP BROWN
1.Place the food on the baking pan and then place the pan on the top of the wire rack in the oven. Close the oven door.
2.Rotate the Temperature Dial clockwise to the “Broil” position.
3.The Timer Dial is the On/Off switch. After rotating the Temperature Dial to the “Broil” position, select the Timer Dial with the following options.
For items requiring short broil times, rotate the Timer Dial clockwise (up to 15 minutes). At the sound of the bell, the broil function will automatically turn “Off.” – OR –
For longer broiling times, rotate the Timer Dial counterclockwise to the “Stay On” setting. The broiling will continue until the Timer Dial is manually turned to the “Off” position and the bell will sound. In this cycle only the upper heating elements operate. NOTE: Always monitor the food at this setting to ensure that you are not overcooking. We suggest using the Timer as food can burn quickly at this setting. When broiling, turn food over for even cooking. Food should not be placed directly on the wire rack. For Top Browning simply broil as long as desired.
NOTE: Do not preheat. Do not allow aluminum foil to touch heating elements. Allow one inch between heating element and food.
CARE AND CLEANING
Before using your SUNBEAM® Toaster Oven/Broiler, wash all of the accessories and the wire rack and baking pan in hot water with detergent or soap.
Always make sure that the appliance is unplugged and cool before cleaning.
CLEANING THE WIRE RACK
The wire rack can be removed for easy cleaning. Open the oven door and tilt upward slightly, pull the wire rack toward you until it slides out completely. Once the rack is removed, clean the interior with a damp cloth. To replace the wire rack, open the oven door and tilt upward slightly and slide the rack into the two rack grooves at either side of the oven chamber, push straight to the back of the oven chamber. Ensure that the automatic door hooks are in the correct position to push in the wire rack towards the rear of the oven chamber. The exterior may be wiped with a damp cloth. Remember, do not place the entire unit in water or any liquid. DO NOT WIPE THE HEATING ELEMENTS – They are self-cleaning.
CLEANING THE BOTTOM OF THE CRUMB TRAY
This appliance has a drop open crumb tray at the bottom of the baking chamber. First, unplug this appliance and allow to cool. To clean out the crumbs, simply tilt the unit backwards and pull down on the “crumb knob” located at the exterior center bottom of the Toaster Oven/Broiler. Washing of the exterior of the crumb tray is accomplished by placing unit on its backside and allow crumb tray to fall forward for easy cleaning. DO NOT use the dishwasher to clean any of the accessories which are included with these products.
DO NOT use any abrasive cleaning products. After cleaning, close the access panel and check that it is locked securely.
TO PREVENT COUNTERTOP FROM BEING DAMAGED, THE TOASTER OVEN/BROILER MUST BE OPERATED WITH THE CRUMB TRAY IN PLACE, SECURELY CLOSED AND CLEANED OF EXCESS FOOD.
NEVER OPERATE YOUR TOASTER OVEN/BROILER WITH THE OVEN DOOR OPEN.
IMPORTANT
Quand vous choisissez un degré du brunissement clair, moyen (entre clair et foncé) et foncé, tournez toujours la minuterie au-delà du repère 5 minutes puis revenez en arrière à la position de brunissement voulue. Ceci assurera le fonctionnement précis et sûr de la minuterie. Le tintement d’une clochette signalera la fin du cycle de grillage du pain puis le four se mettra hors tension. Pour interrompre le cycle de grillage en tout temps, il suffit de tourner la minuterie en sens antihoraire pour la régler à l’arrêt (Off) et la clochette tintera.
À ce cycle d’utilisation, les éléments de voûte et de sole fonctionnent.
CUISSON AU FOUR
1.Déposez les aliments dans le plat à rôtir puis placez celui-ci sur la grille, dans le four. Fermez la porte du four. REMARQUE: Nous conseillons de préchauffer le four avant d’enfourner les aliments.
2.Tournez le sélecteur de température au niveau de chaleur approprié.
3.Le cadran de la minuterie fait office d’interrupteur marche-arrêt.
4.Après avoir réglé la température désirée, sélectionnez l’une des options suivantes du cadran de la minuterie.
Si les aliments requièrent une cuisson de courte durée, tournez le cadran de la minuterie en sens horaire (jusqu’à 15 minutes). La cuisson cessera automatiquement au son de la clochette et l’appareil s’éteindra – OU BIEN –
Pour une cuisson plus longue, tournez le cadran de la minuterie en sens antihoraire pour le positionner au réglage de fonctionnement continu (Stay On). La cuisson au four ne cessera que lorsque vous réglerez manuellement la minuterie à l’arrêt; la clochette tintera alors. Pendant ce cycle de cuisson, les éléments de voûte et de sole fonctionnent. REMARQUE: Surveillez assidûment la cuisson à ce réglage afin de ne pas surcuire les aliments. Ne mettez en aucune circonstance de pellicule plastique ou de sacs en papier dans ce four!
GRILLADES ET RISSOLAGE
1.Déposez les aliments dans le plat à rôtir puis placez celui-ci sur la grille, dans le four. Fermez la porte du four.
2.Tournez le sélecteur de température en sens horaire pour le régler à la position gril (Broil).
3.Le cadran de la minuterie fait office d’interrupteur marche-arrêt. Après avoir réglé le sélecteur de température au réglage gril (Broil), sélectionnez l’une des options suivantes du cadran de la minuterie.
Si les aliments requièrent un grillage de courte durée, tournez le cadran de la minuterie en sens horaire (jusqu’à 15 minutes). Le grillage de la viande ou du poisson cessera automatiquement au son de la clochette et l’appareil s’éteindra – OU BIEN –
Pour un grillage plus long, tournez le cadran de la minuterie en sens antihoraire pour le positionner au réglage de fonctionnement continu (Stay On). Le grillage ne cessera que lorsque vous réglerez manuellement la minuterie à l’arrêt; la clochette tintera alors. À ce cycle, seuls les éléments de voûte fonctionnent. REMARQUE: Surveillez assidûment le grillage afin de ne pas surcuire les aliments. Nous conseillons de régler la minuterie car les aliments peuvent très vite brûler à ce réglage. Tournez, en outre, les aliments afin qu’ils grillent uniformément. Ne placez pas les aliments directement sur la grille. Pour rissoler un mets, placez-le simplement sous le gril jusqu’à ce que le dessus soit à point. REMARQUE: Ne préchauffez pas le four. Veillez à ce qu’il n’y ait pas de papier d’aluminium qui touche aux éléments. Assurez-vous qu’il y ait 2,5 cm /1 po entre les éléments et l’aliment.
NETTOYAGE ET ENTRETIEN
Avant de vous servir du grille-pain four-gril SUNBEAM®, lavez les accessoires, la grille et le plat à rôtir à l’eau savonneuse chaude. Débranchez toujours l’appareil et laissez-le refroidir avant d’entreprendre son nettoyage.
ENTRETIEN DE LA GRILLE
Amovible, la grille se nettoie facilement. Ouvrez la porte du four, levez légèrement l’avant de la grille puis faites-la coulisser vers vous pour la sortir. Nettoyez la cavité avec un linge humide après avoir retiré la grille. Pour replacer la grille, ouvrez la porte du four, inclinez la grille légèrement vers le haut puis faites-la glisser dans les coulisses de part et d’autre de la cavité, jusqu’à ce qu’elle atteigne l’arrière du four. Assurez-vous que crochets de la porte soient correctement positionnés pour aider à acheminer la grille à l’arrière du four. Vous pouvez essuyer l’extérieur de l’appareil avec un linge humide. Ne placez surtout jamais l’appareil dans l’eau ou dans tout autre liquide. N’ESSUYEZ PAS LES ÉLÉMENTS DE CHAUFFAGE – ils sont autonettoyants.
ENTRETIEN DU RAMASSE-MIETTES
Le fond de l’appareil est pourvu d’un ramasse-miettes articulé. Débranchez l’appareil et laissez-le refroidir. Pour vider les miettes, inclinez simplement l’appareil en arrière puis baissez le bouton qui se trouve au milieu du fond du grille-pain four-gril. Pour nettoyer l’intérieur du ramasse-miettes, couchez l’appareil sur sa paroi arrière puis baissez le ramasse-miettes; vous pourrez alors le nettoyer facilement.
NE lavez AUCUN des accessoires fournis avec cet appareil au lave-vaisselle.
NE vous servez PAS de nettoyants récurants ou abrasifs. Fermez le ramasse-miettes après son nettoyage et vérifiez qu’il soit fermement bloqué.
POUR ÉVITER D’ABÎMER LE PLAN DE TRAVAIL, LE GRILLE-PAIN FOUR-GRIL NE DOIT FONCTIONNER
QU’AVEC LE RAMASSE-MIETTES PARFAITEMENT EN PLACE ET AUSSI PROPRE QUE POSSIBLE.
NE L’EMPLOYEZ JAMAIS AVEC LA PORTE OUVERTE.