P L E A S E R E A D A N D S AV E T H E S E
I M P O R TA N T S A F E T Y I N S T R U C T I O N S
F E AT U R E S - O P E R AT I O N S C L E A N I N G / M A I N T E N A N C E
A U T O S A F E T Y S H U T O F F
T R O U B L E S H O O T I N G
When using electrical appliances, basic safety precautions should always be followed to reduce the risk of fire, electric shock, and injury to persons, including the following:
1.Read all instructions before using the appliance.
2.To avoid fire or shock hazard, plug the appliance directly into a 120V AC electrical outlet.
3.The heater is hot when in use. To avoid burns, DO NOT let bare skin touch hot surfaces. If provided, use handles when moving this heater. Keep combustible materials, such as furniture, pillows, bedding, papers, clothes, and curtains at least 3 ft (0.9 m) from the front of the heater and keep them away from the sides and rear.
4.DO NOT run cord under carpeting. DO NOT cover cord with throw rugs, runners, or the like. Arrange cord away from traffic area and where it will not be tripped over.
5.This heater is not intended for use in bathrooms, laundry areas and similar indoor location. NEVER locate heater where it may fall into a bathtub or other water container.
6.Extreme caution is necessary when any heater is used by, or near children or invalids, and whenever the heater is left operating and unattended.
7.Always unplug the heater when not in use.
8.When unplugging, be sure to pull by the plug and not the cord.
9.DO NOT insert or allow foreign objects to enter any ventilation or exhaust opening as this may cause an electric shock or fire, or damage the heater.
10.DO NOT operate heater with a damaged cord or plug, or after the heater malfunctions, has been dropped or damaged in any manner. Return appliance to manufacturer for examination, electrical or mechanical adjustment, or repair.
11.A heater has hot and arcing or sparking parts inside. DO NOT use it in areas where gasoline, paint, or flammable liquids are used or stored.
12.Use appliance only for intended household use as described in this manual. Any other use not recommended by the manufacturer may cause fire, electric shock, or injury to persons. The use of attachments not recommended or sold by the manufacturer may cause hazards.
13.DO NOT use outdoors.
14.To prevent a possible fire, DO NOT block air intakes or exhaust in any manner. DO NOT use on soft surfaces, like a bed, where openings may become blocked.
15.To disconnect heater, turn controls to OFF, then remove plug from outlet.
16.Avoid the use of an extension cord because the extension cord may overheat and cause a risk of fire. However, if you have to use an extension cord, the cord shall be No. 14 AWG minimum size and rated not less than 1875 watts.
17.If the heater will not operate, see specific instructions on Auto Safety
18.DO NOT attempt to repair or adjust any electrical or mechanical functions on this unit. Doing so will void your warranty. The inside of the unit contains no user serviceable parts. All servicing should be performed by qualified personnel only.
19.Discontinue use if plug or outlet is hot. It is recommended that the outlet be replaced if plug or outlet is hot to touch.
PLEASE READ AND SAVE THESE IMPORTANT SAFETY INSTRUCTIONS
TECHNICAL SPECIFICATIONS
•Amps: 12.5
•Wattage: 1500W (+5%
•Working voltage: 120V AC/60Hz
OPERATING INSTRUCTIONS
1.Carefully remove your heater from the box. Please save the carton for
2.Make sure the unit is in the Off position before plugging the heater into the outlet.
3.Place heater on firm level surface.
4.Avoid overloading your circuit by not using other high wattage appliances in the same outlet.
Turn the Mode Control to select your desired settings:
Power Off
Power Light Ring will not illuminate when the Mode Control is at Off position. To shut off the heater at any setting, turn the Mode Control to Off position, the Power Light Ring will then go off.
![]()
![]() Fan Only Setting
Fan Only Setting
For ![]()
![]() ) position.
) position.
Comfort Temperature Setting
•There are 5 temperature levels available for selection: 65˚F, 70˚F, 75˚F, 80˚F, 85˚F. Turn the Mode Control to your desired temperature / comfort level.
•When the preset temperature is reached, the heater will shut off until the room temperature drops below the preset temperature. The heater will continue to turn on and off to maintain the preset temperature.
NOTE: When the preset temperature is reached or when the heater is shut off, the fan will run for 10 seconds without heat. This cool down process ensures an accurate and consistent temperature reading.
Stay On Setting
The heater will run continuously at 1500W until you turn the Mode Control to Off position.
CLEANING/MAINTENANCE
Always unplug the heater before cleaning and allow the heater to cool down.
1.Clean the unit with a soft cloth moistened with a mild soap solution.
2.NEVER use abrasive or flammable solvents to clean the unit.
3.After cleaning, be sure to completely dry the unit with a cloth or towel.
4.Store heater in a cool, dry location.
5.It is recommended that you store the unit in its original carton.
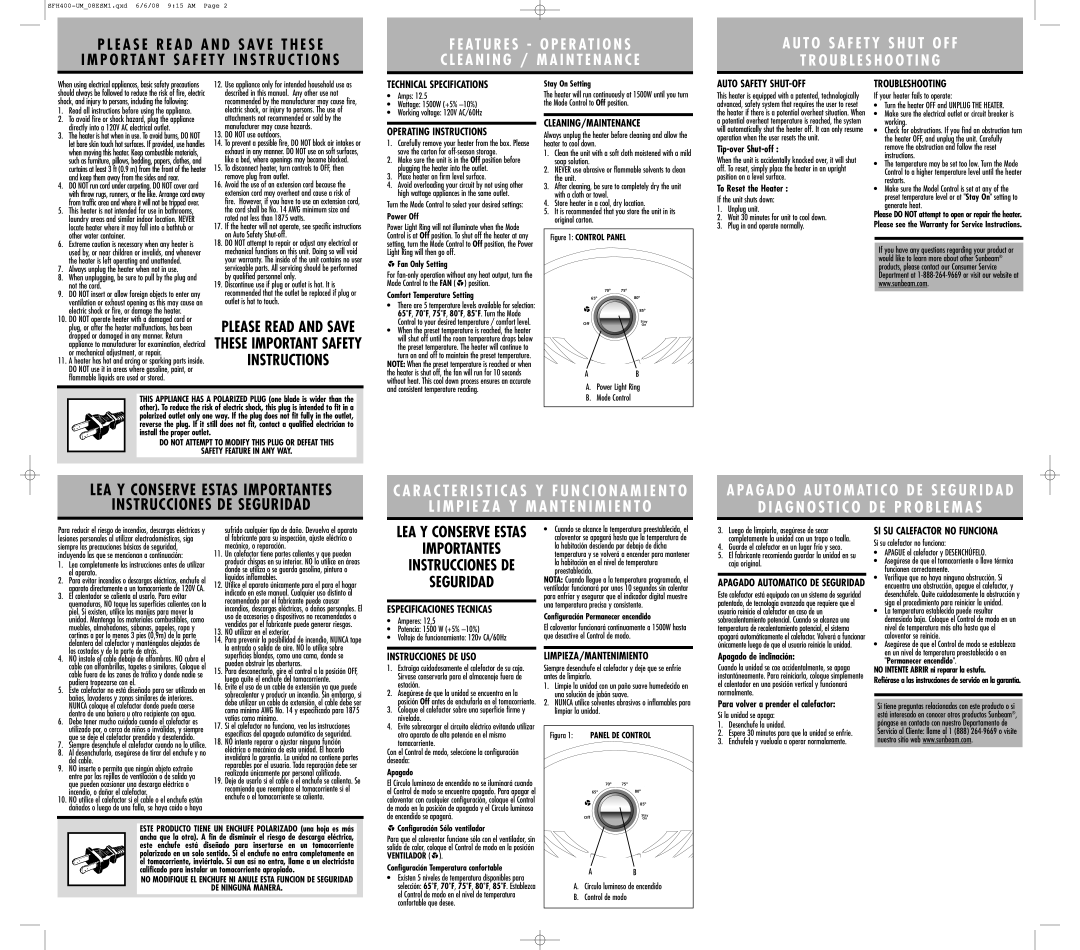
Figure 1: CONTROL PANEL
70o | 75o | R19.1 |
65o |
| 80o |
|
| 85o |
Off |
| Stay |
| On |
AB
A. Power Light Ring |
AUTO SAFETY SHUT-OFF
This heater is equipped with a patented, technologically advanced, safety system that requires the user to reset the heater if there is a potential overheat situation. When a potential overheat temperature is reached, the system will automatically shut the heater off. It can only resume operation when the user resets the unit.
Tip-over Shut-off :
When the unit is accidentally knocked over, it will shut off. To reset, simply place the heater in an upright position on a level surface.
To Reset the Heater :
If the unit shuts down:
1.Unplug unit.
2.Wait 30 minutes for unit to cool down.
3.Plug in and operate normally.
TROUBLESHOOTING
If your heater fails to operate:
•Turn the heater OFF and UNPLUG THE HEATER.
•Make sure the electrical outlet or circuit breaker is working.
•Check for obstructions. If you find an obstruction turn the heater OFF, and unplug the unit. Carefully remove the obstruction and follow the reset instructions.
•The temperature may be set too low. Turn the Mode Control to a higher temperature level until the heater restarts.
•Make sure the Model Control is set at any of the preset temperature level or at "Stay On" setting to generate heat.
Please DO NOT attempt to open or repair the heater. Please see the Warranty for Service Instructions.
If you have any questions regarding your product or would like to learn more about other Sunbeam® products, please contact our Consumer Service Department at
THIS APPLIANCE HAS A POLARIZED PLUG (one blade is wider than the other). To reduce the risk of electric shock, this plug is intended to fit in a polarized outlet only one way. If the plug does not fit fully in the outlet, reverse the plug. If it still does not fit, contact a qualified electrician to install the proper outlet.
DO NOT ATTEMPT TO MODIFY THIS PLUG OR DEFEAT THIS
SAFETY FEATURE IN ANY WAY.
B. Mode Control |
LEA Y CONSERVE ESTAS IMPORTANTES
INSTRUCCIONES DE SEGURIDAD
C A R A C T E R I S T I C A S Y F U N C I O N A M I E N T O
L I M P I E Z A Y M A N T E N I M I E N T O
A P A G A D O A U T O M AT I C O D E S E G U R I D A D
D I A G N O S T I C O D E P R O B L E M A S
Para reducir el riesgo de incendios, descargas eléctricas y lesiones personales al utilizar electrodomésticos, siga siempre las precauciones básicas de seguridad, incluyendo las que se mencionan a continuación:
1. | Lea completamente las instrucciones antes de utilizar |
| el aparato. |
2. | Para evitar incendios o descargas eléctricas, enchufe el |
| aparato directamente a un tomacorriente de 120V CA. |
3. | El calentador se calienta al usarlo. Para evitar |
| quemaduras, NO toque las superficies calientes con la |
| piel. Si existen, utilice las manijas para mover la |
| unidad. Mantenga los materiales combustibles, como |
| muebles, almohadones, sábanas, papeles, ropa y |
| cortinas a por lo menos 3 pies (0,9m) de la parte |
| delantera del calefactor y manténgalos alejados de |
| los costados y de la parte de atrás. |
sufrido cualquier tipo de daño. Devuelva el aparato al fabricante para su inspección, ajuste eléctrico o mecánico, o reparación.
11. | Un calefactor tiene partes calientes y que pueden |
| producir chispas en su interior. NO lo utilice en áreas |
| donde se utiliza o se guarda gasolina, pintura o |
| líquidos inflamables. |
12. | Utilice el aparato únicamente para el para el hogar |
| indicado en este manual. Cualquier uso distinto al |
| recomendado por el fabricante puede causar |
| incendios, descargas eléctricas, o daños personales. El |
| uso de accesorios o dispositivos no recomendados o |
| vendidos por el fabricante puede generar riesgos. |
13. | NO utilizar en el exterior. |
14. | Para prevenir la posibilidad de incendio, NUNCA tape |
| la entrada o salida de aire. NO lo utilice sobre |
LEA Y CONSERVE ESTAS
IMPORTANTES
INSTRUCCIONES DE
SEGURIDAD
ESPECIFICACIONES TECNICAS
•Amperes: 12,5
•Potencia: 1500 W (+5% –10%)
•Voltaje de funcionamiento: 120v CA/60Hz
•Cuando se alcance la temperatura preestablecida, el caloventor se apagará hasta que la temperatura de la habitación descienda por debajo de dicha temperatura y se volverá a encender para mantener la habitación en el nivel de temperatura preestablecido.
NOTA: Cuando llegue a la temperatura programada, el ventilador funcionará por unos 10 segundos sin calentar para enfriar y asegurar que el indicador digital muestre una temperatura precisa y consistente.
Configuración Permanecer encendido
El caloventor funcionará continuamente a 1500W hasta que desactive el Control de modo.
3.Luego de limpiarla, asegúrese de secar completamente la unidad con un trapo o toalla.
4.Guarde el calefactor en un lugar frío y seco.
5.El fabricante recomienda guardar la unidad en su caja original.
APAGADO AUTOMATICO DE SEGURIDAD
Este calefactor está equipado con un sistema de seguridad patentado, de tecnología avanzada que requiere que el usuario reinicie el calefactor en caso de un sobrecalentamiento potencial. Cuando se alcanza una temperatura de recalentamiento potencial, el sistema apagará automáticamente el calefactor. Volverá a funcionar únicamente luego de que el usuario reinicie la unidad.
SI SU CALEFACTOR NO FUNCIONA
Si su calefactor no funciona:
• APAGUE el calefactor y DESENCHÚFELO. |
• Asegúrese de que el tomacorriente o llave térmica |
funcionen correctamente. |
• Verifique que no haya ninguna obstrucción. Si |
encuentra una obstrucción, apague el calefactor, y |
desenchúfelo. Quite cuidadosamente la obstrucción y |
siga el procedimiento para reiniciar la unidad. |
• La temperatura establecida puede resultar |
demasiado baja. Coloque el Control de modo en un |
nivel de temperatura más alto hasta que el |
caloventor se reinicie. |
• Asegúrese de que el Control de modo se establezca |
4. | NO instale el cable debajo de alfombras. NO cubra el |
| cable con alfombrillas, tapetes o similares. Coloque el |
| cable fuera de las zonas de tráfico y donde nadie se |
| pudiera tropezarse con el. |
5. | Este calefactor no está diseñado para ser utilizado en |
| baños, lavaderos y zonas similares de interiores. |
| NUNCA coloque el calefactor donde pueda caerse |
6. | dentro de una bañera u otro recipiente con agua. |
Debe tener mucho cuidado cuando el calefactor es | |
| utilizado por, o cerca de niños o inválidos, y siempre |
7. | que se deje el calefactor prendido y desatendido. |
Siempre desenchufe el calefactor cuando no lo utilice. | |
8. | Al desenchufarlo, asegúrese de tirar del enchufe y no |
9. | del cable. |
NO inserte o permita que ningún objeto extraño | |
| entre por las rejillas de ventilación o de salida ya |
| que pueden ocasionar una descarga eléctrica o |
| incendio, o dañar el calefactor. |
10. | NO utilice el calefactor si el cable o el enchufe están |
| dañados o luego de una falla, se haya caído o haya |
| superficies blandas, como una cama, donde se |
| pueden obstruir las aberturas. |
15. | Para desconectarlo, gire el control a la posición OFF, |
16. | luego quite el enchufe del tomacorriente. |
Evite el uso de un cable de extensión ya que puede | |
| sobrecalentar y producir un incendio. Sin embargo, si |
| debe utilizar un cable de extensión, el cable debe ser |
| como mínimo AWG No. 14 y especificado para 1875 |
17. | vatios como mínimo. |
Si el calefactor no funciona, vea las instrucciones | |
| específicas del apagado automático de seguridad. |
18. | NO intente reparar o ajustar ninguna función |
| eléctrica o mecánica de esta unidad. El hacerlo |
| invalidará la garantía. La unidad no contiene partes |
| reparables por el usuario. Toda reparación debe ser |
| realizada únicamente por personal calificado. |
19. | Deje de usarlo si el cable o el enchufe se calienta. Se |
| recomienda que reemplace el tomacorriente si el |
| enchufe o el tomacorriente se calienta. |
INSTRUCCIONES DE USO
1.Extraiga cuidadosamente el calefactor de su caja. Sírvase conservarla para el almacenaje fuera de estación.
2.Asegúrese de que la unidad se encuentra en la posición Off antes de enchufarla en el tomacorriente.
3.Coloque el calefactor sobre una superficie firme y nivelada.
4.Evite sobrecargar el circuito eléctrico evitando utilizar otro aparato de alta potencia en el mismo tomacorriente.
Con el Control de modo, seleccione la configuración deseada:
Apagado
El Círculo luminoso de encendido no se iluminará cuando el Control de modo se encuentre apagado. Para apagar el caloventor con cualquier configuración, coloque el Control de modo en la posición de apagado y el Círculo luminoso de encendido se apagará.
LIMPIEZA/MANTENIMIENTO
Siempre desenchufe el calefactor y deje que se enfríe antes de limpiarlo.
1.Limpie la unidad con un paño suave humedecido en una solución de jabón suave.
2.NUNCA utilice solventes abrasivos o inflamables para limpiar la unidad.
Figura 1: PANEL DE CONTROL
70o | 75o | R19.1 |
65o |
| 80o |
|
| 85o |
Off |
| Stay |
| On |
Apagado de inclinación:
Cuando la unidad se cae accidentalmente, se apaga instantáneamente. Para reiniciarla, coloque simplemente el calentador en una posición vertical y funcionará normalmente.
Para volver a prender el calefactor:
Si la unidad se apaga:
1.Desenchufe la unidad.
2.Espere 30 minutos para que la unidad se enfrie.
3.Enchufela y vueluala a operar normalamente.
en un nivel de temperatura preestablecido o en |
"Permanecer encendido". |
NO INTENTE ABRIR ni reparar la estufa.
Refiérase a las instrucciones de servicio en la garantía.
Si tiene preguntas relacionadas con este producto o si está interesado en conocer otros productos Sunbeam®, póngase en contacto con nuestro Departamento de Servicio al Cliente: llame al 1 (888)
ESTE PRODUCTO TIENE UN ENCHUFE POLARIZADO (una hoja es más ancha que la otra). A fin de disminuir el riesgo de descarga eléctrica, este enchufe está diseñado para insertarse en un tomacorriente polarizado en un solo sentido. Si el enchufe no entra completamente en el tomacorriente, inviértalo. Si aun así no entra, llame a un electricista calificado para instalar un tomacorriente apropiado.
NO MODIFIQUE EL ENCHUFE NI ANULE ESTA FUNCION DE SEGURIDAD
DE NINGUNA MANERA.

 Configuración Sólo ventilador
Para que el caloventor funcione sólo con el ventilador, sin salida de calor, coloque el Control de modo en la posición VENTILADOR ( ![]()
![]() ).
).
Configuración Temperatura confortable
•Existen 5 niveles de temperatura disponibles para selección: 65˚F, 70˚F, 75˚F, 80˚F, 85˚F. Establezca el Control de modo en el nivel de temperatura confortable que desee.
AB
A.Círculo luminoso de encendido
B.Control de modo