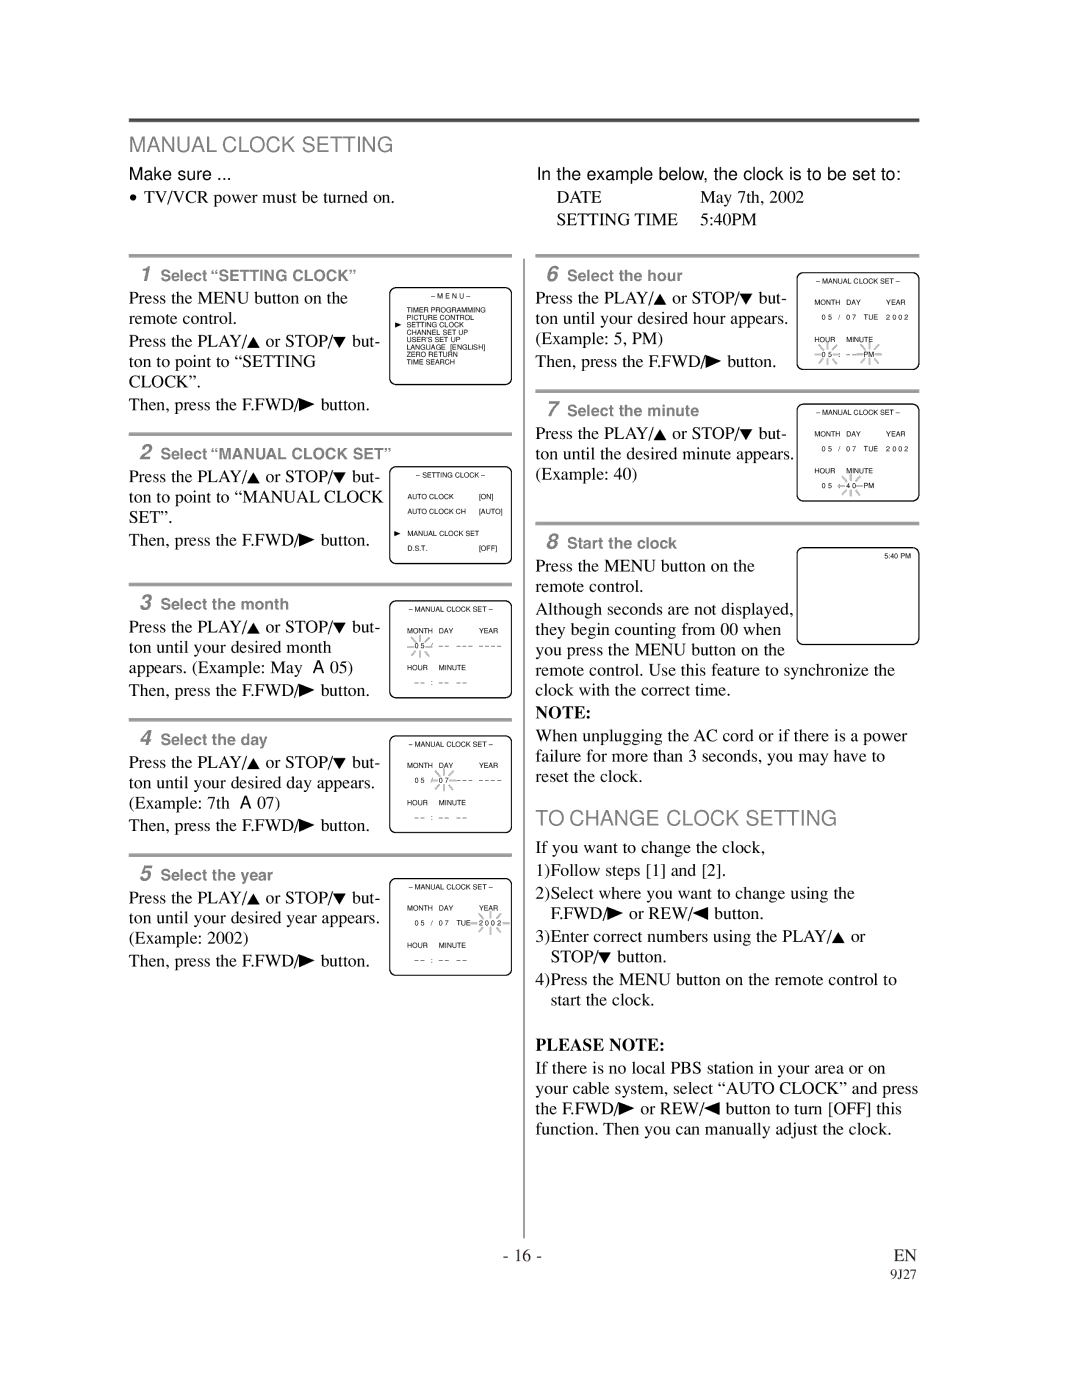
MANUAL CLOCK SETTING

Make sure ...

TV/VCR power must be turned on.

In the example below, the clock is to be set to:

DATE

May 7th, 2002

SETTING TIME

5:40PM

1Select “SETTING CLOCK”

Press the MENU button on the remote control.

Press the PLAY/K or STOP/L but- ton to point to “SETTING CLOCK”.

Then, press the F.FWD/B button.

– M E N U –

TIMER PROGRAMMING PICTURE CONTROL

BSETTING CLOCK CHANNEL SET UP USER’S SET UP LANGUAGE [ENGLISH] ZERO RETURN

TIME SEARCH

6 Select the hour

– MANUAL CLOCK SET –

Press the PLAY/K or STOP/L but-

MONTH DAY

YEAR

ton until your desired hour appears.

0 5

/ 0 7

TUE 2 0 0 2


(Example: 5, PM)

HOUR

MINUTE


Then, press the F.FWD/B button.

0 5

: – –

PM


7 Select the minute

– MANUAL CLOCK SET –


Press the PLAY/K or STOP/L but-

MONTH DAY

YEAR


2Select “MANUAL CLOCK SET”

Press the PLAY/K or STOP/L but-

– SETTING CLOCK –

ton to point to “MANUAL CLOCK

AUTO CLOCK

[ON]

SET”.

AUTO CLOCK CH [AUTO]


Then, press the F.FWD/B button.

B MANUAL CLOCK SET

D.S.T.


[OFF]


3 Select the month

– MANUAL CLOCK SET –

Press the PLAY/K or STOP/L but-

MONTH DAY

YEAR

ton until your desired month

0 5 / – – – – – – – – –

appears. (Example: May 05)

HOUR

MINUTE

Then, press the F.FWD/B button.

– –

: – –

– –


4 Select the day

– MANUAL CLOCK SET –

Press the PLAY/K or STOP/L but-

MONTH DAY

YEAR

ton until your desired day appears.

0 5 / 0 7 – – – – – – –

(Example: 7th 07)

HOUR

MINUTE

Then, press the F.FWD/B button.

– –

: – –

– –


5 Select the year

– MANUAL CLOCK SET –

Press the PLAY/K or STOP/L but-

MONTH DAY

YEAR

ton until your desired year appears.

0 5

/ 0 7

TUE 2 0 0 2

(Example: 2002)

HOUR

MINUTE

Then, press the F.FWD/B button.

– –

: – –

– –

ton until the desired minute appears.

0 5

/ 0 7

TUE 2 0 0 2


(Example: 40)

HOUR

MINUTE

0 5

: 4 0

PM


8 Start the clock

5:40 PM

Press the MENU button on the remote control.

Although seconds are not displayed, they begin counting from 00 when you press the MENU button on the

remote control. Use this feature to synchronize the clock with the correct time.

NOTE:

When unplugging the AC cord or if there is a power failure for more than 3 seconds, you may have to reset the clock.

TO CHANGE CLOCK SETTING

If you want to change the clock, 1)Follow steps [1] and [2].

2)Select where you want to change using the F.FWD/B or REW/s button.

3)Enter correct numbers using the PLAY/K or STOP/L button.

4)Press the MENU button on the remote control to start the clock.

PLEASE NOTE:

If there is no local PBS station in your area or on your cable system, select “AUTO CLOCK” and press the F.FWD/B or REW/s button to turn [OFF] this function. Then you can manually adjust the clock.

- 16 -

EN

9J27

Page 16
Image 16
Sylvania 6309CCC owner manual Manual Clock Setting, To Change Clock Setting, Please Note

6309CCC specifications

The Sylvania 6309CCC is a remarkable lighting solution that exemplifies modern technology combined with efficiency and performance. This innovative product is designed to meet a variety of lighting needs across numerous applications, making it a popular choice among consumers and professionals alike.

One of the standout features of the Sylvania 6309CCC is its energy efficiency. It utilizes advanced LED technology, which significantly reduces power consumption compared to traditional incandescent bulbs. This not only lowers energy bills for users but also contributes to a more sustainable environment by decreasing carbon emissions. The long lifespan of LED bulbs, often exceeding 25,000 hours, means that users can enjoy reliable lighting without the frequent need for replacements, further enhancing its cost-effectiveness.

Another key characteristic of the Sylvania 6309CCC is its exceptional brightness and color rendering. With a high lumen output, this product provides bright and uniform light, ideal for both residential and commercial settings. Additionally, it boasts a high Color Rendering Index (CRI), ensuring that colors appear more vibrant and true to life. This feature is particularly advantageous in spaces where accurate color rendition is crucial, such as art galleries, retail stores, and home environments.

The Sylvania 6309CCC also offers versatility in terms of design and application. It is available in various wattages and color temperatures, allowing users to choose the perfect match for their specific lighting requirements. Whether it’s a warm, inviting glow for living spaces or a bright, cool light for work areas, this product can cater to diverse preferences and atmospheres.

Moreover, the Sylvania 6309CCC is designed with user convenience in mind. It operates on standard fixtures and is easy to install, making it accessible for both DIY enthusiasts and seasoned professionals. The durable construction ensures that it can withstand daily use and environmental factors, making it suitable for both indoor and outdoor applications.

In summary, the Sylvania 6309CCC is a top-tier lighting solution that combines energy efficiency, exceptional brightness, and versatile applications. With its LED technology, long lifespan, and user-friendly design, it sets a standard for lighting products in today’s market, appealing to a wide range of consumers looking for quality and sustainability in their lighting choices.