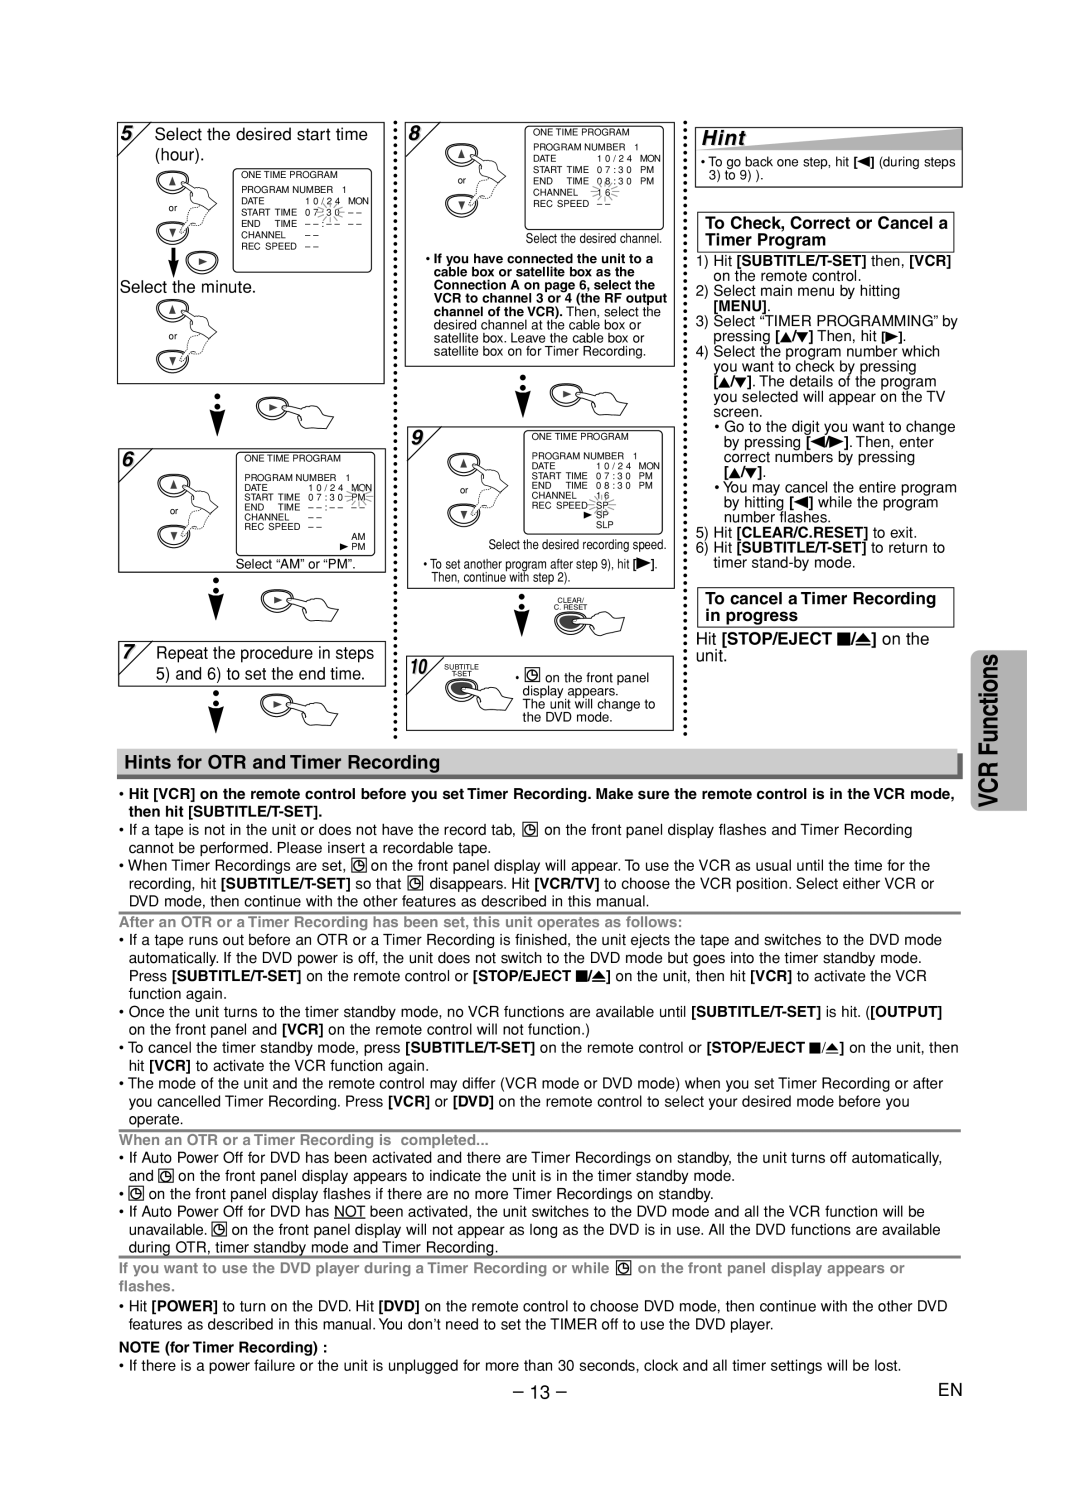
5 Select the desired start time | |||||
(hour). |
|
|
|
| |
| ONE TIME PROGRAM |
| |||
| PROGRAM NUMBER | 1 | |||
or | DATE |
| 1 0 / 2 4 | MON | |
START TIME | 0 7 : 3 0 | – – | |||
| |||||
| END | TIME | – | – – | |
| CHANNEL | – – |
| ||
| REC SPEED | – – |
| ||
Select the minute. |
|
|
| ||
or |
|
|
|
| |
8 | ONE TIME PROGRAM |
| |
| PROGRAM NUMBER | 1 | |
| DATE | 1 0 / 2 4 | MON |
or | START TIME | 0 7 : 3 0 | PM |
END TIME | 0 8 : 3 0 | PM | |
| CHANNEL | 1 6 |
|
| REC SPEED | – – |
|
Select the desired channel.
•If you have connected the unit to a cable box or satellite box as the Connection A on page 6, select the VCR to channel 3 or 4 (the RF output channel of the VCR). Then, select the desired channel at the cable box or satellite box. Leave the cable box or satellite box on for Timer Recording.
Hint
•To go back one step, hit [s] (during steps 3) to 9) ).
To Check, Correct or Cancel a Timer Program
1) | Hit |
| on the remote control. |
2) | Select main menu by hitting |
| [MENU]. |
3) | Select “TIMER PROGRAMMING” by |
| pressing [K/L] Then, hit [B]. |
4) | Select the program number which |
| you want to check by pressing |
| [K/L]. The details of the program |
| you selected will appear on the TV |
| screen. |
| • Go to the digit you want to change |
6 |
| ONE TIME PROGRAM |
| |
|
|
| ||
|
| PROGRAM NUMBER | 1 | |
|
| DATE | 1 0 / 2 4 | MON |
|
| START TIME | 0 7 : 3 0 | PM |
| or | END TIME | – | – – |
| CHANNEL | – – |
| |
|
|
| ||
|
| REC SPEED | – – | AM |
|
|
|
| |
|
|
| B PM | |
Select “AM” or “PM”.
7Repeat the procedure in steps 5) and 6) to set the end time.
9 |
| ONE TIME PROGRAM |
| |
|
| PROGRAM NUMBER | 1 | |
|
| DATE | 1 0 / 2 4 | MON |
|
| START TIME | 0 7 : 3 0 | PM |
| or | END TIME | 0 8 : 3 0 | PM |
| CHANNEL | 1 6 |
| |
|
|
| ||
|
| REC SPEED | SP |
|
|
| B SP |
| |
|
|
| SLP |
|
Select the desired recording speed.
•To set another program after step 9), hit [B]. Then, continue with step 2).
|
|
| CLEAR/ |
|
|
| C. RESET |
10 |
|
| |
| SUBTITLE | • | on the front panel |
|
| ||
|
|
| display appears. |
|
|
| The unit will change to |
|
|
| the DVD mode. |
| by pressing [s/B]. Then, enter |
| correct numbers by pressing |
| [K/L]. |
| • You may cancel the entire program |
| by hitting [s] while the program |
| number flashes. |
5) | Hit [CLEAR/C.RESET] to exit. |
6) | Hit |
| timer |
To cancel a Timer Recording in progress
Hit [STOP/EJECT C/A] on the unit.
Functions
Hints for OTR and Timer Recording
•Hit [VCR] on the remote control before you set Timer Recording. Make sure the remote control is in the VCR mode, then hit
•If a tape is not in the unit or does not have the record tab, ![]()
![]() on the front panel display flashes and Timer Recording cannot be performed. Please insert a recordable tape.
on the front panel display flashes and Timer Recording cannot be performed. Please insert a recordable tape.
•When Timer Recordings are set, ![]()
![]() on the front panel display will appear. To use the VCR as usual until the time for the
on the front panel display will appear. To use the VCR as usual until the time for the
recording, hit ![]()
![]() disappears. Hit [VCR/TV] to choose the VCR position. Select either VCR or DVD mode, then continue with the other features as described in this manual.
disappears. Hit [VCR/TV] to choose the VCR position. Select either VCR or DVD mode, then continue with the other features as described in this manual.
After an OTR or a Timer Recording has been set, this unit operates as follows:
•If a tape runs out before an OTR or a Timer Recording is finished, the unit ejects the tape and switches to the DVD mode automatically. If the DVD power is off, the unit does not switch to the DVD mode but goes into the timer standby mode. Press
•Once the unit turns to the timer standby mode, no VCR functions are available until
•To cancel the timer standby mode, press
•The mode of the unit and the remote control may differ (VCR mode or DVD mode) when you set Timer Recording or after you cancelled Timer Recording. Press [VCR] or [DVD] on the remote control to select your desired mode before you operate.
When an OTR or a Timer Recording is completed...
•If Auto Power Off for DVD has been activated and there are Timer Recordings on standby, the unit turns off automatically, and ![]()
![]() on the front panel display appears to indicate the unit is in the timer standby mode.
on the front panel display appears to indicate the unit is in the timer standby mode.
•![]()
![]() on the front panel display flashes if there are no more Timer Recordings on standby.
on the front panel display flashes if there are no more Timer Recordings on standby.
•If Auto Power Off for DVD has NOT been activated, the unit switches to the DVD mode and all the VCR function will be unavailable. ![]()
![]() on the front panel display will not appear as long as the DVD is in use. All the DVD functions are available during OTR, timer standby mode and Timer Recording.
on the front panel display will not appear as long as the DVD is in use. All the DVD functions are available during OTR, timer standby mode and Timer Recording.
If you want to use the DVD player during a Timer Recording or while ![]()
![]() on the front panel display appears or flashes.
on the front panel display appears or flashes.
•Hit [POWER] to turn on the DVD. Hit [DVD] on the remote control to choose DVD mode, then continue with the other DVD features as described in this manual. You don’t need to set the TIMER off to use the DVD player.
NOTE (for Timer Recording) :
•If there is a power failure or the unit is unplugged for more than 30 seconds, clock and all timer settings will be lost.
– 13 – | EN |