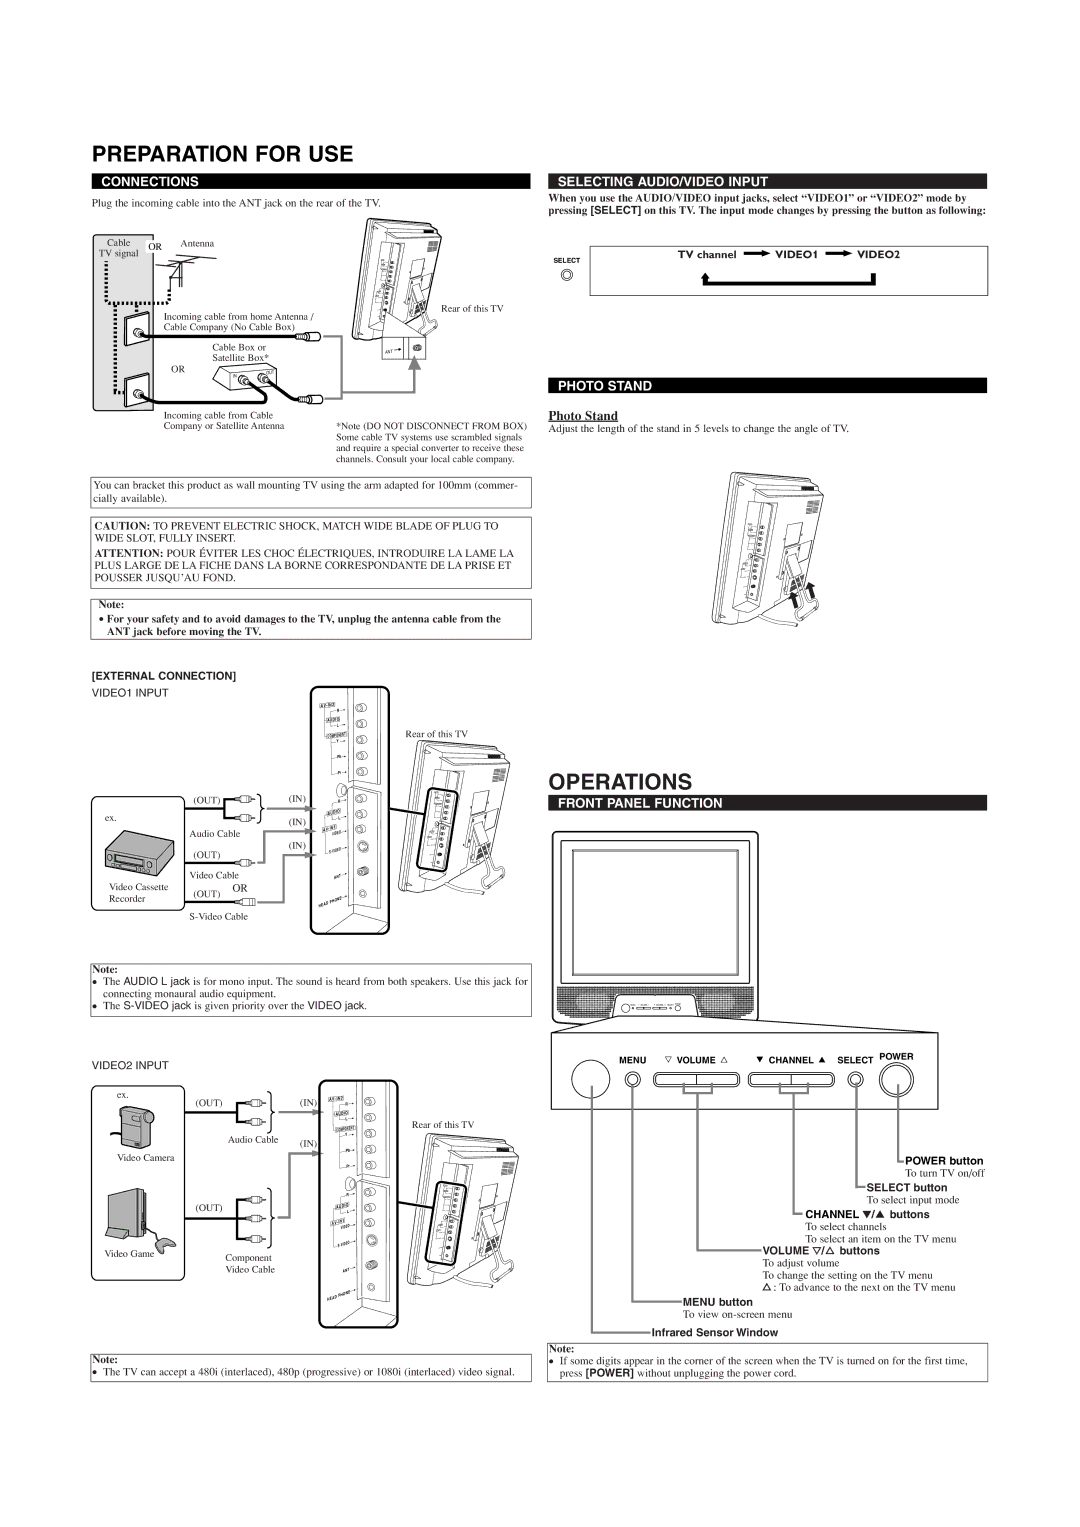
PREPARATION FOR USE
CONNECTIONS
Plug the incoming cable into the ANT jack on the rear of the TV.
SELECTING AUDIO/VIDEO INPUT
When you use the AUDIO/VIDEO input jacks, select “VIDEO1” or “VIDEO2” mode by pressing [SELECT] on this TV. The input mode changes by pressing the button as following:
Cable OR Antenna
TV signal
Incoming cable from home Antenna /
Cable Company (No Cable Box)
Cable Box or
Satellite Box*
Rear of this TV
ANT
SELECT
TV channel ![]() VIDEO1
VIDEO1 ![]() VIDEO2
VIDEO2
OR | OUT |
| IN |
PHOTO STAND
Incoming cable from Cable
Company or Satellite Antenna*Note (DO NOT DISCONNECT FROM BOX) Some cable TV systems use scrambled signals and require a special converter to receive these channels. Consult your local cable company.
Photo Stand
Adjust the length of the stand in 5 levels to change the angle of TV.
You can bracket this product as wall mounting TV using the arm adapted for 100mm (commer- cially available).
CAUTION: TO PREVENT ELECTRIC SHOCK, MATCH WIDE BLADE OF PLUG TO WIDE SLOT, FULLY INSERT.
ATTENTION: POUR ÉVITER LES CHOC ÉLECTRIQUES, INTRODUIRE LA LAME LA PLUS LARGE DE LA FICHE DANS LA BORNE CORRESPONDANTE DE LA PRISE ET POUSSER JUSQU’AU FOND.
Note:
•For your safety and to avoid damages to the TV, unplug the antenna cable from the ANT jack before moving the TV.
[EXTERNAL CONNECTION]
VIDEO1 INPUT
| (OUT) |
|
ex. |
|
|
| Audio Cable | |
| (OUT) |
|
| Video Cable | |
Video Cassette | (OUT) | OR |
Recorder |
| |
|
| |
(IN)
(IN)
(IN)
AV - I N 2 |
| R | |||||
|
|
|
|
| |||
| AUDIO | ||||||
|
|
|
|
| L |
| |
| COMPONENT | ||||||
|
|
|
| Y |
| ||
|
|
|
|
| Pb | ||
|
|
|
|
| Pr | ||
|
|
|
|
| R | ||
| AU | DIO | |||||
|
|
|
|
| L | ||
AV | EO | ||||||
VID | |||||||
|
| ||||||
|
| DEO | |||||
|
|
|
|
| |||
|
|
| AN | T | |||
|
|
|
| ||||
HEA | D | PHO | NE | ||||
|
| ||||||
|
|
|
|
|
| ||
Rear of this TV
OPERATIONS
FRONT PANEL FUNCTION
Note:
●The AUDIO L jack is for mono input. The sound is heard from both speakers. Use this jack for connecting monaural audio equipment.
●The
MENU Y VOLUME X L CHANNEL K SELECT POWER
VIDEO2 INPUT
ex.
(OUT)
Audio Cable
Video Camera
| (OUT) |
Video Game | Component |
| |
| Video Cable |
(IN) | AV - IN 2 |
| R | ||||
|
|
|
|
| |||
|
| AUDIO | |||||
|
|
|
|
|
| L |
|
|
| COMPONENT | |||||
|
|
|
|
| Y |
| |
(IN) |
|
|
|
|
| Pb | |
|
|
|
|
|
| ||
|
|
|
|
|
| Pr | |
|
|
|
|
|
| R | |
|
| AU | DIO | ||||
|
|
|
|
|
| L | |
| AV |
|
| ||||
| VIDEO | ||||||
|
|
| |||||
|
|
| DEO | ||||
|
|
|
| AN | T | ||
|
|
|
|
| |||
| HEA | D | PHO | NE | |||
|
|
| |||||
|
|
|
|
|
| ||
|
|
|
|
|
|
| |
Rear of this TV
MENU Y VOLUME X | L CHANNEL K SELECT POWER |
POWER button
To turn TV on/off
SELECT button
To select input mode
CHANNEL L/ K buttons
To select channels
To select an item on the TV menu
VOLUME Y/ X buttons
To adjust volume
To change the setting on the TV menu
X : To advance to the next on the TV menu
MENU button
To view
Infrared Sensor Window
Note:
Note:
●The TV can accept a 480i (interlaced), 480p (progressive) or 1080i (interlaced) video signal.
●If some digits appear in the corner of the screen when the TV is turned on for the first time, press [POWER] without unplugging the power cord.
