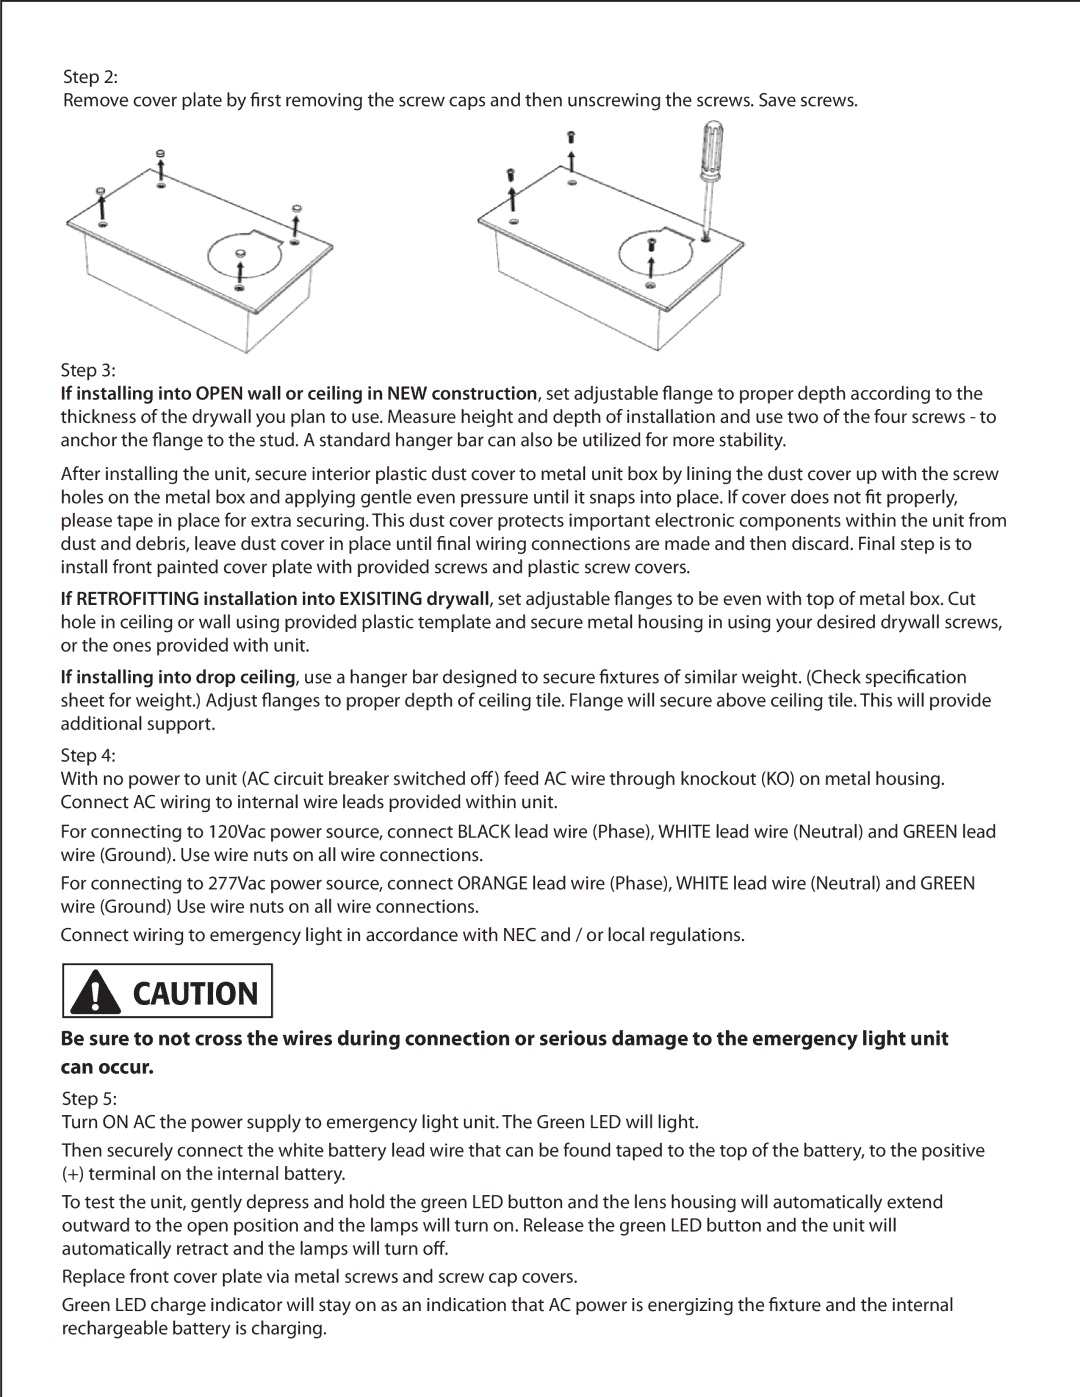
Step 2:

Remove cover plate by first removing the screw caps and then unscrewing the screws. Save screws.

Step 3:

If installing into OPEN wall or ceiling in NEW construction, set adjustable flange to proper depth according to the thickness of the drywall you plan to use. Measure height and depth of installation and use two of the four screws - to anchor the flange to the stud. A standard hanger bar can also be utilized for more stability.

After installing the unit, secure interior plastic dust cover to metal unit box by lining the dust cover up with the screw holes on the metal box and applying gentle even pressure until it snaps into place. If cover does not fit properly, please tape in place for extra securing. This dust cover protects important electronic components within the unit from dust and debris, leave dust cover in place until final wiring connections are made and then discard. Final step is to install front painted cover plate with provided screws and plastic screw covers.

If RETROFITTING installation into EXISITING drywall, set adjustable flanges to be even with top of metal box. Cut hole in ceiling or wall using provided plastic template and secure metal housing in using your desired drywall screws, or the ones provided with unit.

If installing into drop ceiling, use a hanger bar designed to secure fixtures of similar weight. (Check specification sheet for weight.) Adjust flanges to proper depth of ceiling tile. Flange will secure above ceiling tile. This will provide additional support.

Step 4:

With no power to unit (AC circuit breaker switched off) feed AC wire through knockout (KO) on metal housing. Connect AC wiring to internal wire leads provided within unit.

For connecting to 120Vac power source, connect BLACK lead wire (Phase), WHITE lead wire (Neutral) and GREEN lead wire (Ground). Use wire nuts on all wire connections.

For connecting to 277Vac power source, connect ORANGE lead wire (Phase), WHITE lead wire (Neutral) and GREEN wire (Ground) Use wire nuts on all wire connections.

Connect wiring to emergency light in accordance with NEC and / or local regulations.

CAUTION

Be sure to not cross the wires during connection or serious damage to the emergency light unit can occur.

Step 5:

Turn ON AC the power supply to emergency light unit. The Green LED will light.

Then securely connect the white battery lead wire that can be found taped to the top of the battery, to the positive

(+) terminal on the internal battery.

To test the unit, gently depress and hold the green LED button and the lens housing will automatically extend outward to the open position and the lamps will turn on. Release the green LED button and the unit will automatically retract and the lamps will turn off.

Replace front cover plate via metal screws and screw cap covers.

Green LED charge indicator will stay on as an indication that AC power is energizing the fixture and the internal rechargeable battery is charging.

Page 2
Image 2
Sylvania SC36, SC11 installation instructions

SC11, SC36 specifications

The Sylvania SC36 and SC11 are two prominent fixtures in the arena of compact fluorescent lighting solutions. Their design philosophy emphasizes energy efficiency, longevity, and superior performance, making them ideal choices for a variety of residential and commercial applications.

Beginning with the Sylvania SC36, this model boasts a powerful output of 36 watts while maintaining a compact size. The SC36 is engineered to replace traditional incandescent bulbs, providing the same level of illumination with significantly lower energy consumption. One of its key features is the high Color Rendering Index (CRI) rating, typically around 82, which ensures that colors appear more vibrant and true to life. This attribute makes the SC36 a favored option for retail spaces and art galleries where color accuracy is paramount.

Another noteworthy characteristic of the SC36 is its long lifespan, which can reach up to 10,000 hours. This longevity reduces the frequency of bulb replacements, leading to lower overall maintenance costs. The SC36 also includes advanced thermal management technologies, allowing it to operate efficiently without generating excessive heat, contributing to the overall comfort of the environment where it is installed.

Turning to the Sylvania SC11, this model is engineered for efficiency within smaller settings. It operates at 11 watts and is often employed in fixtures that require a lower light output, such as table lamps or recessed lighting. The SC11 maintains a remarkable balance of brightness while minimizing electricity use, aligning perfectly with modern sustainability goals. Like the SC36, the SC11 also has a robust CRI, ensuring excellent color fidelity despite its smaller form factor.

Both models utilize a technology known as rapid start, which allows for quick lamp ignition, reducing flicker and promoting instant brightness. The SC36 and SC11 are also designed to work seamlessly with standard ballast systems, making them straightforward to install and integrate into existing fixtures.

In conclusion, the Sylvania SC36 and SC11 represent a blend of efficiency, durability, and performance. Their innovative features and technologies make them suitable for a wide range of applications, effectively addressing the needs for both energy savings and high-quality lighting. As the demand for sustainable lighting solutions continues to grow, these models stand out as reliable choices for environmentally conscious consumers.