10
EMPLACEMENT DES COMMANDES
Notes on setting alarm:
Setting Alarm
Setting The Clock
IMPORTANT INFORMATION REQUIRED THE FCC
1.Alarm On/Off
2.Hour Set
3.Minute Set
4.Snooze Button
4.Time Set
6.Alarm Set
7.IPOD Jack
8.Power on/off
9.Speaker
10.LCD Display
11.FM/AM Tuning Knob
12.FM/AM Switching Button
13.AUX IN
14.AC 7V IN
15.Function Sitch (Ipod/Radio/Buzzer)
16.Volume Control Knob
LOCATION OF CONTROLS

OPERATION MANUAL

CLOCK RADIO

SIP292

Listening to Your Songs on iPod

1.To Listening to music,switch the button to iPod playback and “iPod” icon will be light on the LCD displayer.

2.Insert your iPod into the universal dock,Press the button on iPod to play the music.

9

1

2

3

4

5

6

7

8

9


Charging Your iPod


Your iPod will always be charging until reaching the full charge mode..


Listening to Your Radio Station


1.To turn the radio on,swith the button to radio playback and “Radio” icon will be light on the


LCD display.


11

12

13 14

15

16

2.To select AM or FM, switch the “AM/FM” button.


3.To tune in a desired station,rotate the “TUNING” knob.


10


Listening to Other Audio Device


lnsert one end of 3.5mm audio cable(not included) into the headphone or line-out jack on the


audio device, then insert another end of audio cable into the AUX jack , located on the rear of unit.

This device complies with Part 15 of FCC Rules.Operation is subject to the following two


Using the Alarm Function

conditions:(1) this device may not cause harmful interference;and(2) this device must accept any


interference received,including interference that may cause undesirable operation.


1.To preview the alarm time, press the “alarm” button once in power-off status.

NOTE:This equipment has been testedand found to comply with the limits for a Class B digital

2.To activate or deactivate the alarm, press the “al-on/off” button,the “AL' icon will be light on or

off on the LCD displayer.

device,pursuant to Part 15 of the FCC rules. These limits are designed to provide reasonable

3.To snooze, press “snooze” button, following the sounding of the alarm. The alarm will then shut

protection against harmful interference in a residential installation.


off and will sound again in 5 minute, You will have the opportunity to repeat this cycle 12 times

This equipment generates uses and can radiate radio frequency energy and,if not installed and

during one hour allotted alarm cycle.

used in accordance with the insrtuctions, may cause harmful interference to radio elevation

4.To turn the alarm off, press the “power” or “al-on/off” button(only in Radio/Buzzer mode), lf all

reception,which can be determined by turning the equipment off and on. The user is encouraged

settings remain the same,the alarm will turn on the following day at the same time.

to try to correct the interference by one or more of following measures.


Reorient or relocate the receiving antenna.


Notes on Alarm Function

Increase the separation between the equipment and receiver.


Connect the equipment into an outlet on a circuit different from that to which the receiver is

1.Snooze function is no effective in ipod mode.

connected. Consult the dealer or an experienced radio/TV technician for help.


2.When alarm is on in ipod mode,to turn off alarm,press “power” button,”al-on/off” button is no use.


3.Set your ipod to the repeat mode if you re selected wake to ipod, and your ipod has less then


one hour of songs.


To Set the time, Locate the “Time” button, press and hold the “Time” button down,and press

4.ln order to wake to ipod or radio ,the unit must be powered off . lf it is in the ipod/radio play

mode,No alarm will sound.

“Hour” or “Min” button to adjust hour or minute. Time is displayed in the 12-Hour format. An icon


to the left of the display indicated PM.


Set up the unit to work with the AC adapter

1.To set the Alarm,press and hold “Alarm ” button, and press “Hour ” or “Min” button to adjust

Attach AC adaptor cable to AC 7V jack on the rear of unit, and plug the other end into a wall socket.


hour or minute,Time is displayed in the 12-hour format. An icon to the left of the display


Specifications


indicated PM.


2.Switch”wake to …” button and select the option for sound source: Ipod,radio or buzzer.


Receiver FrequencyAM 530-1710KHz


FM 87.5-108MHz


Receiver SensitivityAM≤65 dB

1.The user only can set the clock or alarm in power-off starus.


FM≤22 dB


Receiver S/N:

Am≤25 dB

2.To make the alarm setting effective, Before setting alarm time,please note to make”AL”icon in


FM≤40 dB

the LCD displayer is in light-off status,after setting the new alarm time,then press “al-on/off”

Power output2 * 0.18 W (1KHz)

button to make alarm on.


AUX INPUT SENSITIVITY: 380 mV (1K 0Db)

3.Take notice of the adjusted volume level and make sure it is ste at an appropriate level for

Power Input for AC adaptor Primary : AC 120V, Secondary : AC 7V

waking up.


4.When snooze function in Radio/Buzzer mode is activated,setting new Alarm will be not effective.


1


2

MANUEL D'UTILISATION

CLOCK RADIO

SIP292

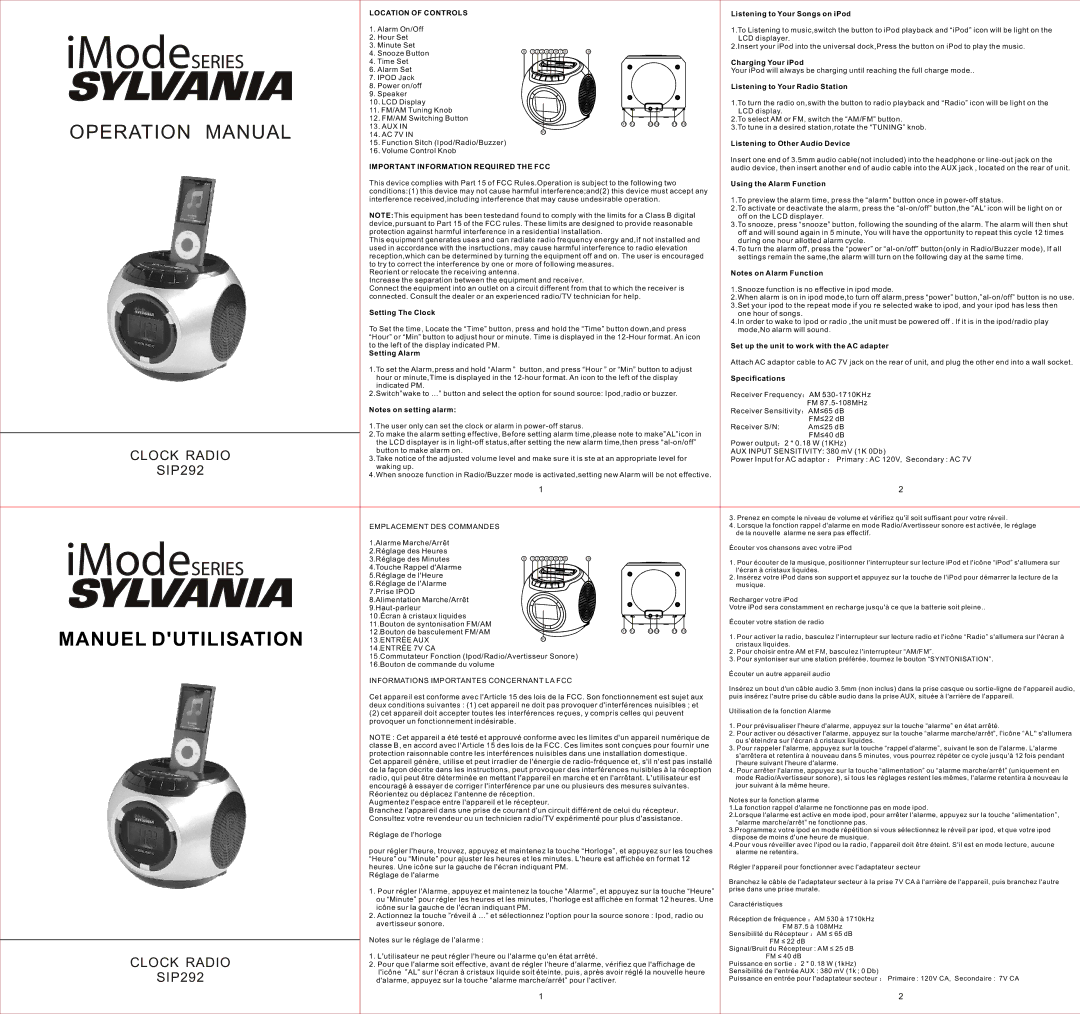
1.Alarme Marche/Arrêt


2.Réglage des Heures


3.Réglage des Minutes

9 1 2 3 4 5 6 7 8

9


4.Touche Rappel d'Alarme


5.Réglage de l'Heure


6.Réglage de l'Alarme


7.Prise IPOD


8.Alimentation Marche/Arrêt


9.Haut-parleur


10.Écran à cristaux liquides


11.Bouton de syntonisation FM/AM


12.Bouton de basculement FM/AM


11

12

13 14

15

16


13.ENTRÉE AUX 14.ENTRÉE 7V CA

15.Commutateur Fonction (Ipod/Radio/Avertisseur Sonore) 16.Bouton de commande du volume

INFORMATIONS IMPORTANTES CONCERNANT LA FCC

Cet appareil est conforme avec l'Article 15 des lois de la FCC. Son fonctionnement est sujet aux deux conditions suivantes : (1) cet appareil ne doit pas provoquer d'interférences nuisibles ; et

(2)cet appareil doit accepter toutes les interférences reçues, y compris celles qui peuvent provoquer un fonctionnement indésirable.

NOTE : Cet appareil a été testé et approuvé conforme avec les limites d'un appareil numérique de classe B, en accord avec l'Article 15 des lois de la FCC. Ces limites sont conçues pour fournir une protection raisonnable contre les interférences nuisibles dans une installation domestique.

Cet appareil génère, utilise et peut irradier de l'énergie de radio-fréquence et, s'il n'est pas installé de la façon décrite dans les instructions, peut provoquer des interférences nuisibles à la réception radio, qui peut être déterminée en mettant l'appareil en marche et en l'arrêtant. L'utilisateur est encouragé à essayer de corriger l'interférence par une ou plusieurs des mesures suivantes. Réorientez ou déplacez l'antenne de réception.

Augmentez l'espace entre l'appareil et le récepteur.

Branchez l'appareil dans une prise de courant d'un circuit différent de celui du récepteur. Consultez votre revendeur ou un technicien radio/TV expérimenté pour plus d'assistance.

Réglage de l'horloge

pour régler l'heure, trouvez, appuyez et maintenez la touche “Horloge”, et appuyez sur les touches “Heure” ou “Minute” pour ajuster les heures et les minutes. L'heure est affichée en format 12 heures. Une icône sur la gauche de l'écran indiquant PM.

Réglage de l'alarme

1.Pour régler l'Alarme, appuyez et maintenez la touche “Alarme”, et appuyez sur la touche “Heure” ou “Minute” pour régler les heures et les minutes, l'horloge est affichée en format 12 heures. Une icône sur la gauche de l'écran indiquant PM.

2.Actionnez la touche ”réveil à …” et sélectionnez l'option pour la source sonore : Ipod, radio ou avertisseur sonore.

Notes sur le réglage de l'alarme :

1.L'utilisateur ne peut régler l'heure ou l'alarme qu'en état arrêté.

2.Pour que l'alarme soit effective, avant de régler l'heure d'alarme, vérifiez que l'affichage de

l'icône ”AL” sur l'écran à cristaux liquide soit éteinte, puis, après avoir réglé la nouvelle heure d'alarme, appuyez sur la touche “alarme marche/arrêt” pour l'activer.

1

3.Prenez en compte le niveau de volume et vérifiez qu'il soit suffisant pour votre réveil.

4.Lorsque la fonction rappel d'alarme en mode Radio/Avertisseur sonore est activée, le réglage de la nouvelle alarme ne sera pas effectif.

Écouter vos chansons avec votre iPod

1.Pour écouter de la musique, positionner l'interrupteur sur lecture iPod et l'icône “iPod” s'allumera sur l'écran à cristaux liquides.

2.Insérez votre iPod dans son support et appuyez sur la touche de l'iPod pour démarrer la lecture de la musique.

Recharger votre iPod

Votre iPod sera constamment en recharge jusqu'à ce que la batterie soit pleine..

Écouter votre station de radio

1.Pour activer la radio, basculez l'interrupteur sur lecture radio et l'icône “Radio” s'allumera sur l'écran à cristaux liquides.

2.Pour choisir entre AM et FM, basculez l'interrupteur “AM/FM”.

3.Pour syntoniser sur une station préférée, tournez le bouton “SYNTONISATION”.

Écouter un autre appareil audio

Insérez un bout d'un câble audio 3.5mm (non inclus) dans la prise casque ou sortie-ligne de l'appareil audio, puis insérez l'autre prise du câble audio dans la prise AUX, située à l'arrière de l'appareil.

Utilisation de la fonction Alarme

1.Pour prévisualiser l'heure d'alarme, appuyez sur la touche “alarme” en état arrêté.

2.Pour activer ou désactiver l'alarme, appuyez sur la touche “alarme marche/arrêt”, l'icône “AL'' s'allumera ou s'éteindra sur l'écran à cristaux liquides.

3.Pour rappeler l'alarme, appuyez sur la touche “rappel d'alarme”, suivant le son de l'alarme. L'alarme s'arrêtera et retentira à nouveau dans 5 minutes, vous pourrez répéter ce cycle jusqu'à 12 fois pendant l'heure suivant l'heure d'alarme.

4.Pour arrêter l'alarme, appuyez sur la touche “alimentation” ou “alarme marche/arrêt” (uniquement en mode Radio/Avertisseur sonore), si tous les réglages restent les mêmes, l'alarme retentira à nouveau le jour suivant à la même heure.

Notes sur la fonction alarme

1.La fonction rappel d'alarme ne fonctionne pas en mode ipod.

2.Lorsque l'alarme est active en mode ipod, pour arrêter l'alarme, appuyez sur la touche “alimentation”, “alarme marche/arrêt” ne fonctionne pas.

3.Programmez votre ipod en mode répétition si vous sélectionnez le réveil par ipod, et que votre ipod dispose de moins d'une heure de musique.

4.Pour vous réveiller avec l'ipod ou la radio, l'appareil doit être éteint. S'il est en mode lecture, aucune alarme ne retentira.

Régler l'appareil pour fonctionner avec l'adaptateur secteur

Branchez le câble de l'adaptateur secteur à la prise 7V CA à l'arrière de l'appareil, puis branchez l'autre prise dans une prise murale.

Caractéristiques

Réception de fréquence AM 530 à 1710kHz FM 87.5 à 108MHz

Sensibilité du Récepteur AM ≤ 65 dB FM ≤ 22 dB

Signal/Bruit du Récepteur : AM ≤ 25 dB FM ≤ 40 dB

Puissance en sortie 2 * 0.18 W (1kHz) Sensibilité de l'entrée AUX : 380 mV (1k ; 0 Db)

Puissance en entrée pour l'adaptateur secteur Primaire : 120V CA, Secondaire : 7V CA

2

Page 1
Image 1
Sylvania SIP292 operation manual Listening to Your Songs on iPod, Charging Your iPod, Listening to Your Radio Station

SIP292 specifications

The Sylvania SIP292 is a high-performance LED bulb that has gained recognition for its exceptional energy efficiency and innovative technology. Designed to replace traditional incandescent bulbs, the SIP292 offers a sustainable lighting solution without compromising on brightness or quality.

One of the most notable features of the Sylvania SIP292 is its exceptional energy efficiency. Consuming only a fraction of the energy compared to conventional incandescent bulbs, it translates to significant savings on electricity bills over time. This makes it an eco-friendly choice for both residential and commercial applications. The SIP292 has a low wattage, typically around 9 watts, while producing an impressive output of lumens comparable to a 60-watt incandescent bulb.

The SIP292 utilizes advanced LED technology, ensuring a longer lifespan than traditional lighting fixtures. With a rated life of up to 25,000 hours, users can expect years of reliable service without the need for frequent replacements. This durability not only reduces maintenance costs but also minimizes waste, contributing to a more sustainable environment.

Another key characteristic of the SIP292 is its versatility in design. It is available in various color temperatures, allowing users to choose between warm white, cool white, and daylight options. This flexibility makes it suitable for a wide range of applications, from cozy living spaces to work environments requiring enhanced visibility.

The SIP292 is also designed with a sleek and modern aesthetic, ensuring it blends seamlessly into any setting. Its compact form factor allows for easy installation in standard light fixtures, making it a convenient option for upgrading existing lighting systems.

Moreover, the Sylvania SIP292 is equipped with dimmable capabilities, providing users with control over their lighting ambiance. This feature is particularly beneficial for creating personalized lighting conditions in different scenarios, whether for relaxation or enhanced productivity.

In summary, the Sylvania SIP292 sets a new standard for LED lighting with its energy-efficient performance, long lifespan, versatile color options, and sleek design. It represents a smart choice for anyone looking to transition to a more sustainable lighting solution without sacrificing quality or aesthetics. With the SIP292, you can illuminate your spaces with confidence while contributing to a greener future.