Model: PMD8141
Allen Wrench: (1) Allen Wrench (5mm hex key) is stored in your saw. This is needed to insert and/or change your saw blade.
NOTE: You can depress the
Trigger Switch: To turn your saw ON, depress the
Variable Speed: Your saw has a variable speed switch that delivers higher speed with increased trigger pressure. Speed is controlled by the amount of trigger switch depression.
Types of Application that are right for this saw:
•Cutting all types of wood
•Cutting masonite and plastic
•Cutting drywall
•Cutting metals such as sheet steel, pipe, steel rods, aluminum, brass and copper.
Blade Selection: To obtain the best performance from your saw it is important to select a specific blade for the particular application and type of material you wish to cut. By doing this you will get a smoother faster cut and prolong blade life. Replacement blades for this saw are available at your nearest dealer or by contacting us at the number below.
THE ASSEMBLY OF THIS SAW:
WARNING: Always remove the battery pack from your saw when you are assembling parts, making adjustments, assembling or removing blades, cleaning or when not in use. Removing the battery pack will prevent accidental starting that could cause serious personal injury.
To remove/attach Battery Pack (Figure 2):
To Remove:
1.Locate latches on side of the battery pack and depress both sides to release battery pack from your saw.
2.Remove the battery pack from your saw.
To Attach:
1.Place the battery pack in your saw by
aligning the raised ribs on the battery pack with the groove in the saw’s battery port.
2.Make sure that the latches on each side of the battery pack snap into place and the battery pack is secured to the saw before beginning operation.
Owner’s Manual
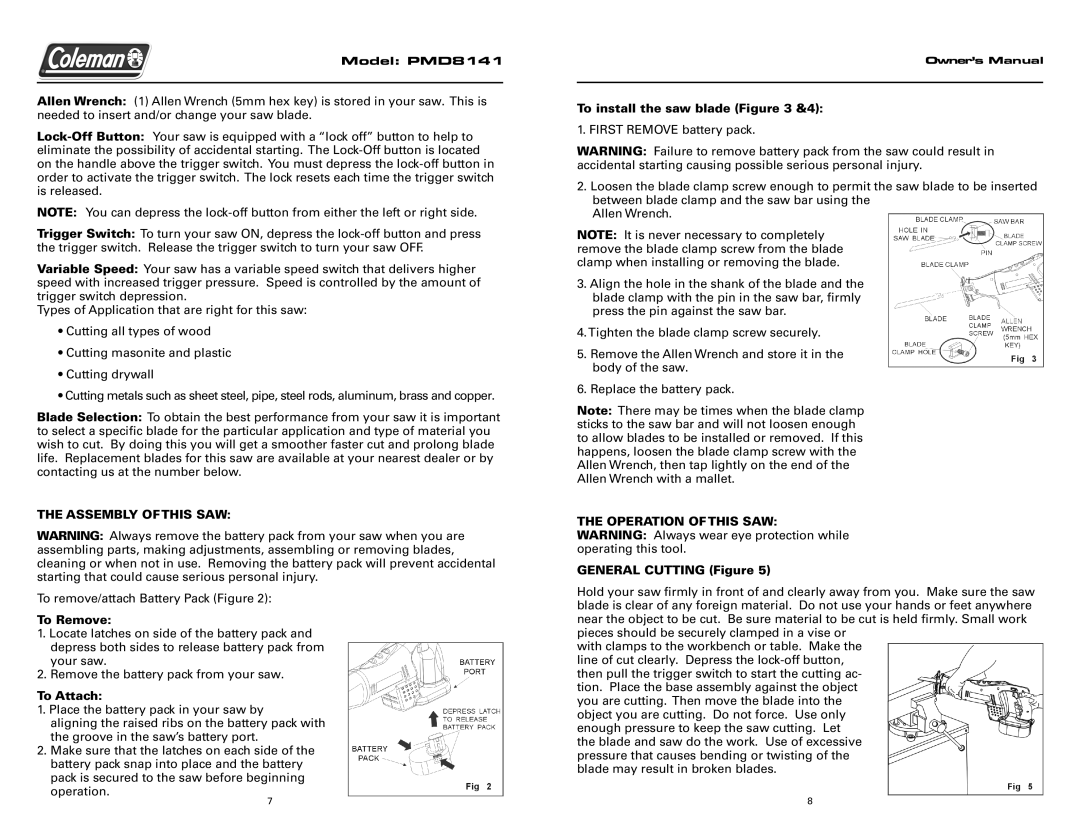
To install the saw blade (Figure 3 &4):
1. FIRST REMOVE battery pack.
WARNING: Failure to remove battery pack from the saw could result in accidental starting causing possible serious personal injury.
2.Loosen the blade clamp screw enough to permit the saw blade to be inserted between blade clamp and the saw bar using the
Allen Wrench.
NOTE: It is never necessary to completely remove the blade clamp screw from the blade clamp when installing or removing the blade.
3.Align the hole in the shank of the blade and the blade clamp with the pin in the saw bar, firmly press the pin against the saw bar.
4.Tighten the blade clamp screw securely.
5.Remove the Allen Wrench and store it in the body of the saw.
6.Replace the battery pack.
Note: There may be times when the blade clamp sticks to the saw bar and will not loosen enough to allow blades to be installed or removed. If this happens, loosen the blade clamp screw with the Allen Wrench, then tap lightly on the end of the Allen Wrench with a mallet.
THE OPERATION OF THIS SAW: WARNING: Always wear eye protection while operating this tool.
GENERAL CUTTING (Figure 5)
Hold your saw firmly in front of and clearly away from you. Make sure the saw blade is clear of any foreign material. Do not use your hands or feet anywhere near the object to be cut. Be sure material to be cut is held firmly. Small work pieces should be securely clamped in a vise or
with clamps to the workbench or table. Make the line of cut clearly. Depress the
7 | 8 |