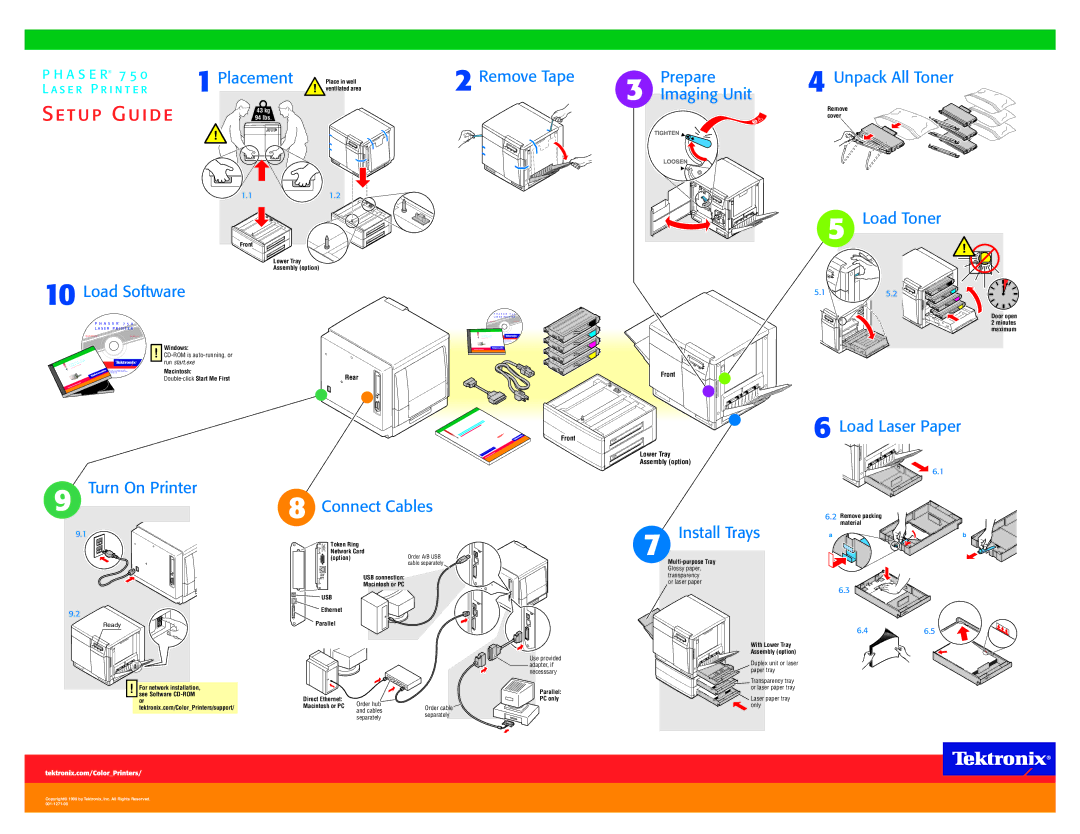
P H A S E R® 7 5 0 | 1 Placement | Place in well | 2 | Remove Tape |
L A S E R P R I N T E R | ventilated area |
|
S ETUP G UIDE | 43 kg |
| 94 lbs. |
|
|
|
| 1.1 | 1.2 |
|
|
|
| Front |
|
|
|
|
|
| Lower Tray |
|
|
|
|
| Assembly (option) |
10 Load Software |
| ||||
|
|
|
|
| P H A S E R 7 5 0 |
|
|
|
|
| L A S E R P R I N T E R |
|
| P H A S E R | 7 5 0 |
|
|
|
| L A S E R P R I N T E R |
|
| |
|
| PRINTER SOFTWARE | Version 1.0 |
|
|
|
|
| ! | Windows: |
|
PLHAASER | P | 5 0 |
| ||
7 TER |
| run start.exe |
| ||
| R |
|
|
| |
S E |
| RIN |
|
|
|
|
|
|
| Macintosh: | Rear |
|
|
|
| ||
Front
Prepare
3 Imaging Unit
Front
Lower Tray
Assembly (option)
4 Unpack All Toner
Remove cover
5 Load Toner
5.1![]() 5.2
5.2
Door open 2 minutes maximum
6 Load Laser Paper
6.1
9 Turn On Printer
9.1
8 Connect Cables | |
Token Ring |
|
Network Card | Order A/B USB |
(option) | |
| cable separately |
7 Install Trays
6.2Remove packing
material
a | b |
USB connection:
Macintosh or PC
USB |
9.2 | Ethernet |
| |
Ready | Parallel |
! | For network installation, |
|
|
|
see Software | Direct Ethernet: |
|
| |
| or | Order hub |
| |
| tektronix.com/Color_Printers/support/ | Macintosh or PC | Order cable | |
| and cables |
separatelyseparately
Use provided adapter, if necesssary
Parallel:
PC only
Glossy paper, transparency or laser paper
With Lower Tray
Assembly (option)
Duplex unit or laser
![]() paper tray
paper tray
Transparency tray or laser paper tray
![]() Laser paper tray only
Laser paper tray only
6.3![]()
![]()
![]()
6.46.5 ![]()
![]()
Copyright© 1999 by Tektronix, Inc. All Rights Reserved.