Using the document camera
Please read this chapter if the model you purchased includes a document camera.
■Uninstalling the camera
1) Place the folded document | 2) Slide the connect lever in | 3) Pressing the lock lever in |
camera with the bottom | the direction of an arrow. | the direction of an arrow, |
side up. |
| slide the document |
|
| camera. |
|
|
|
■Installing the camera
1) Place the folded document | 2) Align the four registration | 3) Slide the document |
camera with the bottom | marks. | camera in the direction of |
side up. |
| an arrow until it clicks. |
|
|
|
4)Slide the connect lever in the direction of an arrow.
 PRECAUTIONS
•Before mounting or dismounting the document camera, disconnect the power plug.
•Place a soft cloth beneath the projector when mounting or dismounting the camera.
•Do not dismount or mount the document camera while the projector is upright or kept in the air.
•Before mounting the camera, confirm that the interconnection connector is closed with the connect lever. If you attempt to mount the camera with the connector being protruded, connector may be damaged.
•When mounting the camera, be sure to slide the document camera until it is locked with click sound.
•Confirm the four registration stays are aligned before sliding the camera.
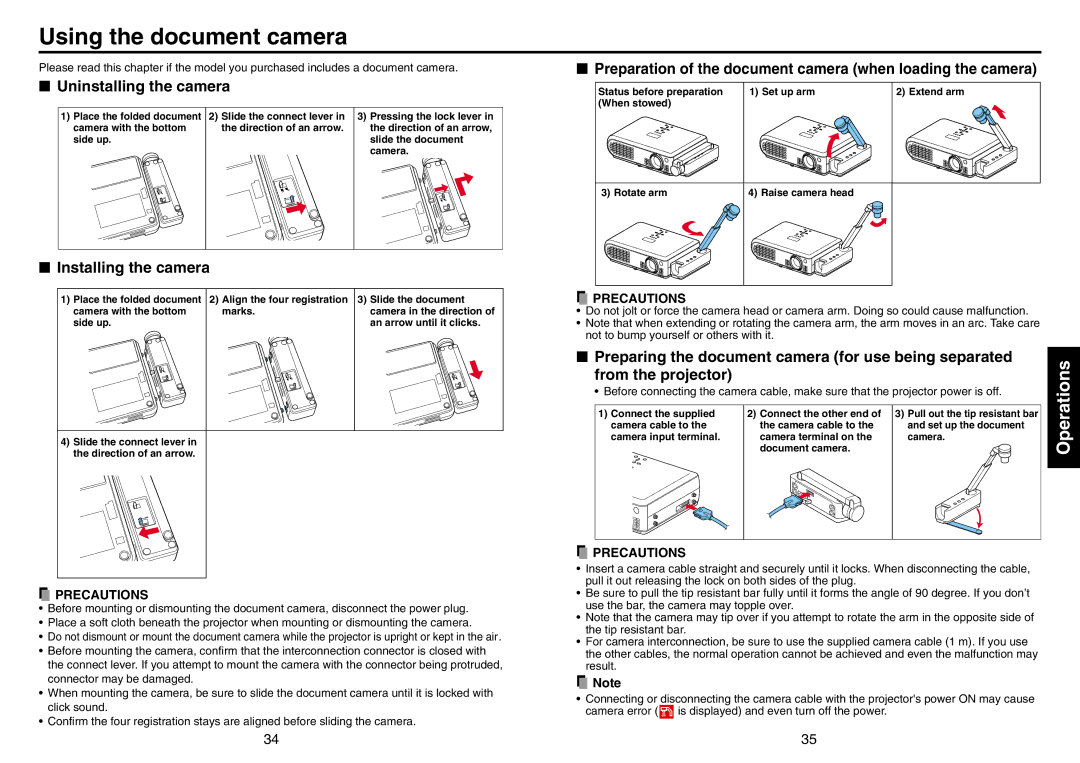
■Preparation of the document camera (when loading the camera)
Status before preparation | 1) Set up arm | 2) Extend arm |
(When stowed) |
|
|
3) Rotate arm | 4) Raise camera head |
|
 PRECAUTIONS
•Do not jolt or force the camera head or camera arm. Doing so could cause malfunction.
•Note that when extending or rotating the camera arm, the arm moves in an arc. Take care not to bump yourself or others with it.
■Preparing the document camera (for use being separated from the projector)
• Before connecting the camera cable, make sure that the projector power is off.
1) Connect the supplied | 2) Connect the other end of | 3) Pull out the tip resistant bar | |
camera cable to the | the camera cable to the | and set up the document | |
camera input terminal. | camera terminal on the | camera. | |
|
| document camera. |
|
|
|
|
|
|
|
|
|
|
|
|
|
 PRECAUTIONS
•Insert a camera cable straight and securely until it locks. When disconnecting the cable, pull it out releasing the lock on both sides of the plug.
•Be sure to pull the tip resistant bar fully until it forms the angle of 90 degree. If you don’t use the bar, the camera may topple over.
•Note that the camera may tip over if you attempt to rotate the arm in the opposite side of the tip resistant bar.
•For camera interconnection, be sure to use the supplied camera cable (1 m). If you use the other cables, the normal operation cannot be achieved and even the malfunction may result.
![]() Note
Note
•Connecting or disconnecting the camera cable with the projector's power ON may cause camera error (![]() is displayed) and even turn off the power.
is displayed) and even turn off the power.
Operations
34 | 35 |