Step 1
PIPING CHECK AND ROUGH-IN
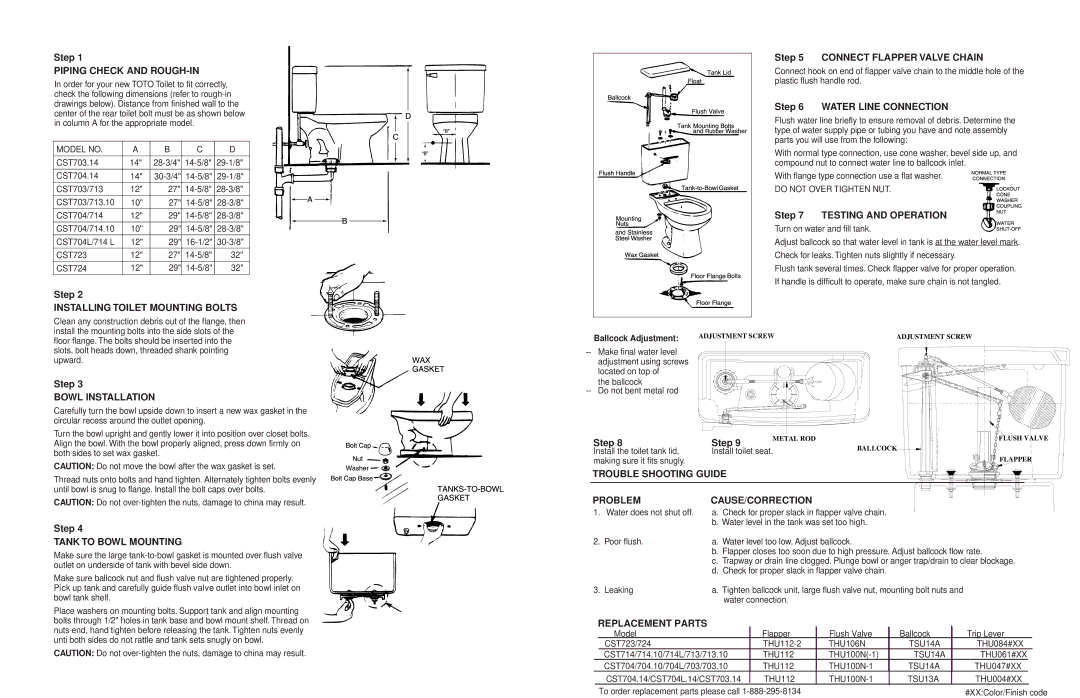
In order for your new TOTO Toilet to fit correctly, check the following dimensions (refer to
MODEL NO. | A | B | C | D |
|
|
|
|
|
CST703.14 | 14" | |||
CST704.14 | 14" | |||
CST703/713 | 12" | 27" | ||
CST703/713.10 | 10" | 27" | ||
CST704/714 | 12" | 29" | ||
CST704/714.10 | 10" | 29" | ||
CST704L/714 L | 12" | 29" | ||
CST723 | 12" | 27" | 32" | |
CST724 | 12" | 29" | 32" |
Step 2
INSTALLING TOILET MOUNTING BOLTS
Step 5 CONNECT FLAPPER VALVE CHAIN
Connect hook on end of flapper valve chain to the middle hole of the plastic flush handle rod.
Step 6 WATER LINE CONNECTION
Flush water line briefly to ensure removal of debris. Determine the type of water supply pipe or tubing you have and note assembly parts you will use from the following:
With normal type connection, use cone washer, bevel side up, and compound nut to connect water line to ballcock inlet.
With flange type connection use a flat washer.
DO NOT OVER TIGHTEN NUT.
Step 7 TESTING AND OPERATION ![]()
![]()
![]()
![]() Turn on water and fill tank.
Turn on water and fill tank.![]()
![]()
![]()
![]()
![]()
![]()
![]()
![]()
![]() Adjust ballcock so that water level in tank is at the water level mark. Check for leaks. Tighten nuts slightly if necessary.
Adjust ballcock so that water level in tank is at the water level mark. Check for leaks. Tighten nuts slightly if necessary.
Flush tank several times. Check flapper valve for proper operation. If handle is difficult to operate, make sure chain is not tangled.
Clean any construction debris out of the flange, then install the mounting bolts into the side slots of the floor flange. The bolts should be inserted into the slots, bolt heads down, threaded shank pointing upward.
Step 3
BOWL INSTALLATION
Carefully turn the bowl upside down to insert a new wax gasket in the circular recess around the outlet opening.
Turn the bowl upright and gently lower it into position over closet bolts. Align the bowl. With the bowl properly aligned, press down firmly on both sides to set wax gasket.
CAUTION: Do not move the bowl after the wax gasket is set.
Thread nuts onto bolts and hand tighten. Alternately tighten bolts evenly until bowl is snug to flange. Install the bolt caps over bolts.
Ballcock Adjustment: | ADJUSTMENT SCREW |
–Make final water level adjustment using screws located on top of
the ballcock
–Do not bent metal rod
Step 8 | Step 9 | METAL ROD |
| ||
Install the toilet tank lid, | Install toilet seat. | |
making sure it fits snugly.
TROUBLE SHOOTING GUIDE
ADJUSTMENT SCREW
FLUSH VALVE
BALLCOCK
FLAPPER
CAUTION: Do not
Step 4
TANK TO BOWL MOUNTING
Make sure the large
Make sure ballcock nut and flush valve nut are tightened properly. Pick up tank and carefully guide flush valve outlet into bowl inlet on bowl tank shelf.
Place washers on mounting bolts. Support tank and align mounting bolts through 1/2" holes in tank base and bowl mount shelf. Thread on
nuts end, hand tighten before releasing the tank. Tighten nuts evenly unti both sides do not rattle and tank sets snugly on bowl.
CAUTION: Do not
PROBLEM | CAUSE/CORRECTION | |
1. | Water does not shut off. | a. Check for proper slack in flapper valve chain. |
|
| b. Water level in the tank was set too high. |
2. | Poor flush. | a. Water level too low. Adjust ballcock. |
|
| b. Flapper closes too soon due to high pressure. Adjust ballcock flow rate. |
|
| c. Trapway or drain line clogged. Plunge bowl or anger trap/drain to clear blockage. |
|
| d. Check for proper slack in flapper valve chain. |
3. | Leaking | a. Tighten ballcock unit, large flush valve nut, mounting bolt nuts and |
water connection.
REPLACEMENT PARTS
|
| Model | Flapper | Flush Valve | Ballcock | Trip Lever |
| ||
|
| CST723/724 | THU106N | TSU14A | THU084#XX |
| |||
|
| CST714/714.10/714L/713/713.10 | THU112 | TSU14A | THU061#XX |
| |||
|
| CST704/704.10/704L/703/703.10 | THU112 | TSU14A | THU047#XX |
| |||
|
| CST704.14/CST704L.14/CST703.14 | THU112 | TSU13A | THU004#XX |
| |||
|
| To order replacement parts please call |
|
| #XX:Color/Finish code | ||||