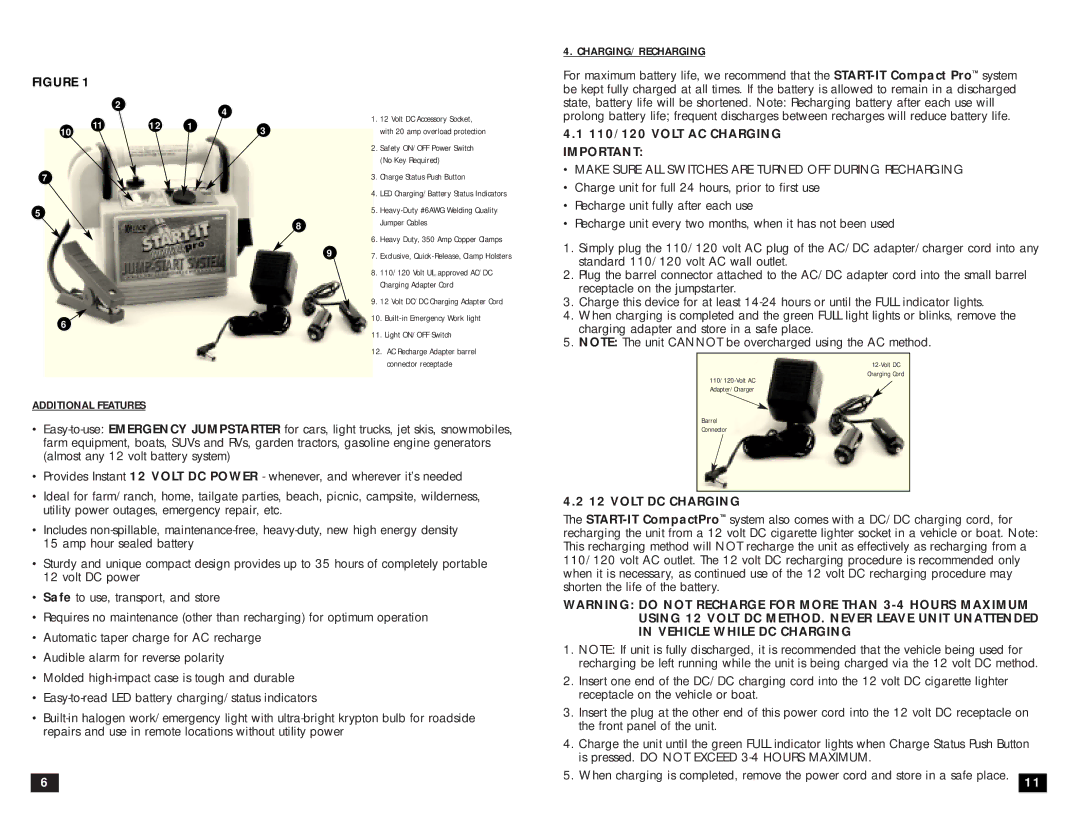
FIGURE 1
|
| 2 |
| 4 |
|
|
|
|
|
| 1. | 12 Volt DC Accessory Socket, | |
| 11 | 12 | 1 |
| ||
10 | 3 |
| with 20 amp overload protection | |||
|
|
|
| |||
|
|
|
|
| 2. | Safety ON/OFF Power Switch |
|
|
|
|
|
| (No Key Required) |
7 |
|
|
|
| 3. | Charge Status Push Button |
|
|
|
|
| 4. | LED Charging/Battery Status Indicators |
5 |
|
|
|
| 5. | |
|
|
|
| 8 |
| Jumper Cables |
|
|
|
| 6. | Heavy Duty, 350 Amp Copper Clamps | |
|
|
|
|
| ||
|
|
|
| 9 | 7. | Exclusive, |
|
|
|
|
| 8. | 110/120 Volt UL approved AC/DC |
|
|
|
|
|
| Charging Adapter Cord |
|
|
|
|
| 9. | 12 Volt DC/DC Charging Adapter Cord |
6 |
|
|
|
| 10. | |
|
|
|
|
|
| |
11. Light ON/OFF Switch
12. AC Recharge Adapter barrel
4. CHARGING/RECHARGING
For maximum battery life, we recommend that the
4.1110/120 VOLT AC CHARGING IMPORTANT:
• MAKE SURE ALL SWITCHES ARE TURNED OFF DURING RECHARGING
• Charge unit for full 24 hours, prior to first use
• Recharge unit fully after each use
• Recharge unit every two months, when it has not been used
1.Simply plug the 110/120 volt AC plug of the AC/DC adapter/charger cord into any standard 110/120 volt AC wall outlet.
2.Plug the barrel connector attached to the AC/DC adapter cord into the small barrel receptacle on the jumpstarter.
3.Charge this device for at least
4.When charging is completed and the green FULL light lights or blinks, remove the charging adapter and store in a safe place.
5.NOTE: The unit CANNOT be overcharged using the AC method.
connector receptacle
ADDITIONAL FEATURES
• |
farm equipment, boats, SUVs and RVs, garden tractors, gasoline engine generators |
(almost any 12 volt battery system) |
• Provides Instant 12 VOLT DC POWER - whenever, and wherever it’s needed |
• Ideal for farm/ranch, home, tailgate parties, beach, picnic, campsite, wilderness, |
utility power outages, emergency repair, etc. |
Adapter/Charger
Barrel
Connector
4.2 12 VOLT DC CHARGING
Charging Cord
• Includes |
15 amp hour sealed battery |
• Sturdy and unique compact design provides up to 35 hours of completely portable |
12 volt DC power |
• Safe to use, transport, and store |
• Requires no maintenance (other than recharging) for optimum operation |
• Automatic taper charge for AC recharge |
• Audible alarm for reverse polarity |
• Molded |
• |
• |
repairs and use in remote locations without utility power |
6
The
WARNING: DO NOT RECHARGE FOR MORE THAN
1.NOTE: If unit is fully discharged, it is recommended that the vehicle being used for recharging be left running while the unit is being charged via the 12 volt DC method.
2.Insert one end of the DC/DC charging cord into the 12 volt DC cigarette lighter receptacle on the vehicle or boat.
3.Insert the plug at the other end of this power cord into the 12 volt DC receptacle on the front panel of the unit.
4.Charge the unit until the green FULL indicator lights when Charge Status Push Button is pressed. DO NOT EXCEED
5.When charging is completed, remove the power cord and store in a safe place. 11
