CHARGING THE VECTORLITE DURING EITHER AC RECHARGE/OR DC RECHARGE:
1.Connect the charger to an appropriate power source (see below DC or AC Source).
2.Plug the charger's barrel connecter into the Recharge Port (see Figure 1).
3.Recharge for 10 hours maximum or until the green LED is lit.
4.After recharge, disconnect the barrel connector from the Recharge Port and store the adapter.
5.Disconnect charger and wait 5 minutes before use.
Charging from a DC Source
Plug the DC fused Recharge/Power Adapter (included) into the Recharge Port on the back of the spotlight body, and then insert the power plug into the accessory socket of your vehicle or other 12 VDC power source. Make sure the spotlight is OFF and the Trigger Switch is in the OFF position. Allow approximately
Charging from an AC Source
Recharging from an AC outlet requires the use of the AC/DC Recharge Adapter (See Figure 3). Make sure the AC outlet provides 110 to 120 VAC at 60 Hz.
Figures 2 | Figures 3 |
Caution: Use the supplied AC Recharge adapter only; do not substitute with any other.
AC Recharge requires the use of the supplied AC Recharge Adapter that supplies 12 volts DC. Charge for
5.PERIODIC MAINTENANCE
All batteries lose charge over time, especially when they are warm. AC recharge is recommended every two months, when not in frequent use. Use the AC recharger and charge for the recommend- ed time. If the unit has dirt on it, gently clean the outer surfaces of the spotlight unit with a soft cloth moistened with a mild solution of water and detergent. Periodically inspect the condition of recharge adapters, connectors, and wires. Replace any components that may have become worn or broken.
6.PARTS REPLACEMENT
Three parts are replaceable by users. The quartz halogen bulb and sealed lead acid battery are pro- prietary and are available through Vector Manufacturing. A substitute 6 volt H3 55 watt bulb may be used instead of a Vector bulb. These can also be purchased from popular automotive parts sup- pliers nationwide. The DC charging adapter fuse is also replaceable. Contact Vector Manufacturing's Technical Support Department for replacement parts and any additional information that you may need. They may be reached at (954)
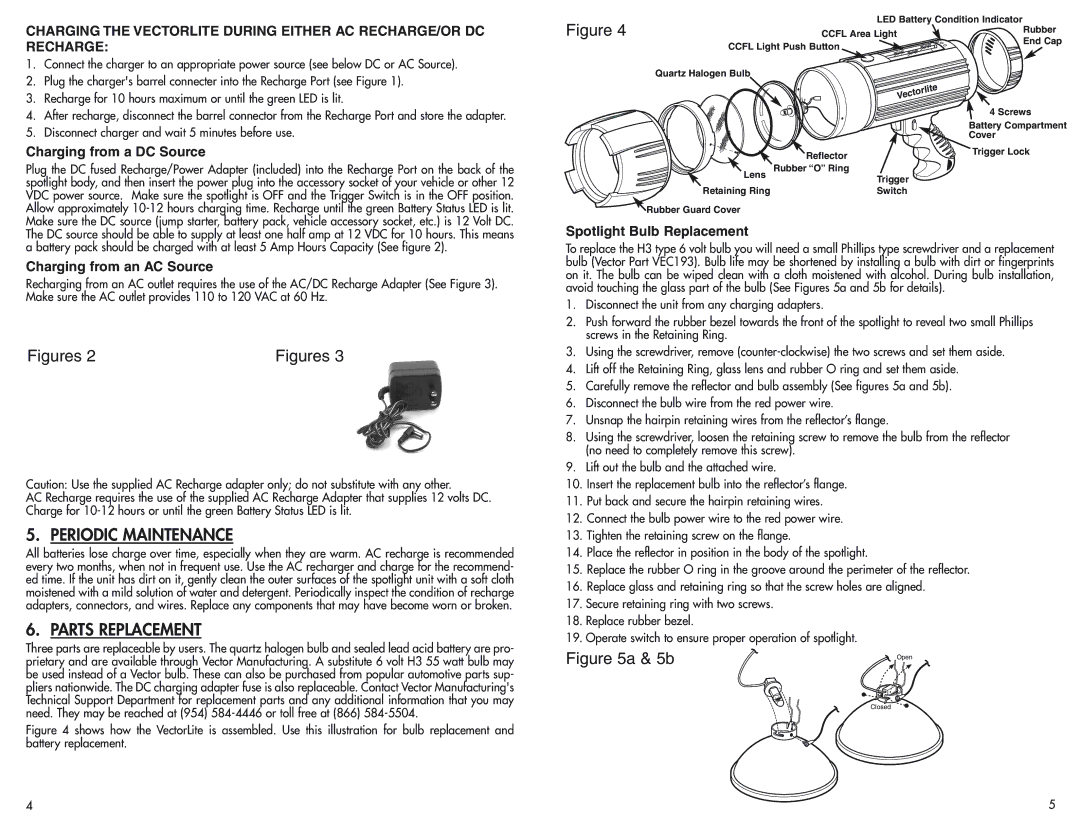
Figure 4 shows how the VectorLite is assembled. Use this illustration for bulb replacement and battery replacement.
Figure 4 | LED Battery Condition Indicator | |
CCFL Area Light | Rubber | |
CCFL Light Push Button | End Cap | |
| ||
Quartz Halogen Bulb |
|
|
|
| 4 Screws |
|
| Battery Compartment |
|
| Cover |
| Reflector | Trigger Lock |
|
| |
Lens | Rubber “O” Ring |
|
| Trigger |
|
Retaining Ring | Switch |
|
![]() Rubber Guard Cover
Rubber Guard Cover
Spotlight Bulb Replacement
To replace the H3 type 6 volt bulb you will need a small Phillips type screwdriver and a replacement bulb (Vector Part VEC193). Bulb life may be shortened by installing a bulb with dirt or fingerprints on it. The bulb can be wiped clean with a cloth moistened with alcohol. During bulb installation, avoid touching the glass part of the bulb (See Figures 5a and 5b for details).
1.Disconnect the unit from any charging adapters.
2.Push forward the rubber bezel towards the front of the spotlight to reveal two small Phillips screws in the Retaining Ring.
3.Using the screwdriver, remove
4.Lift off the Retaining Ring, glass lens and rubber O ring and set them aside.
5.Carefully remove the reflector and bulb assembly (See figures 5a and 5b).
6.Disconnect the bulb wire from the red power wire.
7.Unsnap the hairpin retaining wires from the reflector’s flange.
8.Using the screwdriver, loosen the retaining screw to remove the bulb from the reflector (no need to completely remove this screw).
9.Lift out the bulb and the attached wire.
10.Insert the replacement bulb into the reflector’s flange.
11.Put back and secure the hairpin retaining wires.
12.Connect the bulb power wire to the red power wire.
13.Tighten the retaining screw on the flange.
14.Place the reflector in position in the body of the spotlight.
15.Replace the rubber O ring in the groove around the perimeter of the reflector.
16.Replace glass and retaining ring so that the screw holes are aligned.
17.Secure retaining ring with two screws.
18.Replace rubber bezel.
19.Operate switch to ensure proper operation of spotlight.
Figure 5a & 5b | Open |
| |
| Closed |
4 | 5 |
