XMF1300
QUICK START GUIDE
TOOLS NEEDED
|
|
|
|
| 1/2” | 7/32” |
|
| 1/2” socket & |
|
| (12.5mm) | (5.5mm) |
|
|
|
|
|
| |
Stud finder | 1/2” wrench | wrench | Phillips screwdriver | Pencil | Drill with drill bits: | |
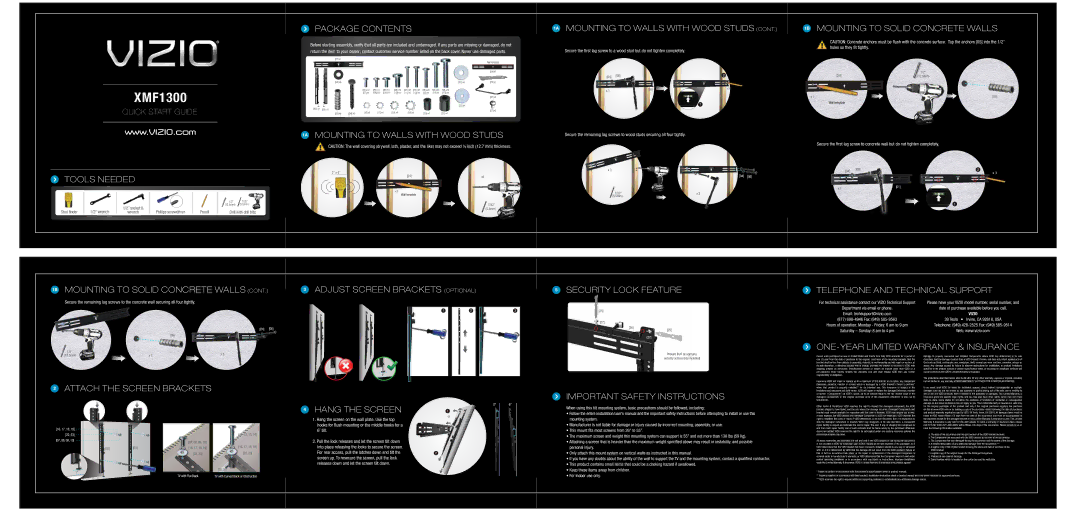
PACKAGE CONTENTS
Before starting assembly, verify that all parts are included and undamaged. If any parts are missing or damaged, do not return the item to your dealer; contact customer service number listed on the back cover. Never use damaged parts.
[01] x1
|
|
|
|
|
|
|
|
|
|
|
|
|
| Wall template |
|
|
|
|
|
|
|
|
|
|
|
|
|
|
|
|
|
|
|
|
|
|
|
|
|
|
|
|
|
|
|
|
|
|
|
|
|
|
|
|
|
|
|
| [24] x1 |
|
|
| [04] x6 |
|
|
|
|
|
|
|
|
| [22] x4 | [25] x1 |
|
|
|
|
| M4 x12 | M5 x12 | M6 x12 | M8 x16 | M4 x30 | M5 x30 | M6 x20 | M6 x35 | M8 x40 |
|
|
|
|
|
| [07] x4 | [08] x4 | [09] x4 | [10] x4 | [11] x4 | [12] x4 | [13] x4 | [14] x4 | [15] x4 |
|
|
|
|
|
|
|
|
|
|
|
|
|
|
| [26] x2 |
|
|
|
|
|
|
|
|
|
|
|
|
| [23] x4 |
|
[02] | x1 | [03] | x1 |
|
|
|
|
|
|
|
|
|
| [27] x2 |
|
|
|
|
| [16] x4 | [17] x4 | [18] x4 | [19] x4 | [20] x4 |
| [21] x4 | |||
|
|
| [05] x6 | [06] x6 |
|
| ||||||||
|
|
|
|
|
|
|
|
|
|
| ||||
1A MOUNTING TO WALLS WITH WOOD STUDS
![]() CAUTION: The wall covering (drywall, lath, plaster, and the like) may not exceed ½ inch (12.7 mm) thickness.
CAUTION: The wall covering (drywall, lath, plaster, and the like) may not exceed ½ inch (12.7 mm) thickness.
2" x 4"
[24] | x4 |
x1
Wall template
7/32”
(5.5mm)
1A MOUNTING TO WALLS WITH WOOD STUDS (CONT.)
Secure the first lag screw to a wood stud but do not tighten completely.
[04] | [06] |
|
| 2 |
| |||
|
|
|
|
|
|
|
| |
x 1 |
| [01] |
|
|
|
|
| x 3 |
|
|
|
|
|
| |||
|
|
|
|
|
| |||
|
|
|
|
|
|
| ||
|
|
|
|
|
|
|
| |
|
|
|
| 1 |
|
|
| |
Secure the remaining lag screws to wood studs securing all four tightly.
x 3
[04] [06]
7/32” | x 3 |
(5.5mm) |
|
1B MOUNTING TO SOLID CONCRETE WALLS
CAUTION: Concrete anchors must be flush with the concrete surface. Tap the anchors [05] into the 1/2” holes so they fit tightly.
[24] | 1/2” |
(12.5mm) | |
x 1 | [05] |
Wall template |
|
Secure the first lag screw to concrete wall but do not tighten completely.
[04] | [06] | 2 | x 3 |
|
| ||
|
|
| |
x 1 |
| [01] |
|
|
|
| |
|
| 1 |
|
1B MOUNTING TO SOLID CONCRETE WALLS (CONT.)
Secure the remaining lag screws to the concrete wall securing all four tightly.
[04] [06]
[05] |
1/2” |
3ADJUST SCREEN BRACKETS (OPTIONAL)
1 | 2 | 3 |
5SECURITY LOCK FEATURE
[25]
[27]
[26] | [25] |
| |
| [27] |
TELEPHONE AND TECHNICAL SUPPORT
For technical assistance contact our VIZIO Technical Support | Please have your VIZIO model number, serial number, and |
Department via email or phone. | date of purchase available before you call. |
Email: techsupport@vizio.com | VIZIO |
(877) | 39 Tesla • Irvine, CA 92618, USA |
Hours of operation: Monday - Friday: 6 am to 9 pm | Telephone: (949) |
Saturday – Sunday: 8 am to 4 pm | Web: www.vizio.com |
(12.5mm) | x 3 | x 3 |
|
2ATTACH THE SCREEN BRACKETS
1”
Prevent theft by applying security screws (key included)
IMPORTANT SAFETY INSTRUCTIONS
Covers units purchased as new in United States and Puerto Rico Only VIZIO warrants for a period of one (1) year from the date of purchase to the original purchaser of its mounting brackets, that the bracket shall be free from defects in assembly, material, or workmanship and will repair or replace, at its sole discretion, a defective bracket free of charge, provided the bracket is returned to VIZIO with shipping prepaid by purchaser. Unauthorized service or repairs by anyone other than VIZIO or a
Insurance: VIZIO will repair or replace up to a maximum of $10,000.00, at its option, any component (television, projector, monitor or screen) which is damaged by a VIZIO bracket’s failure to perform* when that product is properly installed** for its intended use. This insurance is subject to the limitations and exclusions set forth herein. VIZIO will repair or replace the damaged television, monitor or screen (“Components”) at VIZIO’s option, up to an amount equal to the fair market value of the damaged Components or the original purchase price of the equipment, whichever is less, up to $10,000.00.
damage to properly connected and installed Components where VIZIO has determined, in its sole discretion, that the damage resulted from a VIZIO bracket’s failure, and does not protect against acts of God such as flood, earthquake, war, vandalism, theft,
The protections described herein shall be IN LIEU OF any other warranty, express or implied, including but not limited to, any warranty of MERCHANTABILITY or FITNESS FOR A PARTICULAR PURPOSE.
In no event shall VIZIO be liable for incidental, special, direct, indirect consequential or multiple damages such as, but not limited to, lost business or profits arising out of the sale, use or inability to sell or use any VIZIO products, even if advised of the possibility of damages. This Limited Warranty & Insurance gives you specific legal rights, and you may also have other rights, which may vary from state to state. Some states do not allow the exclusion of limitation of incidental or consequential
[16, 17, 18, 19] |
|
|
|
[22, 23] |
|
| [11, 12, 13, 14] |
[07, 08, 09, 10] |
| [07, 08, 09, 10] |
|
|
|
| |
[02] | [03] | [16, 17, 18, 19] | [16, 17, 18, 19] |
|
| [22, 23] | [20, 21] [22, 23] |
1” |
|
| [20, 21] [9] |
|
|
|
4HANG THE SCREEN
1.Hang the screen on the wall plate. Use the top
hooks for flush mounting or the middle hooks for a 6˚ tilt.
2.Pull the lock releases and let the screen tilt down into place releasing the locks to secure the screen.
For rear access, pull the latches down and tilt the | 2 |
screen up. To resecure the screen, pull the lock releases down and let the screen tilt down.
0°
1 or
6°
When using this tilt mounting system, basic precautions should be followed, including:
• Follow the entire installation/user’s manual and the important safety instructions before attempting to install or use this |
mounting system. |
• Manufacturer is not liable for damage or injury caused by incorrect mounting, assembly, or use. |
• This mount fits most screens from 26” to 55”. |
• The maximum screen and weight this mounting system can support is 55” and not more than 130 lbs (59 Kg). |
• Attaching a screen that is heavier than the maximum weight specified above may result in instability, and possible |
personal injury. |
• Only attach this mount system on vertical walls as instructed in this manual. |
• If you have any doubts about the ability of the wall to support the TV and the mounting system, contact a qualified contractor. |
• This product contains small items that could be a choking hazard if swallowed. |
• Keep these items away from children. |
Other Terms & Conditions: VIZIO reserves the right to inspect the damaged component, the VIZIO bracket alleged to have failed, and the site where the damage occurred. Damaged Components and bracket must remain available for inspection until the claim is finalized. VIZIO may require you to ship, at your expense, the VIZIO bracket and damaged Component to VIZIO for inspection. VIZIO reserves the right to negotiate the costs of repair. If VIZIO determines, in its sole discretion, that it is impractical to ship the damaged component or bracket, VIZIO may designate, in its sole discretion, a component repair facility to inspect and estimate the cost to repair. The cost, if any, of shipping the Component to and from such repair facility and of such estimate shall be borne solely by the purchaser. Whenever claims are settled, VIZIO reserves the right to be subrogated under any existing insurance policies the claimant/purchaser may have.
All above warranties and insurance are null and void if: the VIZIO bracket in use during the occurrence is not provided to VIZIO for inspection upon VIZIO’s request at the sole expense of the purchaser; or if VIZIO determines that the VIZIO bracket has been improperly installed, altered in any way or tampered with; or if it is determined by VIZIO that the damage did not result from the VIZIO product’s failure or that in fact no occurrence took place; or the repair or replacement of the damaged Component is covered under a manufacturer’s warranty; or VIZIO determines that the Component was not used under normal operating conditions or in accordance with any labels or instructions. Improper installation voids this Limited Warranty & Insurance. VIZIO’s Limited Warranty & Insurance only protects against
* Failure to perform in accordance with that bracket’s specifications sheet or product manual.
damage so the above limitations may not apply to you. This Limited Warranty & Insurance is valid only for the original purchaser of the product and only if the original purchaser registers the purchase
a. The date of the occurrence and the part number of the VIZIO bracket involved.
b. The Component that was used with the VIZIO bracket at the time of the occurrence.
c. The Component that was damaged during the occurrence and the extent of the damage. d. A detailed description of any additional damage from the occurrence.***
e. A legible copy of the original receipt showing the place and date of purchase of the VIZIO bracket.
f. A legible copy of the original receipt for the damaged Component. g. Photo(s) of any claimed damage.
h. Serial number which is located on the carton box and the wall plate.
TV with Flat Back | TV with Curved Back or Obstruction |
• For indoor use only. |
**Properly installed in accordance with that bracket’s installation instruction sheet or bracket manual and only when mounted on approved surfaces.
***VIZIO reserves the right to require additional supporting evidence to substantiate any additional damage claims.