IMPORTANT SAFETY INSTRUCTIONS
REPLACING THE HANDSET BATTERY PACK
11.To reduce the risk of electric shock, do not disassemble this product. Opening or removing covers may expose you to dangerous voltages or other risks. Incorrect reassembly can cause electric shock when the appliance is subsequently used.
12.Unplug this product from the wall outlet and refer servicing to qualified service personnel under the following conditions:
a)When the power supply cord plug is damaged or frayed.
b)If liquid has been spilled into the product.
c)If the product has been exposed to rain or water.
d)If the product does not operate normally by following the operating
instructions. Adjust only those controls that are covered by the operating instructions because improper adjustment of other controls may result in damage and will often require extensive work by a qualified technician to restore the product to normal operation.
e)If the product has been dropped or the cabinet has been damaged.
f)If the product exhibits a distinct change in performance.
13.Do not use the telephone to report a gas leak in the vicinity of the leak.
IT’S IMPOSSIBLE TO
OVERCHARGE THE BATTERY
PACK
The battery pack can be recharged many times, but if you get a
To purchase replacement battery packs, call VTECH Communications at
REPLACING THE HANDSET
BATTERY PACK
Follow the steps below:
1. Remove the battery case cover by |
pressing on the ridged lines and sliding |
downward. |
CAUTION:
To Reduce the Risk of Fire or Injury to Persons, read and Follow the Instructions
1.Use only VTECH rechargeable battery pack.
2.Do not dispose of the battery in a fire. The cell may explode.
IMPORTANT:
Do not dispose of this battery into household garbage. For information on recycling or proper disposal, consult your local solid waste collection or disposal organization.
3. Do not open or mutilate the battery. |
Released electrolyte is corrosive and |
may cause damage to the eyes or skin. |
It may be toxic if swallowed. |
4. Exercise care in handling batteries in |
SAVE THESE INSTRUCTIONS
REPLACING THE HANDSET BATTERY PACK
2. Hold the battery pack and plug the cord |
into the handset.(The two cord metal tips |
on the white plastic end of the plug should |
be facing upwards.) |
3. Place the cord in the case so it rests on |
order not to short the battery with |
conducting materials such as rings, |
bracelets, and keys. The battery or |
conductor may overheat and cause |
burns. |
A WORD ABOUT RECHARGEABLE
Charging the handset batteries. The handset of your VTech VT 1712 cordless telephone is powered by a rechargeable battery pack. It charges automatically when- ever the handset is in the base. You should charge the battery pack for 16 hours when you first receive your phone. You’ll know that battery pack needs charging when:
recommended that the battery pack be charged for at least 16 hours initially and 8 hours for maintenance charging. You can use your telephone before that with diminished capacity, but it is best to charge the battery pack fully. It will take several recharge cycles to maximize the charge capacity of your battery pack. The maximum
| top of the battery pack. |
4. | Replace the battery case cover by sliding |
| the cover upwards. |
5. | If the new battery pack is not already charged, |
| place the handset in the cradle of the base unit to |
| allow it to charge for 16 hours. |
BATTERIES
Your
*The phone emits a warning tone when you press the ON/OFF key.
*The handset seems completely dead; no lights are evident, and pressing keys do not generate a beep.
To Charge the Battery Pack. To charge the battery pack, place the handset in the base unit. The CHARGE indicator will light to show the handset is seated properly and the battery pack is charging. It is
battery life between charges is 7 hours of continuous talk time or 14 days of stand by.
Alternatively, if you have purchased a spare battery pack and it has been charging in the base unit, simply exchange the drained handset battery pack with the fully charged replacement battery pack from the base charger. Place the drained handset battery pack into the base charger to recharge.
GETTING STARTED
SETTINGUPYOURVTECHVT1712 | SETTING THE TONE/PULSE SWITCH | |
Choose an area near an electrical outlet | The TONE\PULSE switch is located on | |
and a telephone wall jack. | the bottom of the base unit and is factory | |
AC POWER ADAPTOR | set to TONE. If you have touch tone | |
service, do not change the switch setting. If | ||
Plug the AC power adaptor into an | ||
you have rotary (Pulse) service, set the | ||
electrical outlet and the DC connector to | ||
switch to PULSE. | ||
the back of the base unit. | ||
|
4
5
GETTING STARTED
WALL MOUNTING
CHARGE THE HANDSET BATTERY
PACK BEFORE USE
The battery pack recharges automatically whenever the handset is in the base unit. The battery pack must be charged for 16 hours before using your phone for the first time.
CONNECT TELEPHONE LINE CORD
Plug one end of the telephone cord into a wall jack, and the other end into the back of the Base Unit.
CHECK FOR A DIAL TONE
After charging the battery pack, rotate the Base Unit antenna to an upright position. Pick up the Handset, making sure the Handset antenna is fully extended. Now press ON/OFF, you should hear a dial tone. If not, see ‘IN CASE OF DIFFICULTY’.
Fill in the telephone number card on the base unit.
DETACHABLE EARPIECE COVER
Your VT1712 comes with extra earpiece covers in various colors, which are interchangeable according to your preference . To remove the cover presently on your Handset, using your thumb and index finger, pry the lower portion of the cover away from the body of the Handset, one side at a time. Then, gently pull until the entire cover separates from the Handset.
Snap the new earpiece cover in place. Enjoy colorful phone calls!
CAUTION:
1.Never install telephone wiring during a lightning storm.
2.Never install telephone jacks in wet lo- cations unless the jack is specifically de- signed for wet locations.
3.Never touch uninsulated telephone wires or terminals unless the telephone line has been disconnected at the network interface.
4.Use caution when installing or modifying telephone lines.
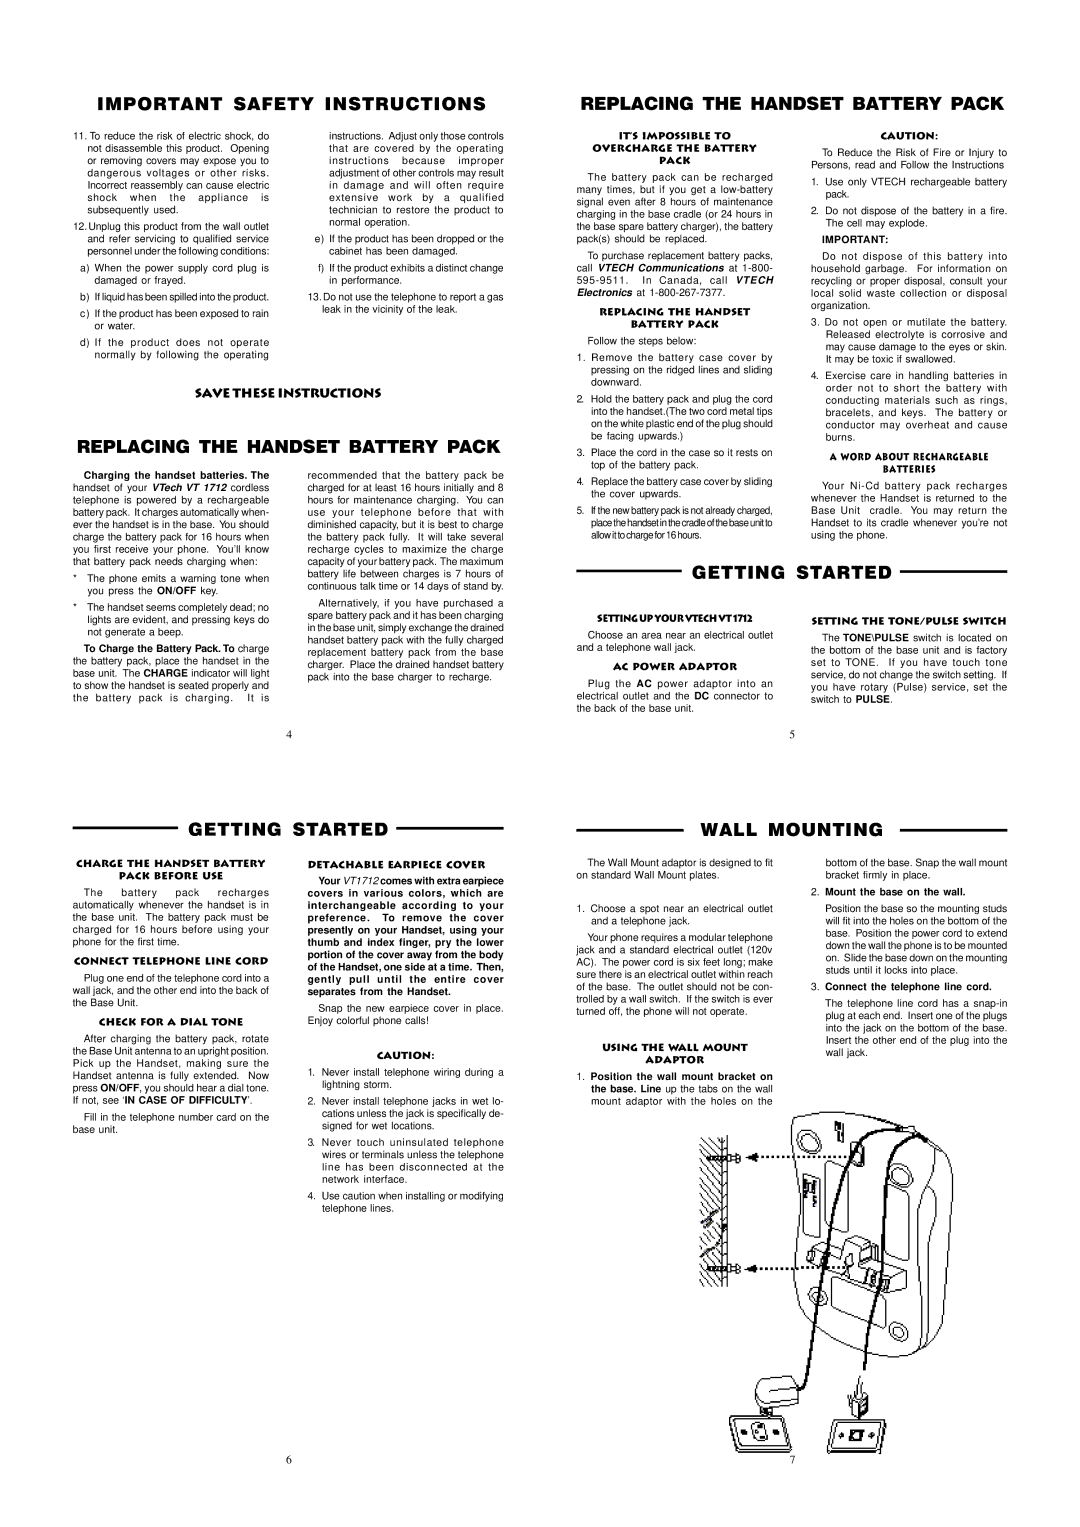
The Wall Mount adaptor is designed to fit on standard Wall Mount plates.
1.Choose a spot near an electrical outlet and a telephone jack.
Your phone requires a modular telephone jack and a standard electrical outlet (120v AC). The power cord is six feet long; make sure there is an electrical outlet within reach of the base. The outlet should not be con- trolled by a wall switch. If the switch is ever turned off, the phone will not operate.
USING THE WALL MOUNT
ADAPTOR
1.Position the wall mount bracket on the base. Line up the tabs on the wall mount adaptor with the holes on the
bottom of the base. Snap the wall mount bracket firmly in place.
2.Mount the base on the wall.
Position the base so the mounting studs will fit into the holes on the bottom of the base. Position the power cord to extend down the wall the phone is to be mounted on. Slide the base down on the mounting studs until it locks into place.
3.Connect the telephone line cord.
The telephone line cord has a
6 | 7 |