WINTERIZING YOUR SPA
If the spa is located where freezing temperatures occur, and you do not intend
to use your spa for an extended period, follow steps 1 through 7 outlined in
“DRAINING YOUR SPA” then complete the steps below:
IMPORTANT:The following steps should protect your spa from freezing
damage provided these instructions are followed exactly. For maximum
protection against freeze damage to your spa, Watkins®Manufacturing
Corporation recommends contacting your local dealer to schedule an in-home
Propylene glycol (anti-freeze) Winterizing Service plan.
NOTE: MAKE CERTAIN ALL POWER TO THE SPA IS OFFand all water has been
drained from the spa before you continue.
1. It will be necessary to remove all water from the interior plumbing.
2. Remove the floating weir, basket, and filter cartridge. Clean the filter cartridge and store in a dry place. Attach the vacuum hose to the vacuum side of the shop vac
and thoroughly dry the filter compartment.
3. Using the shop vac, remove the water starting with the jets at the top and moving to the ones at the bottom of the spa.
NOTE: When removing the water from jet openings, you may notice suction coming from another jet. With the help of a second person, block off any suction from
the other jet using a large rag or cloth. This will help pull out the water that is trapped deep inside the main line.
4. Thoroughly dry the spa shell with a clean towel.
5. Pour Propylene glycol anti-freeze into the filter suction fittings and jet outlets. Add enough anti-freeze until the liquid starts to come out of the drain.
CAUTION: Use only Propylene glycol as your anti-freeze. This is non-toxic. NEVER use automobile anti-freeze since it is toxic.
6. Close the spa cover and fasten the cover tie downs. If your area receives a lot of snow or ice, it is recommended to cover the spa cover with two pieces of
plywood forming a pitched roof top to prevent snow and ice build-up. Secure a plastic sheet or tarp over the spa cover and one over the plywood.
WARNING: When not in use, the spa must be covered with an insulating spa cover. Damage caused by either sun exposure or freezing is not covered under
warranty.
7. Remove the pump and equipment compartment doors by removing the door screws.
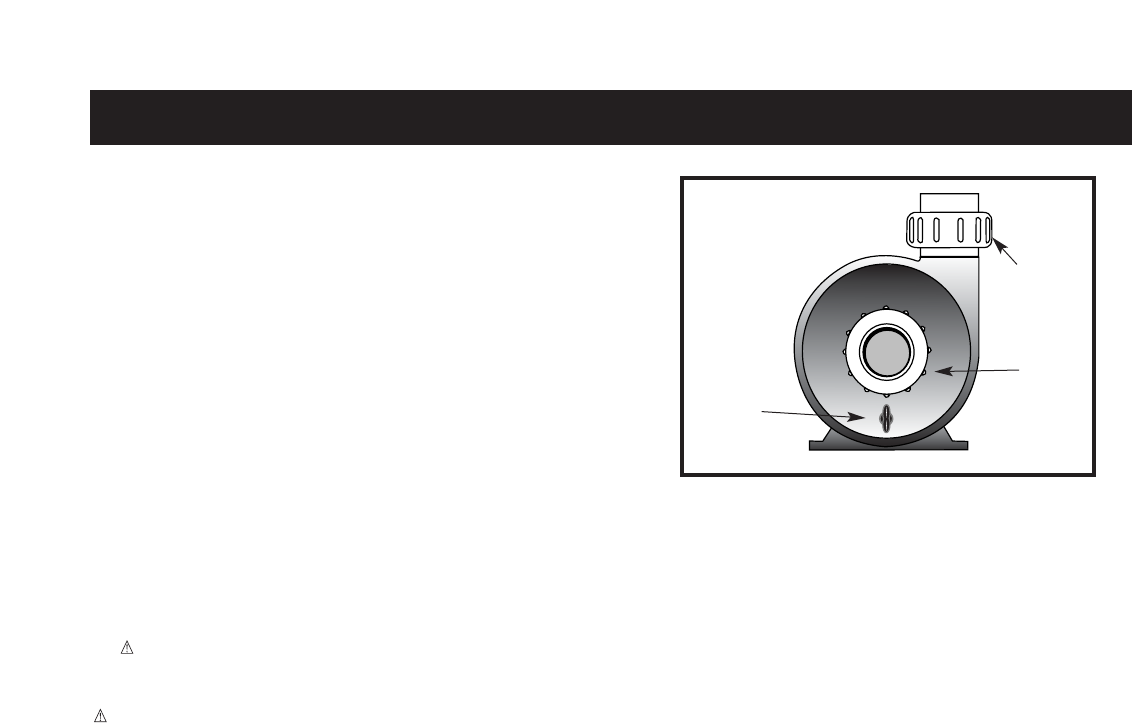
8. On the pump side of the equipment control bay, remove the pump drain plug located on the front of the pump housings. Allow all water to drain out. Place the drain
plug in a reclosable plastic bag and store near the pump. Replace the drain plugs on start-up. (Refer to the Figure above)
9. Unscrew the suction pump and heater union(s) and allow the water to drain. Leave union loose. NOTE: Tighten union(s) before filling spa.
10. Replace the equipment and pump doors and secure with screws.
NOTE: DO NOT LEAVE ANY WATER IN YOUR SPA.
Opening Instructions:
11. Remove plastic, plywood, and spa cover. Remove pump doors by removing the door screws. Once doors are open, reinstall drain plugs and hand tighten pump
union(s). Follow the “START-UP AND REFILL PROCEDURES” to refill your spa.
MAINTENANCE
25
PUMP DRAIN
PLUG
LOCATION
DRAIN
PLUG
DISCHARGE
UNION
SUCTION
UNION