STEP 2: Outside Lock Handle Assembly

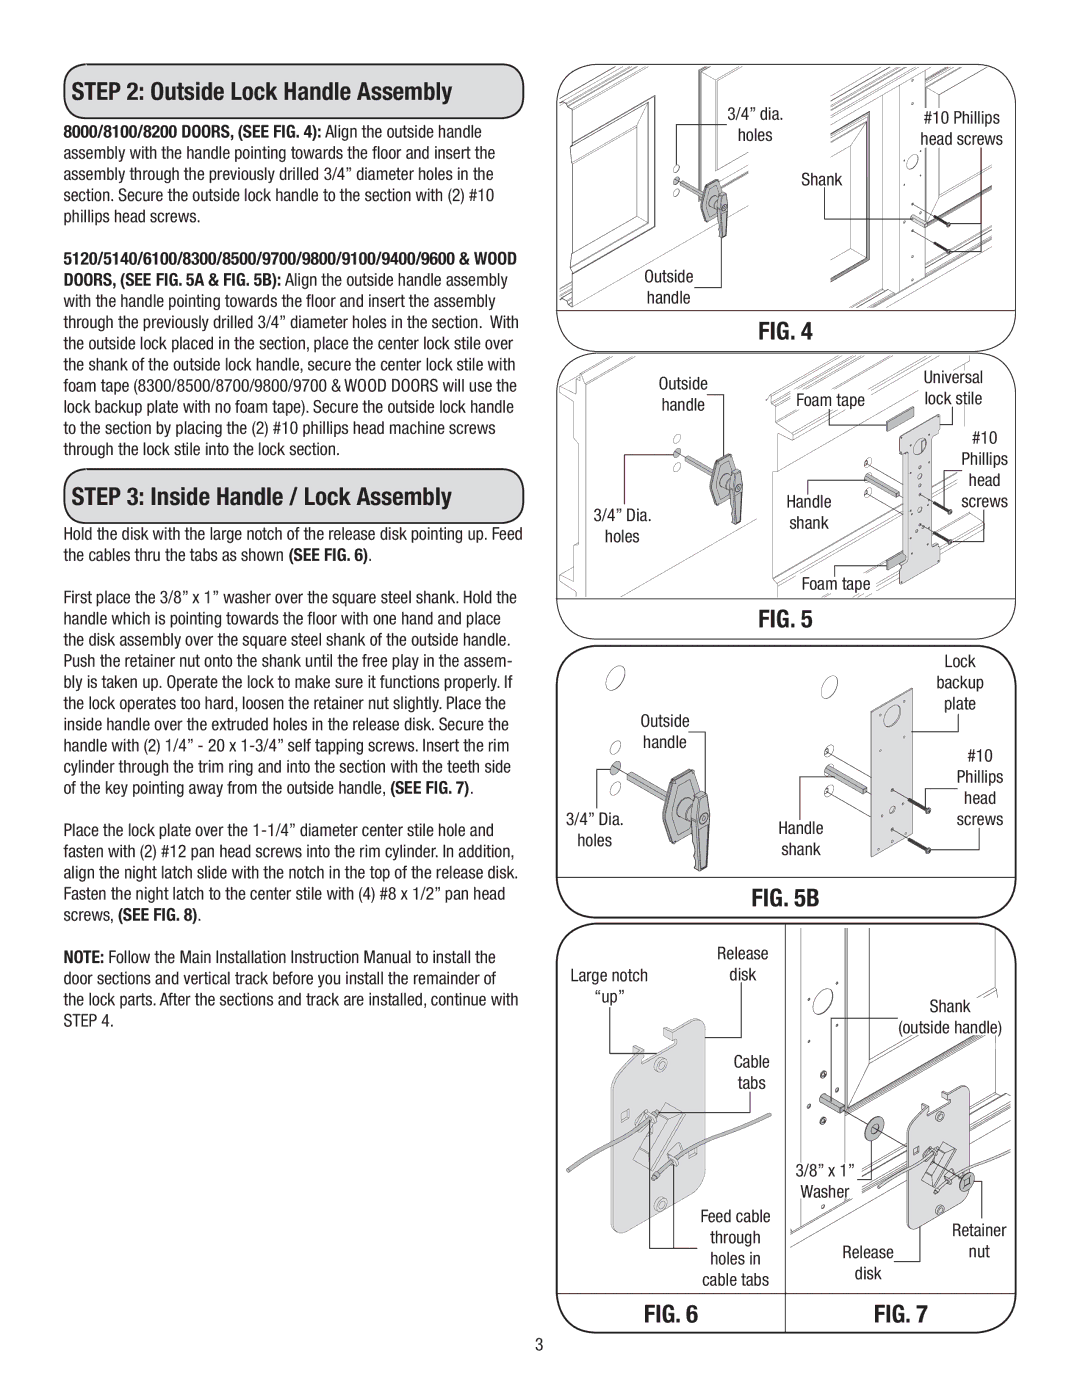
8000/8100/8200 DOORS, (SEE FIG. 4): Align the outside handle assembly with the handle pointing towards the floor and insert the assembly through the previously drilled 3/4” diameter holes in the section. Secure the outside lock handle to the section with (2) #10 phillips head screws.

5120/5140/6100/8300/8500/9700/9800/9100/9400/9600 & WOOD DOORS, (SEE FIG. 5A & FIG. 5B): Align the outside handle assembly with the handle pointing towards the floor and insert the assembly through the previously drilled 3/4” diameter holes in the section. With the outside lock placed in the section, place the center lock stile over the shank of the outside lock handle, secure the center lock stile with

3/4” dia.


#10 Phillips

holes


head screws


Shank


Outside

handle

FIG. 4

foam tape (8300/8500/8700/9800/9700 & WOOD DOORS will use the lock backup plate with no foam tape). Secure the outside lock handle to the section by placing the (2) #10 phillips head machine screws through the lock stile into the lock section.

STEP 3: Inside Handle / Lock Assembly

Hold the disk with the large notch of the release disk pointing up. Feed the cables thru the tabs as shown (SEE FIG. 6).

First place the 3/8” x 1” washer over the square steel shank. Hold the

Outside

handle

3/4” Dia. holes


Universal

Foam tape

lock stile


#10


Phillips


head

Handle

screws

shank


Foam tape


handle which is pointing towards the floor with one hand and place the disk assembly over the square steel shank of the outside handle.

FIG. 5

Push the retainer nut onto the shank until the free play in the assem- bly is taken up. Operate the lock to make sure it functions properly. If the lock operates too hard, loosen the retainer nut slightly. Place the inside handle over the extruded holes in the release disk. Secure the handle with (2) 1/4” - 20 x 1-3/4” self tapping screws. Insert the rim cylinder through the trim ring and into the section with the teeth side of the key pointing away from the outside handle, (SEE FIG. 7).

Place the lock plate over the 1-1/4” diameter center stile hole and fasten with (2) #12 pan head screws into the rim cylinder. In addition, align the night latch slide with the notch in the top of the release disk.

Outside

handle

3/4” Dia. holes


Lock


backup


plate


#10


Phillips


head

Handle

screws


shank


Fasten the night latch to the center stile with (4) #8 x 1/2” pan head screws, (SEE FIG. 8).

NOTE: Follow the Main Installation Instruction Manual to install the door sections and vertical track before you install the remainder of the lock parts. After the sections and track are installed, continue with STEP 4.

FIG. 5B


Release


Large notch

disk


“up”


Shank


(outside handle)


Cable


tabs


3/8” x 1”


Washer


Feed cable


Retainer


through


Release

nut


holes in


disk


cable tabs


FIG. 6


FIG. 7

3

Page 3
Image 3
Wayne-Dalton 9000, 9700, 8000, 9800, 5000 installation instructions Outside Lock Handle Assembly, Inside Handle / Lock Assembly

5000, 9000, 8000, 9800, 9700 specifications

Wayne-Dalton is a well-known brand in the garage door industry, offering a wide range of models designed for durability, performance, and aesthetic appeal. Among its most popular series are the 9700, 5000, 8000, 9000, and 9800, each equipped with unique features and advanced technologies to meet diverse customer needs.

The Wayne-Dalton 9700 series is known for its combination of strength and insulation. This garage door is manufactured with a three-layer construction providing robust protection against the elements while offering excellent energy efficiency. The insulated steel construction can help maintain interior temperatures, making it ideal for attached garages.

The 5000 series, on the other hand, is designed for a more traditional look combined with modern performance. Featuring a lightweight design, it is made from durable materials that resist rust and corrosion. The 5000 series can be customized with different colors and styles, allowing homeowners to achieve the perfect aesthetic to enhance their property.

Moving on to the 8000 series, this model is designed for commercial applications and residential use where heavy-duty functions are necessary. It is built to withstand extreme weather conditions while providing optimal security with added strength features. The 8000 series offers smooth operation and minimal maintenance requirements, making it a great choice for those seeking reliability.

The 9000 series stands out with its stylish design and sleek finishes. This series offers advanced insulation options, coupled with numerous panel designs that provide a polished and sophisticated look. The 9000 model emphasizes both aesthetics and energy efficiency, making it a favorite among homeowners looking for a beautiful yet functional garage door.

Lastly, the 9800 series is the premium option within Wayne-Dalton’s offerings. This series is characterized by its high insulation value and thermal efficiency, thanks to its innovative construction techniques. The 9800 doors can be customized with numerous panel options and colors, delivering a luxury look while ensuring excellent performance.

In conclusion, Wayne-Dalton’s 9700, 5000, 8000, 9000, and 9800 series garage doors each feature distinctive characteristics and technologies aimed at enhancing durability, security, and aesthetics. Homeowners can find a reliable option within this range that suits their specific requirements, whether they prioritize insulation, style, or heavy-duty functionality. With Wayne-Dalton’s commitment to quality and innovation, these garage doors stand out in today’s market.