Installing Work Surfaces &
Gas Connection Guidelines
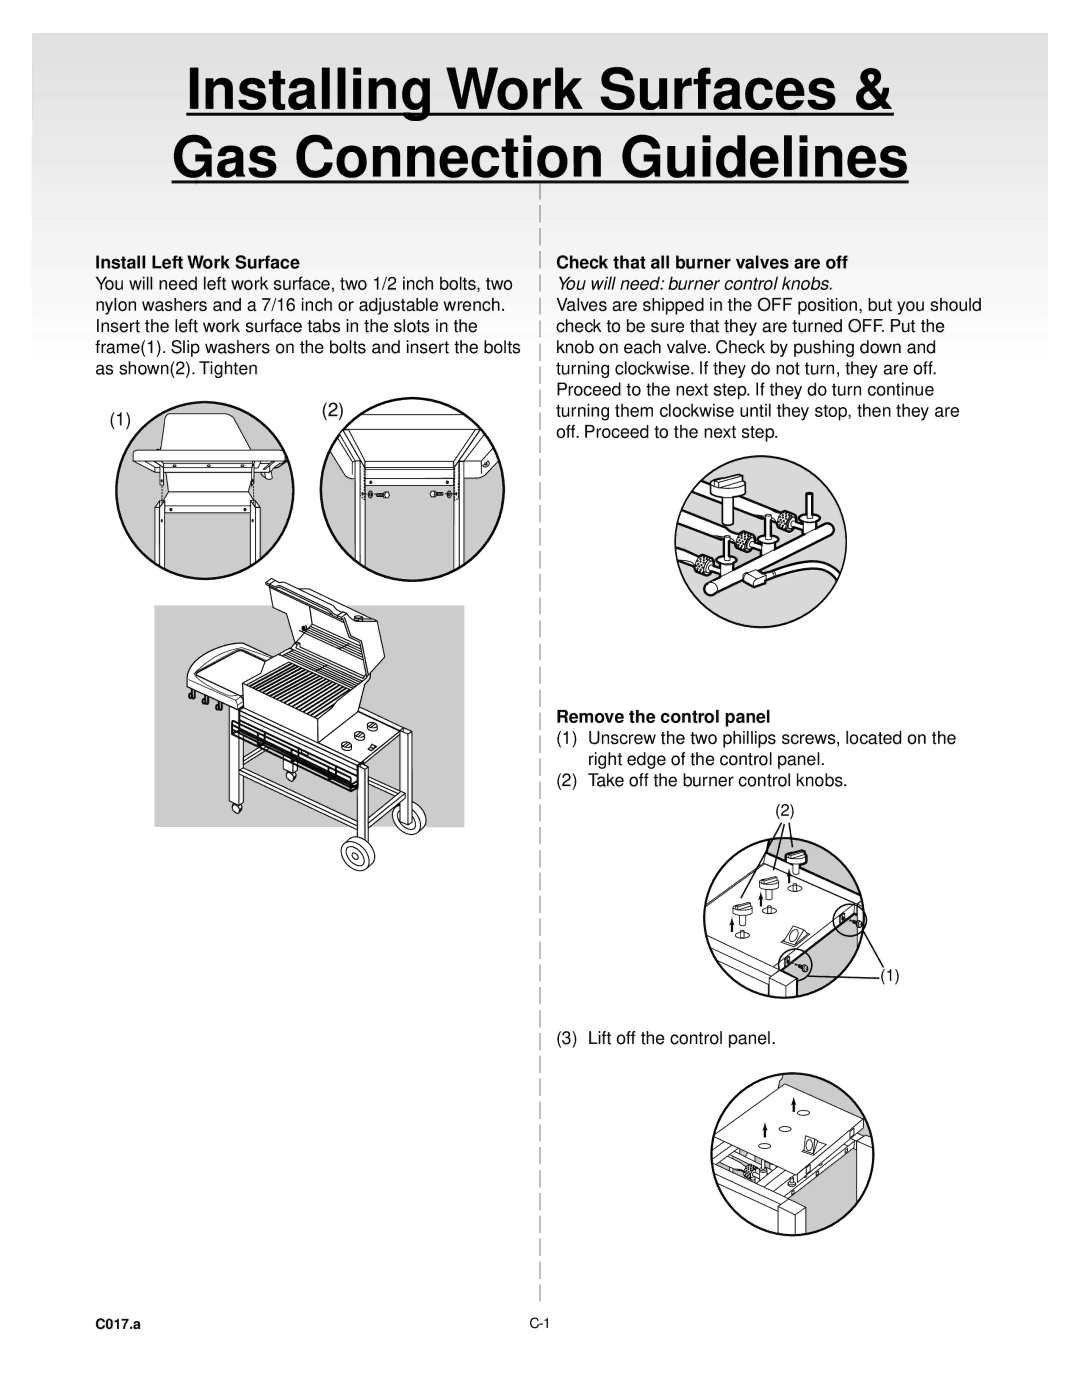
Install Left Work Surface |
|
|
|
|
|
| Check that all burner valves are off | ||||||
You will need left work surface, two 1/2 inch bolts, two |
| You will need: burner control knobs. | |||||||||||
| |||||||||||||
nylon washers and a 7/16 inch or adjustable wrench. |
| Valves are shipped in the OFF position, but you should | |||||||||||
| |||||||||||||
Insert the left work surface tabs in the slots in the |
| check to be sure that they are turned OFF. Put the | |||||||||||
| |||||||||||||
frame(1). Slip washers on the bolts and insert the bolts |
| knob on each valve. Check by pushing down and | |||||||||||
| |||||||||||||
as shown(2). Tighten |
|
|
|
|
|
| turning clockwise. If they do not turn, they are off. | ||||||
|
|
|
|
|
| ||||||||
|
|
|
|
|
|
| (2) |
|
|
|
|
| Proceed to the next step. If they do turn continue |
|
|
|
|
|
|
|
|
|
|
|
| ||
|
|
|
|
|
|
|
|
|
|
|
| ||
(1) |
|
|
|
|
|
|
|
|
|
|
| turning them clockwise until they stop, then they are | |
|
|
|
|
|
|
| |||||||
|
|
|
|
|
|
| |||||||
|
|
|
|
|
|
|
|
|
|
|
| off. Proceed to the next step. | |
|
|
|
|
|
|
|
|
|
|
|
|
| |
|
|
|
|
|
|
|
|
|
|
|
|
| |
|
|
|
|
|
|
|
|
|
|
|
|
|
|
|
|
|
|
|
|
|
|
|
|
|
|
|
|
|
|
|
|
|
|
|
|
|
|
|
|
|
|
|
|
|
|
|
|
|
|
|
|
|
|
|
|
|
|
|
|
|
|
|
|
|
|
|
|
|
|
|
|
|
|
|
|
|
|
|
|
|
|
|
|
|
|
|
|
|
|
|
|
|
|
|
|
|
|
Remove the control panel
(1) Unscrew the two phillips screws, located on the right edge of the control panel.
(2) Take off the burner control knobs.
(2)
(1)
(3) Lift off the control panel.
C017.a |
