WARNING: If received assembled, repeat all steps to ensure your unit is properly assembled and all fasteners are secure.

Examine parts for damage. Do not use dam- aged parts.

NOTE: If you need assistance or find parts missing or damaged, call 1-800-554-6723.

TOOLS REQUIRED

SHex wrench (provided)

HANDLEBAR ASSEMBLY

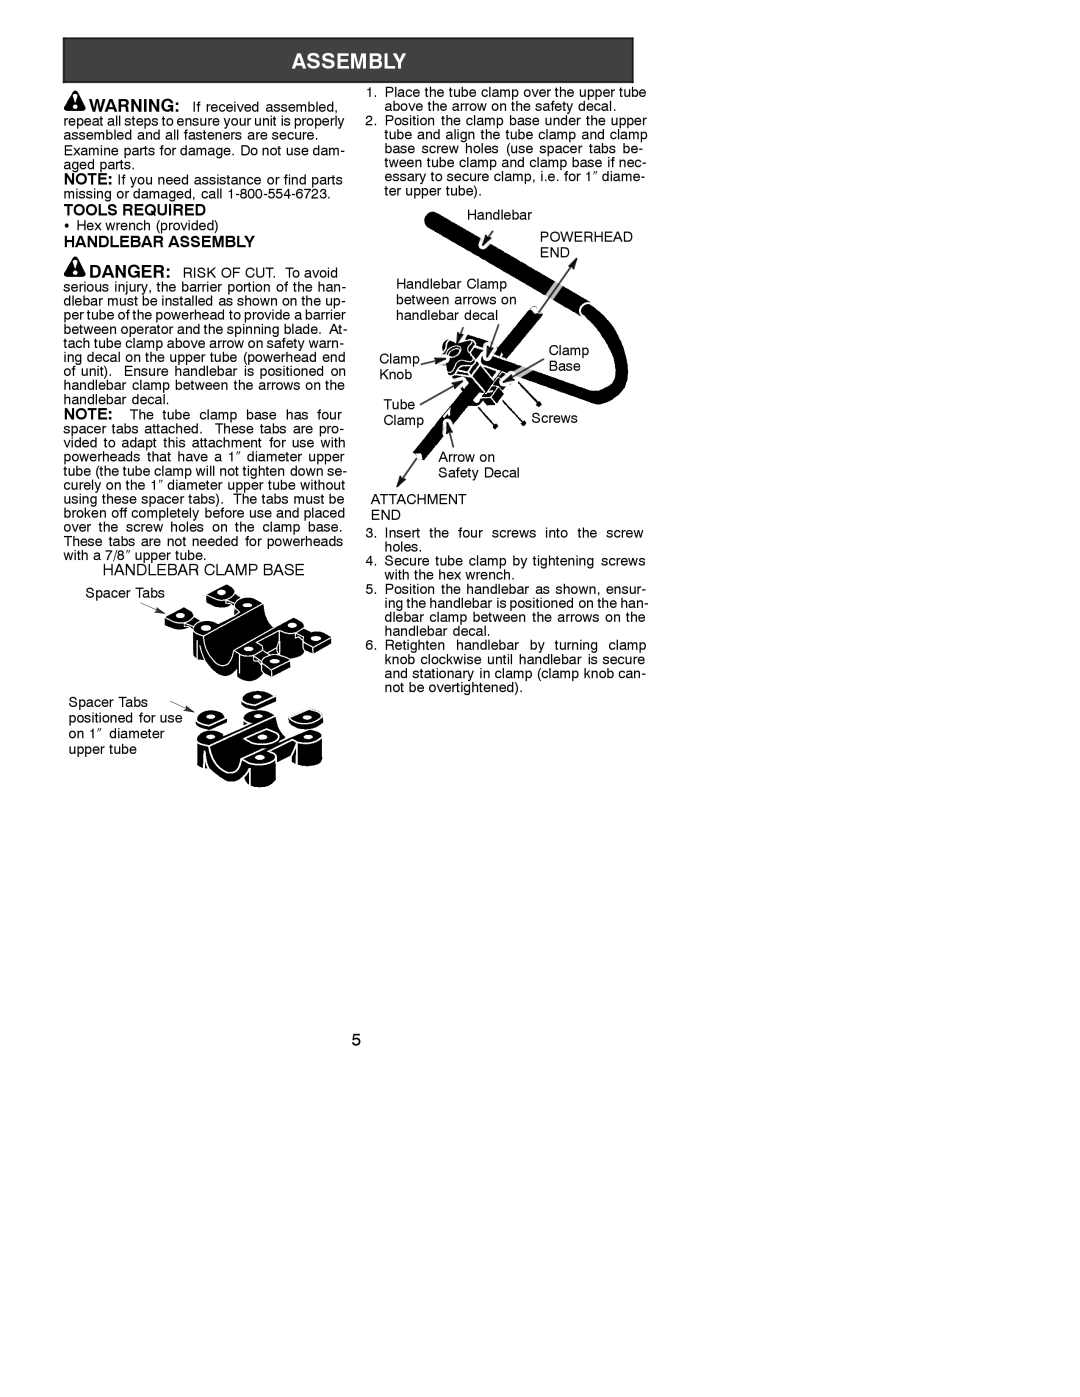
DANGER: RISK OF CUT. To avoid serious injury, the barrier portion of the han- dlebar must be installed as shown on the up- per tube of the powerhead to provide a barrier between operator and the spinning blade. At- tach tube clamp above arrow on safety warn- ing decal on the upper tube (powerhead end of unit). Ensure handlebar is positioned on handlebar clamp between the arrows on the handlebar decal.

NOTE: The tube clamp base has four spacer tabs attached. These tabs are pro- vided to adapt this attachment for use with powerheads that have a 1diameter upper tube (the tube clamp will not tighten down se- curely on the 1diameter upper tube without using these spacer tabs). The tabs must be broken off completely before use and placed over the screw holes on the clamp base. These tabs are not needed for powerheads with a 7/8upper tube.

HANDLEBAR CLAMP BASE

Spacer Tabs

Spacer Tabs positioned for use on 1diameter upper tube

1.Place the tube clamp over the upper tube above the arrow on the safety decal.

2.Position the clamp base under the upper tube and align the tube clamp and clamp base screw holes (use spacer tabs be- tween tube clamp and clamp base if nec- essary to secure clamp, i.e. for 1diame- ter upper tube).

Handlebar

POWERHEAD

END

Handlebar Clamp between arrows on handlebar decal

Clamp


Clamp


Base

Knob


Tube


Screws


Clamp


Arrow on


Safety Decal


ATTACHMENT

END

3.Insert the four screws into the screw holes.

4.Secure tube clamp by tightening screws with the hex wrench.

5.Position the handlebar as shown, ensur- ing the handlebar is positioned on the han- dlebar clamp between the arrows on the handlebar decal.

6.Retighten handlebar by turning clamp knob clockwise until handlebar is secure and stationary in clamp (clamp knob can- not be overtightened).

5

Page 5
Image 5
Weed Eater 530086783 instruction manual Tools Required, Handlebar Assembly, Powerhead END, Attachment END

530086783 specifications

The Weed Eater 530086783 is a powerful and efficient string trimmer designed to meet the needs of both homeowners and professionals. It combines advanced technology with a user-friendly design, making it an essential tool for maintaining a well-groomed lawn and garden.

At the heart of the Weed Eater 530086783 is its robust 25cc two-stroke engine. This powerful engine provides ample power to tackle tough weeds and overgrown grass, ensuring that your landscaping tasks can be completed quickly and efficiently. The lightweight design of the trimmer, weighing in at just over 10 pounds, ensures that users can maneuver it easily without experiencing fatigue during extended use.

One of the standout features of the Weed Eater 530086783 is its split shaft design. This innovative design allows for easy attachment changes, enabling users to switch from trimming to edging or even blowing leaves with the addition of compatible accessories. This versatility makes it a valuable addition to any homeowner’s toolkit or landscaping professional’s arsenal.

The trimmer also features an easy-to-use bump feed system, which ensures that the string advances efficiently while you work. With a simple bump of the head against the ground, you can release more line, minimizing downtime and keeping you focused on the job at hand. The 0.095-inch line provides an excellent cutting width, allowing for greater coverage with each pass.

For user comfort and safety, the Weed Eater 530086783 is equipped with an adjustable handle that allows for multiple gripping positions. This feature provides better control and ergonomics, reducing strain on the user during operation. Additionally, the trimmer comes with a protective shield that helps direct debris away from the user, ensuring a safer mowing experience.

The design of the Weed Eater 530086783 also emphasizes easy starting. The engine incorporates a primer bulb and choke that simplify the starting process, making it accessible even for those who may be new to using string trimmers.

In summary, the Weed Eater 530086783 stands out with its powerful engine, lightweight design, and flexible attachment options. Its bump feed mechanism, adjustable handle, and easy start technology make it an exceptional choice for effectively managing yard work, providing users with both performance and convenience.