MAINTENANCE

WARNING: Disconnect power source before performing maintenance.

GENERAL RECOMMENDATIONS

The warranty on this unit does not cover items that have been subjected to operator abuse or negligence. To receive full value from the warranty, the operator must maintain unit as instructed in this manual. Various adjust- ments will need to be made periodically to properly maintain your unit.

BEFORE EACH USE

CHECK FOR LOOSE

FASTENERS AND PARTS

SHousing Screws S Assist Handle S Debris Shield

S Edge Guide

CHECK FOR DAMAGED OR WORN PARTS

Contact an authorized service dealer for re- placement of damaged or worn parts.

STrigger Switch -- Ensure switch functions properly by pressing and releasing the trig-

ger switch. Make sure motor stops.

SDebris Shield -- Discontinue use of unit if debris shield is damaged.

AFTER EACH USE

INSPECT AND CLEAN UNIT AND DE- CALS

SAfter each use, inspect complete unit for

loose or damaged parts. Clean the unit us- ing a damp cloth with a mild detergent.

SWipe off unit with a clean dry cloth.

SERVICE AND ADJUSTMENTS

REPLACING THE LINE

Pre--wound spools offer the most convenient method for replacing line and ensuring opti- mum performance.

SReplacement spools are color--coded to ensure use of the correct spool with your unit. Be sure to use the same color spool as

the existing spool.

NOTE: Always clear dirt and debris from cut- ting head components when performing any type of maintenance.

SHold spool and unscrew cap by turning in

the direction shown on top of the cap.

SRemove line guide ring and spool.

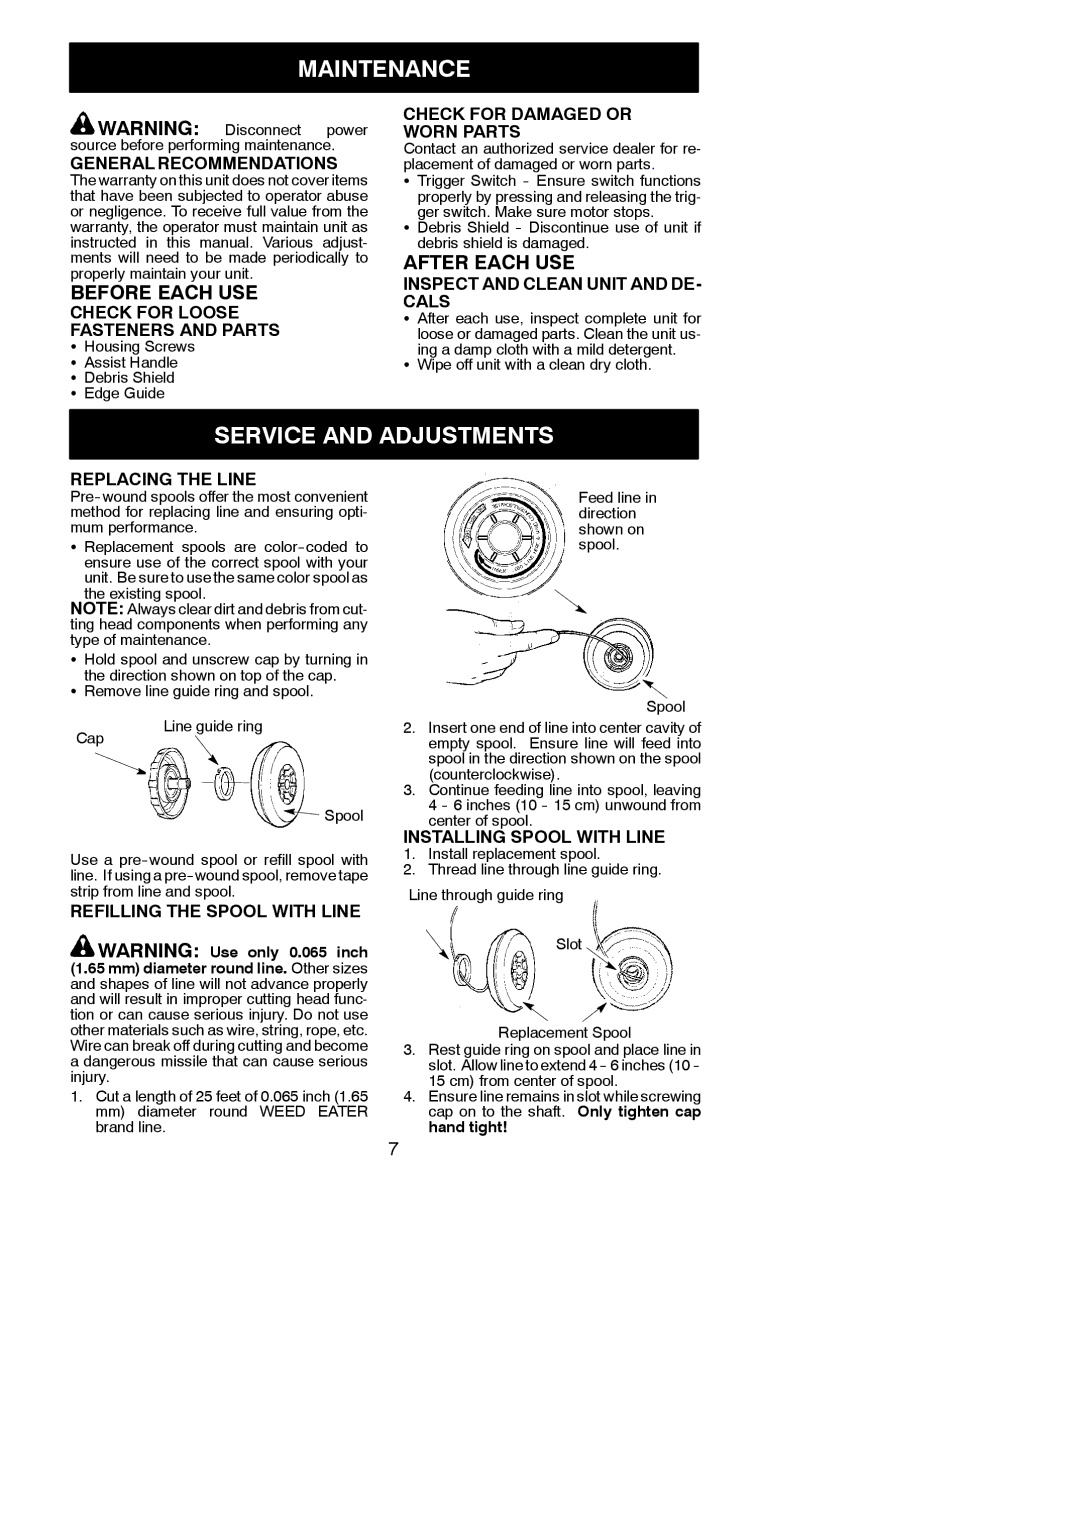
Feed line in direction shown on spool.

Spool

Cap

Line guide ring

Spool

2.Insert one end of line into center cavity of empty spool. Ensure line will feed into spool in the direction shown on the spool (counterclockwise).

3.Continue feeding line into spool, leaving 4 -- 6 inches (10 -- 15 cm) unwound from center of spool.

INSTALLING SPOOL WITH LINE

Use a pre--wound spool or refill spool with line. If using a pre--wound spool, remove tape strip from line and spool.

REFILLING THE SPOOL WITH LINE

WARNING: Use only 0.065 inch (1.65 mm) diameter round line. Other sizes and shapes of line will not advance properly and will result in improper cutting head func- tion or can cause serious injury. Do not use other materials such as wire, string, rope, etc. Wire can break off during cutting and become a dangerous missile that can cause serious injury.

1.Cut a length of 25 feet of 0.065 inch (1.65

mm)diameter round WEED EATER

brand line.

1.Install replacement spool.

2.Thread line through line guide ring.

Line through guide ring

Slot

Replacement Spool

3.Rest guide ring on spool and place line in slot. Allow line to extend 4 -- 6 inches (10 -- 15 cm) from center of spool.

4.Ensure line remains in slot while screwing cap on to the shaft. Only tighten cap hand tight!

7

Page 7
Image 7
Weed Eater 952711711, 545186759 instruction manual Maintenance, Service and Adjustments, Before Each USE, After Each USE

952711711, 545186759 specifications

The Weed Eater 545186759,952711711 is a powerful and versatile outdoor tool designed for maintaining your lawn and garden efficiently. This model stands out with a blend of innovative technologies and user-friendly features that appeal to both professional landscapers and homeowners alike.

One of the primary features of the Weed Eater 545186759,952711711 is its robust engine. Equipped with a high-performance two-cycle gas engine, this trimmer is capable of delivering superior power and performance while ensuring reduced emissions for a more environmentally-friendly operation. The engine design allows for easy starting, minimizing frustration with pull cords and enhancing user satisfaction.

In terms of cutting capabilities, the Weed Eater boasts a heavy-duty cutting head that accommodates various types of cutting lines. This feature allows users to easily switch between different line thicknesses depending on the task at hand, whether it’s trimming delicate flower beds or tackling thick, overgrown weeds. The automatic line feed system ensures a consistent cutting length, making the job more efficient and reducing downtime.

The design of the Weed Eater 545186759,952711711 emphasizes ergonomics and comfort. It comes with an adjustable handle, allowing operators of different heights to customize the grip for better control and reduced strain during extended use. The lightweight construction of the trimmer further enhances usability, making it easier to maneuver through tight spaces and around obstacles.

Another significant characteristic of this model is its durability. The Weed Eater is constructed with high-quality materials designed to withstand the rigors of outdoor use. The trimmer’s components are resistant to wear and tear, ensuring longevity and reliability over time. Additionally, the open design of the cutting head allows for easy access to maintenance points, making routine upkeep straightforward.

Technologically, the Weed Eater 545186759,952711711 incorporates noise reduction features, making it quieter than many of its competitors on the market. This is an essential aspect for users who prioritize a peaceful outdoor environment while maintaining their landscape.

In summary, the Weed Eater 545186759,952711711 combines power, efficiency, and user-centric features. With its reliable engine, versatile cutting capabilities, ergonomic design, and focus on durability, this trimmer is an excellent choice for anyone looking to keep their yard looking pristine with minimal effort. Whether tackling small garden tasks or larger landscaping projects, this model has the capabilities to meet the demands of any lawn care job.