ASSEMBLY

WARNING: If received assembled, review all assembly steps to ensure your unit is properly assembled and all fasteners are secure.

TUBE ASSEMBLY

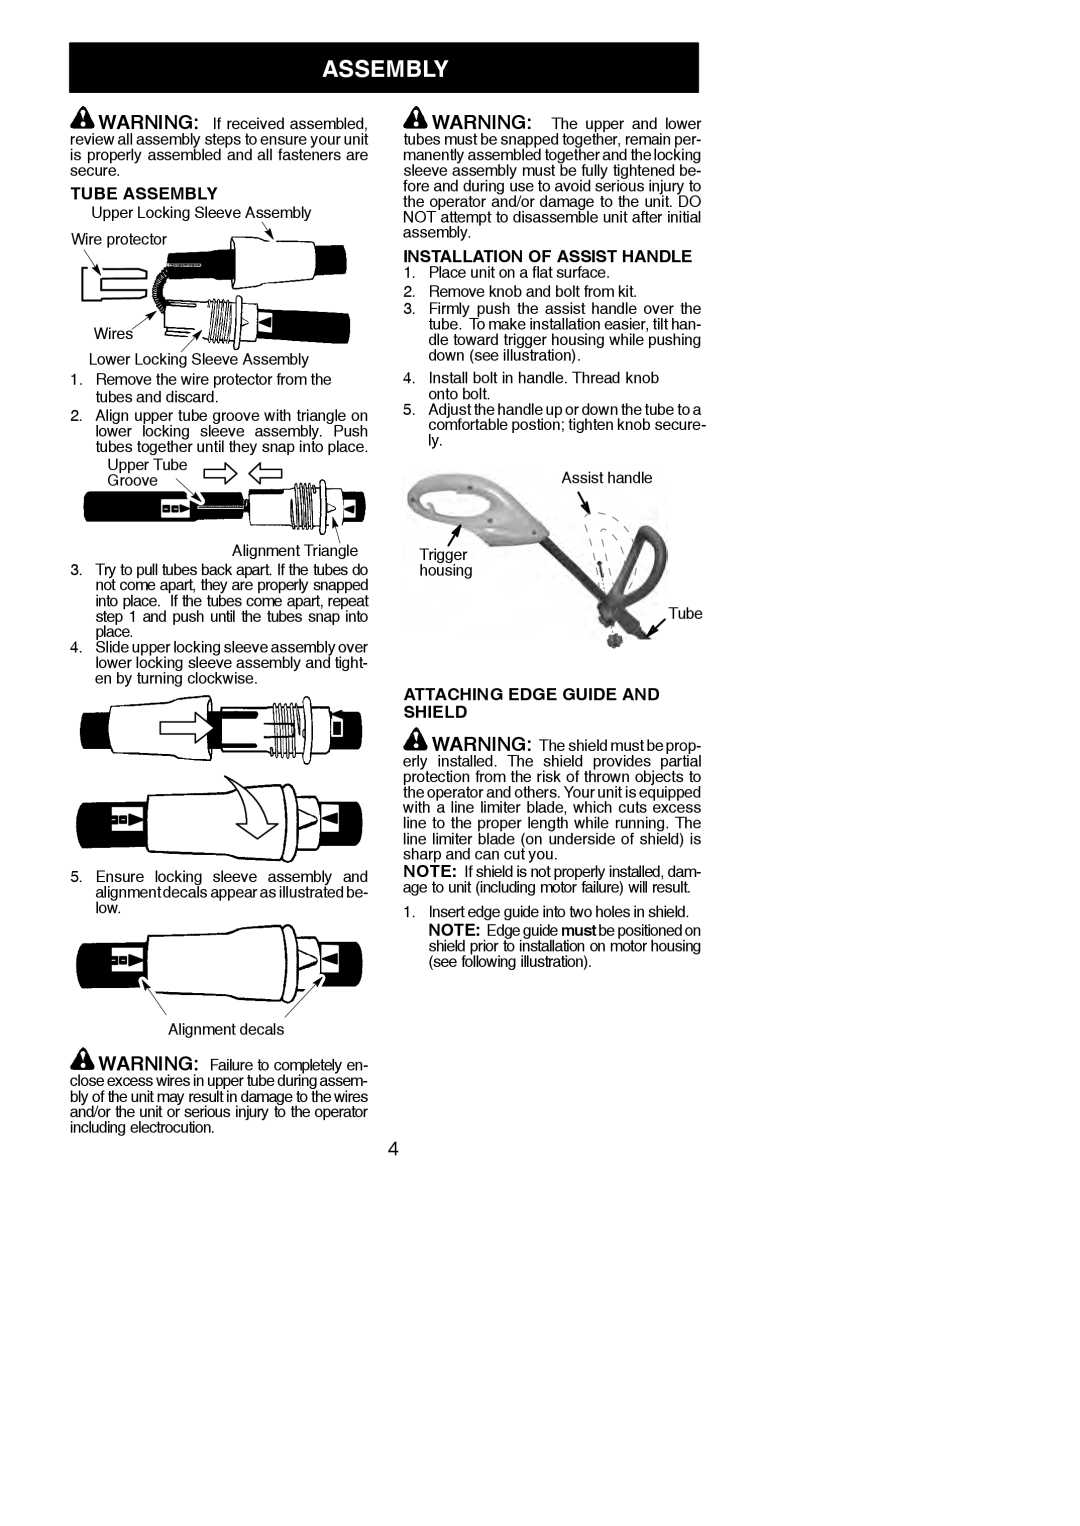
Upper Locking Sleeve Assembly Wire protector

Wires

Lower Locking Sleeve Assembly

1.Remove the wire protector from the tubes and discard.

2.Align upper tube groove with triangle on lower locking sleeve assembly. Push tubes together until they snap into place.

Upper Tube

Groove

Alignment Triangle

3.Try to pull tubes back apart. If the tubes do not come apart, they are properly snapped into place. If the tubes come apart, repeat step 1 and push until the tubes snap into place.

4.Slide upper locking sleeve assembly over lower locking sleeve assembly and tight- en by turning clockwise.

5.Ensure locking sleeve assembly and alignment decals appear as illustrated be- low.

Alignment decals

WARNING: Failure to completely en- close excess wires in upper tube during assem- bly of the unit may result in damage to the wires and/or the unit or serious injury to the operator including electrocution.

WARNING: The upper and lower tubes must be snapped together, remain per- manently assembled together and the locking sleeve assembly must be fully tightened be- fore and during use to avoid serious injury to the operator and/or damage to the unit. DO NOT attempt to disassemble unit after initial assembly.

INSTALLATION OF ASSIST HANDLE

1.Place unit on a flat surface.

2.Remove knob and bolt from kit.

3.Firmly push the assist handle over the tube. To make installation easier, tilt han- dle toward trigger housing while pushing down (see illustration).

4.Install bolt in handle. Thread knob onto bolt.

5.Adjust the handle up or down the tube to a comfortable postion; tighten knob secure- ly.

Assist handle

Trigger housing

Tube

ATTACHING EDGE GUIDE AND SHIELD

WARNING: The shield must be prop- erly installed. The shield provides partial protection from the risk of thrown objects to the operator and others. Your unit is equipped with a line limiter blade, which cuts excess line to the proper length while running. The line limiter blade (on underside of shield) is sharp and can cut you.

NOTE: If shield is not properly installed, dam- age to unit (including motor failure) will result.

1.Insert edge guide into two holes in shield. NOTE: Edge guide must be positioned on shield prior to installation on motor housing (see following illustration).

4

Page 4
Image 4
Weed Eater 966047901, 115254026 Tube Assembly, Installation of Assist Handle, Attaching Edge Guide and Shield, Groove

115254026, 966047901, WE EL-13TNE specifications

The Weed Eater WE EL-13TNE is an electric string trimmer designed to make lawn care efficient and hassle-free. With its lightweight design and user-friendly features, this model is ideal for homeowners looking for an effective solution for trimming grass and weeds around their yards.

One of the standout features of the WE EL-13TNE is its powerful 13-amp motor, which provides ample strength to slice through tough vegetation. This electric trimmer eliminates the need for fuel, making it an environmentally friendly choice that reduces emissions and noise pollution. The trimmer operates quietly, allowing for convenient trimming anytime without disturbing neighbors.

The WE EL-13TNE features a dual-line auto-feed system, which ensures a consistently even cutting length. This technology automatically feeds the string when needed, meaning users can focus on the task at hand without the hassle of manually advancing the line. The trimmer uses .065-inch replacement line, making it compatible with a variety of replacement spools available in the market.

This model also offers a 180-degree rotating head, allowing for easy transitions from trimming to edging. This versatility is beneficial for tackling different landscaping tasks around the yard. The adjustable telescoping shaft makes it easy to customize the length, ensuring comfort for users of various heights while reducing strain on the back and arms.

The WE EL-13TNE is built with a lightweight design, weighing only around 4.5 pounds, which enhances maneuverability. The trimmer also features a comfortable handle grip that enhances user control during operation. The integrated safety switch prevents accidental starts, ensuring safe use at all times.

In terms of build quality, the Weed Eater WE EL-13TNE is crafted from durable materials designed to withstand the rigors of outdoor use. Its compact design makes it easy to store and transport, perfect for homeowners with limited storage space.

Overall, the Weed Eater WE EL-13TNE electric string trimmer combines power, efficiency, and ease of use. It is a valuable tool for maintaining a well-groomed lawn, making it an excellent choice for anyone seeking reliable outdoor equipment. Whether tackling edges or trimming overgrown areas, this electric trimmer is up for the task.