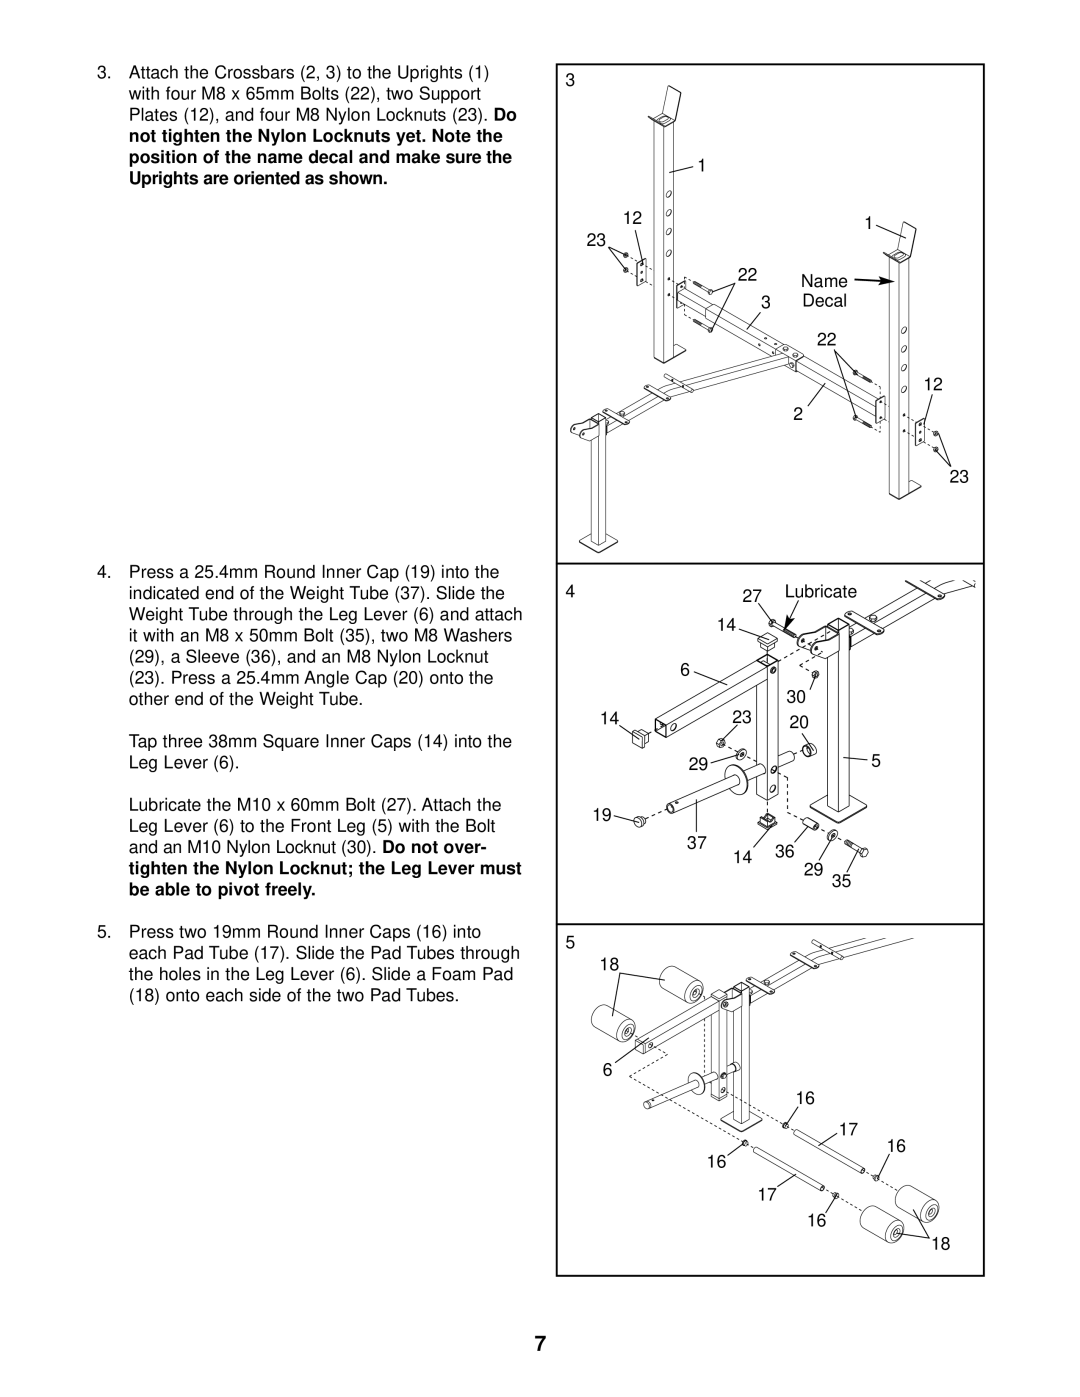
3. Attach the Crossbars (2, 3) to the Uprights (1) | 3 |
|
| |
with four M8 x 65mm Bolts (22), two Support |
|
| ||
|
|
| ||
Plates (12), and four M8 Nylon Locknuts (23). | Do |
|
| |
not tighten the Nylon Locknuts yet. Note the |
|
|
|
|
position of the name decal and make |
| sure the | 1 |
|
Uprights are oriented as shown. |
|
|
| |
|
|
|
| |
|
| 12 |
| 1 |
|
| 23 |
| |
|
|
|
| |
|
|
| 22 | Name |
|
|
|
| |
|
|
| 3 | Decal |
|
|
|
| 22 |
|
|
|
| 12 |
|
|
|
| 2 |
|
|
|
| 23 |
4. Press a 25.4mm Round Inner Cap (19) into the |
| 4 |
| Lubricate |
indicated end of the Weight Tube (37). Slide the | 27 | |||
Weight Tube through the Leg Lever (6) and attach |
| 14 |
| |
it with an M8 x 50mm Bolt (35), two M8 Washers |
|
| ||
|
|
| ||
(29), a Sleeve (36), and an M8 Nylon Locknut |
| 6 |
| |
(23). Press a 25.4mm Angle Cap (20) onto the |
|
| ||
|
| 30 | ||
other end of the Weight Tube. |
| 14 | 23 | |
Tap three 38mm Square Inner Caps (14) into the | 20 | |||
|
| 5 | ||
Leg Lever (6). |
|
| 29 | |
Lubricate the M10 x 60mm Bolt (27). Attach the | 19 |
|
| |
Leg Lever (6) to the Front Leg (5) with the Bolt |
|
|
| |
|
| 37 |
| |
and an M10 Nylon Locknut (30). | Do not over- | 36 | ||
tighten the Nylon Locknut; the Leg Lever must |
| 14 | 2935 | |
|
| |||
be able to pivot freely. |
|
|
|
|
5. Press two 19mm Round Inner Caps (16) into |
| 5 |
|
|
each Pad Tube (17). Slide the Pad Tubes through |
|
| ||
18 |
|
| ||
the holes in the Leg Lever (6). Slide a Foam Pad |
|
|
| |
|
|
|
| |
(18) onto each side of the two Pad Tubes. |
|
|
|
|
|
| 6 |
|
|
|
|
|
| 16 |
|
|
|
| 17 |
|
|
| 16 | 16 |
|
|
|
| |
|
|
| 17 | |
|
|
|
| 16 |
|
|
|
| 18 |
|
| 7 |
|
|
