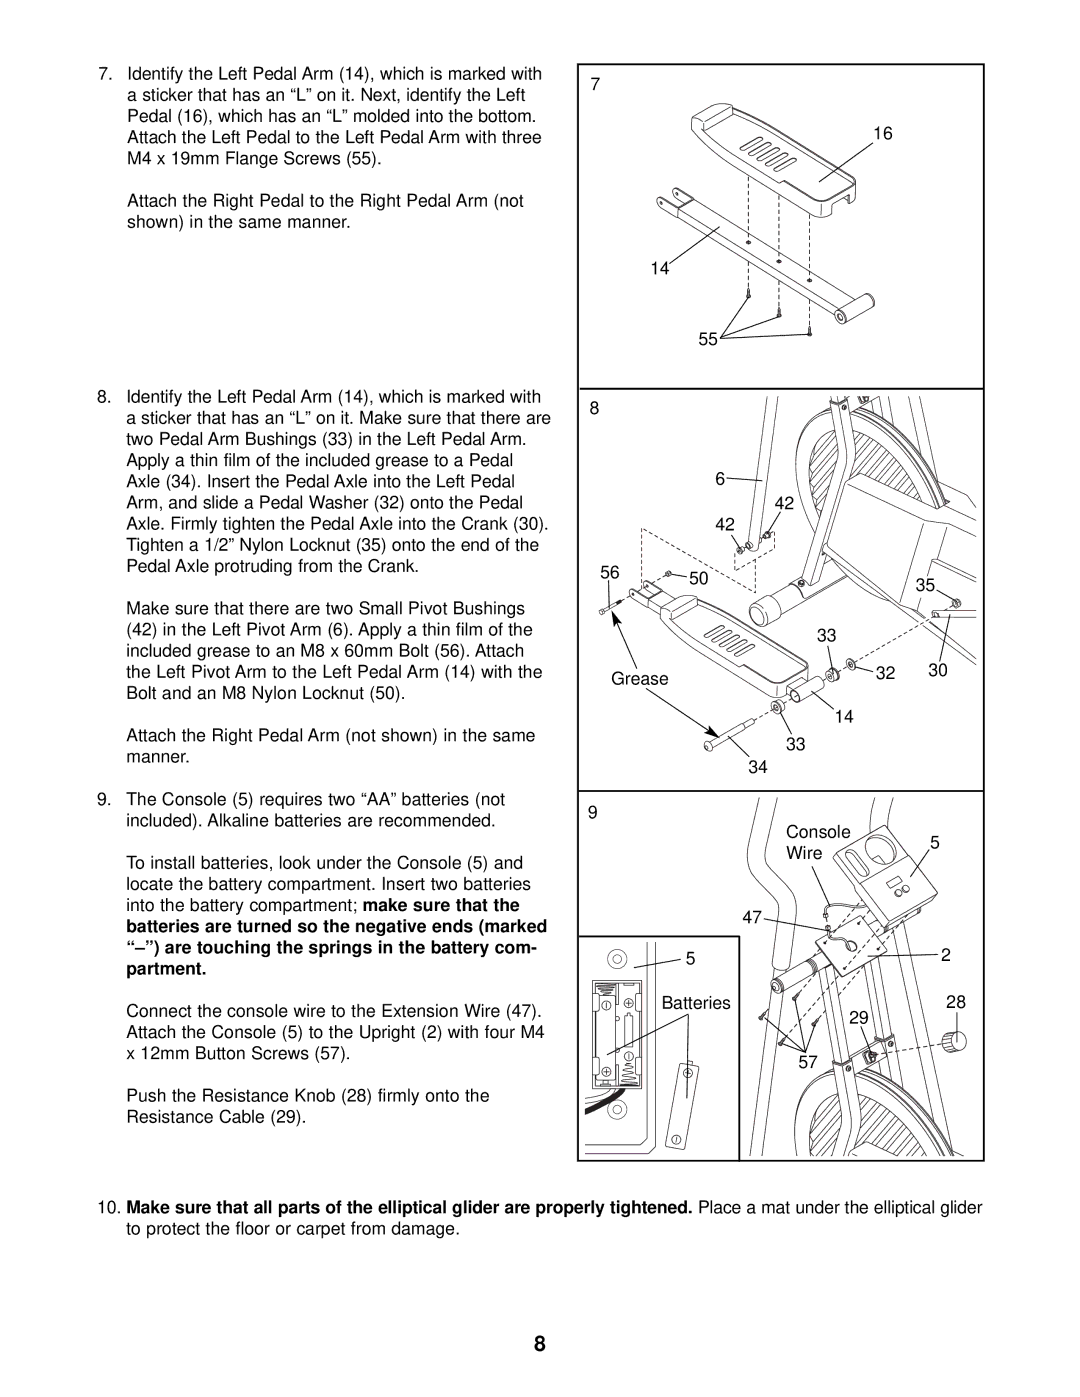
7.Identify the Left Pedal Arm (14), which is marked with a sticker that has an “L” on it. Next, identify the Left Pedal (16), which has an “L” molded into the bottom. Attach the Left Pedal to the Left Pedal Arm with three M4 x 19mm Flange Screws (55).
Attach the Right Pedal to the Right Pedal Arm (not shown) in the same manner.
8.Identify the Left Pedal Arm (14), which is marked with
a sticker that has an “L” on it. Make sure that there are two Pedal Arm Bushings (33) in the Left Pedal Arm. Apply a thin film of the included grease to a Pedal Axle (34). Insert the Pedal Axle into the Left Pedal Arm, and slide a Pedal Washer (32) onto the Pedal Axle. Firmly tighten the Pedal Axle into the Crank (30). Tighten a 1/2” Nylon Locknut (35) onto the end of the Pedal Axle protruding from the Crank.
Make sure that there are two Small Pivot Bushings
(42)in the Left Pivot Arm (6). Apply a thin film of the included grease to an M8 x 60mm Bolt (56). Attach the Left Pivot Arm to the Left Pedal Arm (14) with the Bolt and an M8 Nylon Locknut (50).
Attach the Right Pedal Arm (not shown) in the same manner.
9.The Console (5) requires two “AA” batteries (not included). Alkaline batteries are recommended.
To install batteries, look under the Console (5) and locate the battery compartment. Insert two batteries into the battery compartment; make sure that the batteries are turned so the negative ends (marked
Connect the console wire to the Extension Wire (47). Attach the Console (5) to the Upright (2) with four M4 x 12mm Button Screws (57).
Push the Resistance Knob (28) firmly onto the Resistance Cable (29).
7 |
|
|
|
|
| 16 |
|
| 14 |
|
|
| 55 |
|
|
8 |
|
|
|
| 6 |
|
|
|
| 42 |
|
| 42 |
|
|
56 | 50 |
| 35 |
|
| ||
|
|
| |
|
| 33 |
|
Grease | 32 | 30 | |
|
| ||
|
| 14 |
|
|
| 33 |
|
|
| 34 |
|
9 |
| Console |
|
|
| 5 | |
|
| Wire | |
|
|
| |
|
| 47 |
|
| 5 |
| 2 |
| Batteries | 29 | 28 |
|
|
| |
|
| 57 |
|
10.Make sure that all parts of the elliptical glider are properly tightened. Place a mat under the elliptical glider to protect the floor or carpet from damage.
8