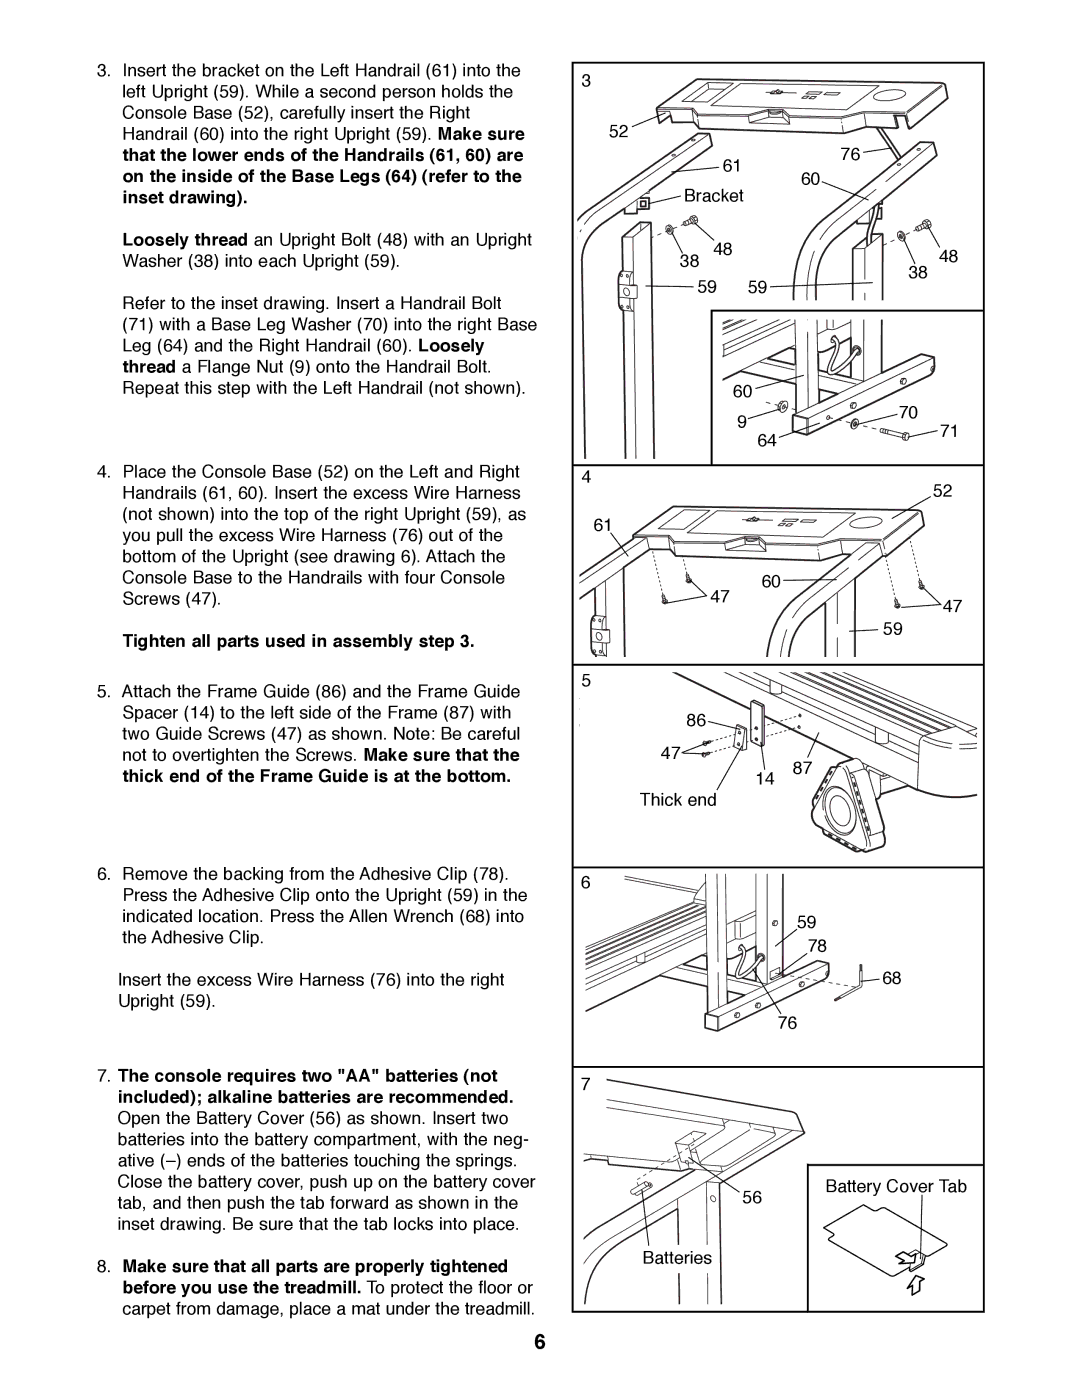
3.Insert the bracket on the Left Handrail (61) into the left Upright (59). While a second person holds the Console Base (52), carefully insert the Right Handrail (60) into the right Upright (59). Make sure that the lower ends of the Handrails (61, 60) are on the inside of the Base Legs (64) (refer to the inset drawing).
Loosely thread an Upright Bolt (48) with an Upright Washer (38) into each Upright (59).
Refer to the inset drawing. Insert a Handrail Bolt
(71) with a Base Leg Washer (70) into the right Base Leg (64) and the Right Handrail (60). Loosely thread a Flange Nut (9) onto the Handrail Bolt. Repeat this step with the Left Handrail (not shown).
4.Place the Console Base (52) on the Left and Right Handrails (61, 60). Insert the excess Wire Harness (not shown) into the top of the right Upright (59), as you pull the excess Wire Harness (76) out of the bottom of the Upright (see drawing 6). Attach the Console Base to the Handrails with four Console Screws (47).
Tighten all parts used in assembly step 3.
5.Attach the Frame Guide (86) and the Frame Guide Spacer (14) to the left side of the Frame (87) with two Guide Screws (47) as shown. Note: Be careful not to overtighten the Screws. Make sure that the thick end of the Frame Guide is at the bottom.
6.Remove the backing from the Adhesive Clip (78). Press the Adhesive Clip onto the Upright (59) in the indicated location. Press the Allen Wrench (68) into the Adhesive Clip.
Insert the excess Wire Harness (76) into the right Upright (59).
7.The console requires two "AA" batteries (not included); alkaline batteries are recommended.
Open the Battery Cover (56) as shown. Insert two batteries into the battery compartment, with the neg- ative (Ð) ends of the batteries touching the springs. Close the battery cover, push up on the battery cover tab, and then push the tab forward as shown in the inset drawing. Be sure that the tab locks into place.
8.Make sure that all parts are properly tightened before you use the treadmill. To protect the floor or carpet from damage, place a mat under the treadmill.
6
3 |
|
|
| |
52 |
|
|
| |
| 61 | 76 | ||
| 60 | |||
Bracket | ||||
| ||||
38 | 48 |
| 48 | |
59 | 59 | 38 | ||
| ||||
|
| 60 |
| |
|
| 9 | 70 | |
|
| 71 | ||
|
| 64 | ||
|
|
| ||
4 |
|
| 52 | |
|
|
| ||
61 |
|
|
| |
| 47 | 60 | ||
|
| 47 | ||
|
|
| ||
|
|
| 59 | |
5 |
|
|
| |
86 |
|
|
| |
47 |
|
| 87 | |
|
| 14 | ||
Thick end |
|
| ||
6 |
|
|
| |
|
|
| 59 | |
|
|
| 78 | |
|
|
| 68 | |
|
|
| 76 | |
7 |
|
|
| |
|
| 56 | Battery Cover Tab | |
|
|
| ||
Batteries |
|
| ||