UL-ES-6CP30-WH 04

If you have difficulty operating your new ceiling fan, it may be the result of incorrect assembly, installation, or wiring. In some cases, these TROUBLESHOOTING GUIDE installation errors may be mistaken for defects. If you experience any faults, please check this Trouble Shooting Chart. If a problem cannot

be remedied, please consult with your authorized electrician and do not attempt any electrical repairs yourself.

TROUBLE

1.If fan does not start:

2.If fan sounds noisy:

3. If fan wobbles:

Touching

Ceiling

Figure 1

Blade Tip Down:

Fan Blade

Blade Brackets

Blade Tip Up:

Fan Blade

4. If light does not work:

SUGGESTED REMEDY

1.Check main and branch circuit fuses or circuit breakers.

2.Check wire connections as performed in step #6 or #7 of installation. CAUTION: Make sure main power is turned off.

3.Make sure forward/reverse switch is firmly in up or down position. Fan will not operate when switch is in the middle.

4.If the fan still will not start, contact a qualified electrician. Do not attempt to troubleshoot internal electrical connections yourself.

1.Check to make sure all screws in motor housing are snug (not over tightened).

2.Check to make sure the screws which attach the fan blade holder to the motor are tight.

3.If using an optional Ceiling Fan Light Kit, check to be sure the screws securing the glassware are finger tight. Check to be sure light bulb is tight in socket and not touching glass shade(s). If vibration persists from glass, remove glass and install a 6mm wide rubber band on glass neck to act as an insulator. Replace glass and tighten screws against rubber band.

4.Some fan motors are sensitive to signals from Solid State variable speed controls. DO NOT USE a Solid State variable speed control.

5.Allow “break-in” period of 24 hours. Most noises associated with a new fan will disappear after this period.

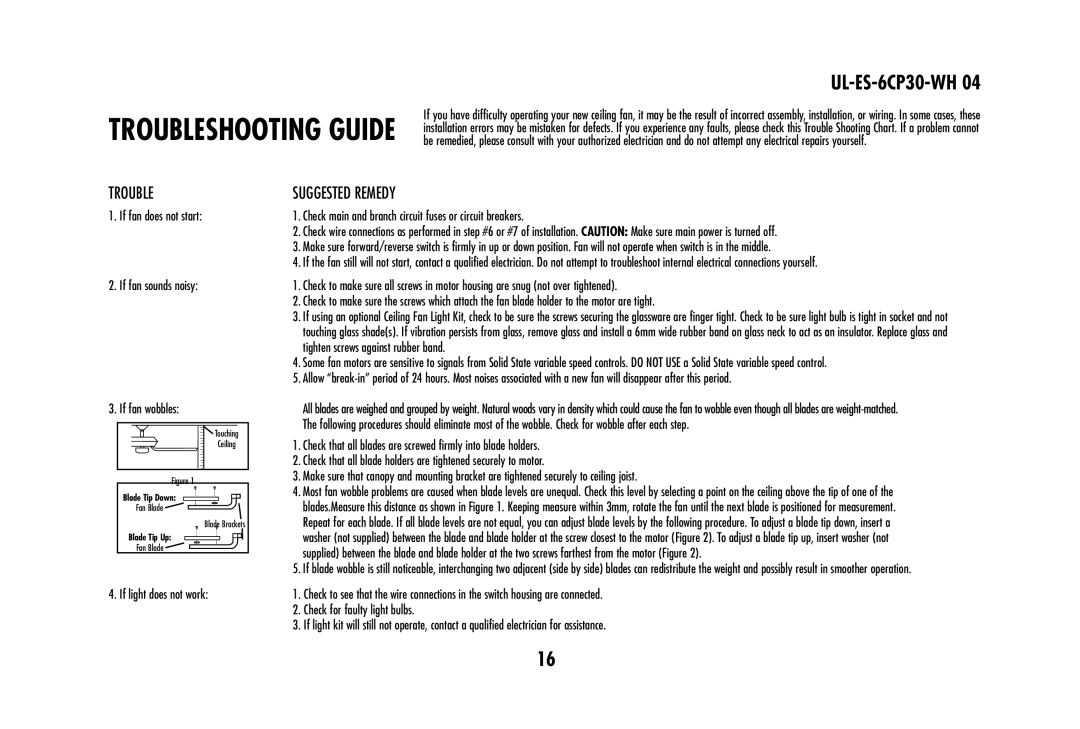
All blades are weighed and grouped by weight. Natural woods vary in density which could cause the fan to wobble even though all blades are weight-matched. The following procedures should eliminate most of the wobble. Check for wobble after each step.

1.Check that all blades are screwed firmly into blade holders.

2.Check that all blade holders are tightened securely to motor.

3.Make sure that canopy and mounting bracket are tightened securely to ceiling joist.

4.Most fan wobble problems are caused when blade levels are unequal. Check this level by selecting a point on the ceiling above the tip of one of the blades.Measure this distance as shown in Figure 1. Keeping measure within 3mm, rotate the fan until the next blade is positioned for measurement. Repeat for each blade. If all blade levels are not equal, you can adjust blade levels by the following procedure. To adjust a blade tip down, insert a washer (not supplied) between the blade and blade holder at the screw closest to the motor (Figure 2). To adjust a blade tip up, insert washer (not supplied) between the blade and blade holder at the two screws farthest from the motor (Figure 2).

5.If blade wobble is still noticeable, interchanging two adjacent (side by side) blades can redistribute the weight and possibly result in smoother operation.

1.Check to see that the wire connections in the switch housing are connected.

2.Check for faulty light bulbs.

3.If light kit will still not operate, contact a qualified electrician for assistance.

16

Page 16
Image 16
Westinghouse 78108, 78603 owner manual Trouble, Suggested Remedy

78603, 78108 specifications

The Westinghouse 78108 and 78603 are notable models in the realm of electrical household appliances, specifically designed for modern cooking needs. These units are part of Westinghouse’s commitment to innovation and efficiency, delivering both power and versatility in the kitchen.

The Westinghouse 78108 model is primarily recognized for its compact design and user-friendly features. One of the standout characteristics is its energy-efficient technology, which not only conserves electricity but also ensures that meals are cooked evenly and thoroughly. The 78108 comes equipped with a high-performance heating element that offers rapid heat-up times, allowing users to cook meals quickly without sacrificing quality. Furthermore, it boasts multiple cooking modes, such as bake, broil, and roast, catering to a variety of culinary styles.

On the other hand, the Westinghouse 78603 model is tailored for those who appreciate advanced cooking technology. It includes a digital control panel that allows for precise temperature adjustments and cooking times, making it an ideal choice for both novice cooks and seasoned chefs. Its convection cooking feature circulates hot air throughout the oven, ensuring that dishes are cooked consistently and reducing cooking times. The 78603 also emphasizes safety, incorporating features like an automatic shut-off timer and a cool-touch exterior to prevent burns.

Both models exhibit a sleek and modern aesthetic, designed to complement contemporary kitchen decor. They are made from durable materials to withstand the rigors of daily use, ensuring longevity and reliability.

Moreover, the Westinghouse 78108 and 78603 are relatively easy to clean, featuring removable racks and smooth surfaces that can be wiped down effortlessly. With their easy installation options, users can set them up in their kitchens with minimal hassle.

In summary, the Westinghouse 78108 and 78603 provide a perfect blend of convenience, efficiency, and cutting-edge technology. They represent Westinghouse’s dedication to enhancing the cooking experience, making them excellent choices for anyone looking to upgrade their kitchen appliances. From energy efficiency to safety features and user-friendly designs, these models are crafted to meet the demands of modern culinary enthusiasts.