COperating position

front leveling leg

rear leveling leg

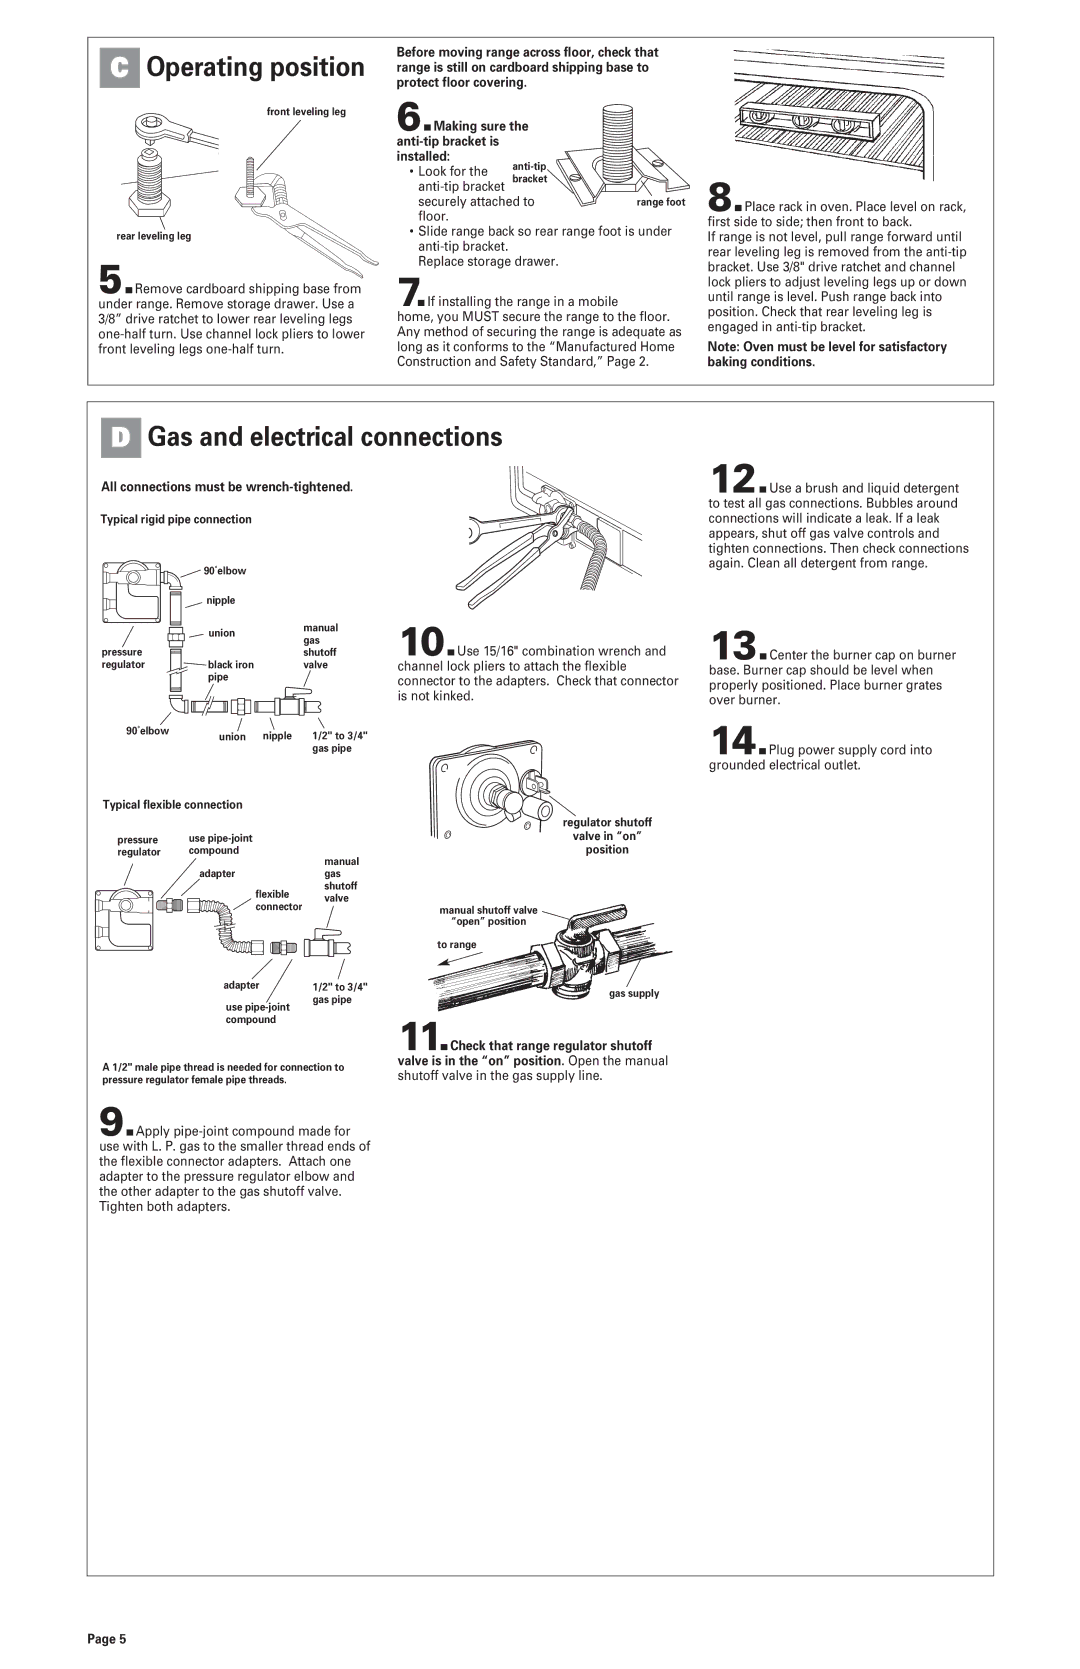
5.Remove cardboard shipping base from under range. Remove storage drawer. Use a 3/8” drive ratchet to lower rear leveling legs one-half turn. Use channel lock pliers to lower front leveling legs one-half turn.

Before moving range across floor, check that range is still on cardboard shipping base to protect floor covering.

6.Making sure the anti-tip bracket is installed:

• Look for the

anti-tip


anti-tip bracket

bracket


securely attached to

range foot

floor.


Slide range back so rear range foot is under anti-tip bracket.

Replace storage drawer.

7.If installing the range in a mobile

home, you MUST secure the range to the floor. Any method of securing the range is adequate as long as it conforms to the “Manufactured Home Construction and Safety Standard,” Page 2.

8.Place rack in oven. Place level on rack, first side to side; then front to back.

If range is not level, pull range forward until rear leveling leg is removed from the anti-tip bracket. Use 3/8" drive ratchet and channel lock pliers to adjust leveling legs up or down until range is level. Push range back into position. Check that rear leveling leg is engaged in anti-tip bracket.

Note: Oven must be level for satisfactory baking conditions.

DGas and electrical connections

All connections must be wrench-tightened.

Typical rigid pipe connection

12.Use a brush and liquid detergent to test all gas connections. Bubbles around connections will indicate a leak. If a leak appears, shut off gas valve controls and tighten connections. Then check connections again. Clean all detergent from range.

pressure regulator

90˚elbow

90˚elbow


nipple


union

manual

gas


shutoff

black iron

valve

pipe


union

nipple

1/2" to 3/4"


gas pipe

10.Use 15/16" combination wrench and channel lock pliers to attach the flexible connector to the adapters. Check that connector is not kinked.

13.Center the burner cap on burner base. Burner cap should be level when properly positioned. Place burner grates over burner.

14.Plug power supply cord into grounded electrical outlet.

Typical flexible connection

pressure

use pipe-joint


regulator

compound


manual


adapter


gas


flexible

shutoff


valve


connector


adapter

1/2" to 3/4"

use pipe-joint

gas pipe


compound


A 1/2" male pipe thread is needed for connection to pressure regulator female pipe threads.

9.Apply pipe-joint compound made for use with L. P. gas to the smaller thread ends of the flexible connector adapters. Attach one adapter to the pressure regulator elbow and the other adapter to the gas shutoff valve. Tighten both adapters.

regulator shutoff

valve in “on”

position

manual shutoff valve

“open” position

to range

gas supply

11.Check that range regulator shutoff valve is in the “on” position. Open the manual shutoff valve in the gas supply line.

Page 5

Page 5
Image 5
Whirlpool 8523782 installation instructions Gas and electrical connections, All connections must be wrench-tightened

8523782 specifications

The Whirlpool 8523782 is a highly regarded refrigerator water filter that offers consumers a reliable solution for ensuring clean and safe drinking water. This filter is designed to be compatible with various Whirlpool refrigerators, making it a versatile choice for many households.

One of the main features of the Whirlpool 8523782 is its ability to reduce a wide range of contaminants found in tap water. This includes substances like chlorine, lead, and sediment, which can affect both the taste and safety of drinking water. By utilizing a certified filtration process, the 8523782 effectively improves the overall quality of water dispensed from the refrigerator, providing peace of mind to users who prioritize health and wellness.

The technology used in the Whirlpool 8523782 involves activated carbon block filtration. This method is renowned for its efficiency in trapping impurities while allowing essential minerals to remain in the water. As a result, users can enjoy crisp, refreshing water and ice, free from unwanted odors and flavors. The filter is designed to provide up to six months of usage before requiring a replacement, making it a practical option for busy families.

Another characteristic of the Whirlpool 8523782 is its easy installation process. The filter is designed to snap into place with minimal effort, allowing users to replace it without the need for professional assistance. This user-friendly feature is particularly beneficial for those who might find the idea of changing a water filter daunting.

Additionally, the 8523782 is built with the environment in mind. By ensuring that users can easily switch out their filters rather than relying on bottled water, it contributes to reducing plastic waste. It also supports Whirlpool’s commitment to sustainability, aligning with consumers’ growing demand for eco-friendly products.

In conclusion, the Whirlpool 8523782 water filter stands out for its effective filtration capabilities, user-friendly installation, and commitment to sustainability. With its advanced technology and reliability, it is an essential accessory for anyone seeking to enhance the quality of their drinking water directly from their refrigerator. Whether you’re a health-conscious individual or simply enjoy the taste of pure, filtered water, the Whirlpool 8523782 is a commendable investment for your home.