Connect to Refrigerator

Depending on your model, the water line may come down from the top or up from the bottom. Follow the connection instructions for your model.

Style 1

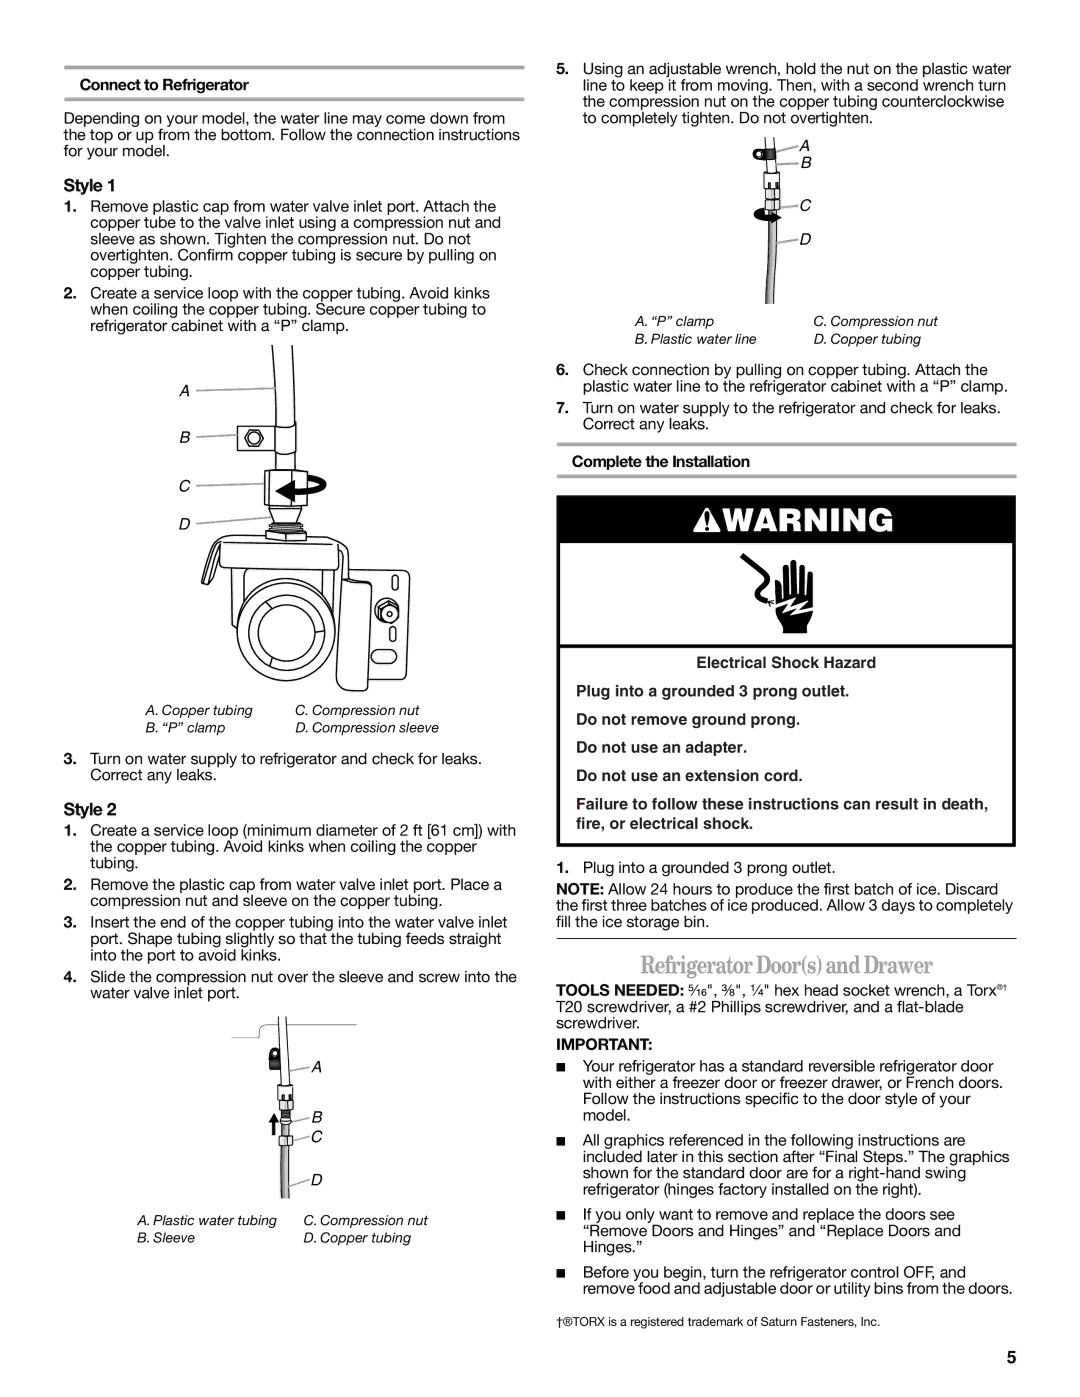
1.Remove plastic cap from water valve inlet port. Attach the copper tube to the valve inlet using a compression nut and sleeve as shown. Tighten the compression nut. Do not overtighten. Confirm copper tubing is secure by pulling on copper tubing.

2.Create a service loop with the copper tubing. Avoid kinks when coiling the copper tubing. Secure copper tubing to refrigerator cabinet with a “P” clamp.

A

B

C

D

A. Copper tubing

C. Compression nut

B. “P” clamp

D. Compression sleeve

3.Turn on water supply to refrigerator and check for leaks. Correct any leaks.

Style 2

1.Create a service loop (minimum diameter of 2 ft [61 cm]) with the copper tubing. Avoid kinks when coiling the copper tubing.

2.Remove the plastic cap from water valve inlet port. Place a compression nut and sleeve on the copper tubing.

3.Insert the end of the copper tubing into the water valve inlet port. Shape tubing slightly so that the tubing feeds straight into the port to avoid kinks.

4.Slide the compression nut over the sleeve and screw into the water valve inlet port.


A


B


C


D

A. Plastic water tubing

C. Compression nut

B. Sleeve

D. Copper tubing

5.Using an adjustable wrench, hold the nut on the plastic water line to keep it from moving. Then, with a second wrench turn the compression nut on the copper tubing counterclockwise to completely tighten. Do not overtighten.

A

B

C

D

A. “P” clamp

C. Compression nut

B. Plastic water line

D. Copper tubing

6.Check connection by pulling on copper tubing. Attach the plastic water line to the refrigerator cabinet with a “P” clamp.

7.Turn on water supply to the refrigerator and check for leaks. Correct any leaks.

Complete the Installation

WARNING

Electrical Shock Hazard

Plug into a grounded 3 prong outlet.

Do not remove ground prong.

Do not use an adapter.

Do not use an extension cord.

Failure to follow these instructions can result in death, fire, or electrical shock.

1.Plug into a grounded 3 prong outlet.

NOTE: Allow 24 hours to produce the first batch of ice. Discard the first three batches of ice produced. Allow 3 days to completely fill the ice storage bin.

Refrigerator Door(s)and Drawer

TOOLS NEEDED: ⁵⁄₁₆", ³⁄₈", ¹⁄₄" hex head socket wrench, a Torx®† T20 screwdriver, a #2 Phillips screwdriver, and a flat-blade screwdriver.

IMPORTANT:

Your refrigerator has a standard reversible refrigerator door with either a freezer door or freezer drawer, or French doors. Follow the instructions specific to the door style of your model.

All graphics referenced in the following instructions are included later in this section after “Final Steps.” The graphics shown for the standard door are for a right-hand swing refrigerator (hinges factory installed on the right).

If you only want to remove and replace the doors see “Remove Doors and Hinges” and “Replace Doors and Hinges.”

Before you begin, turn the refrigerator control OFF, and remove food and adjustable door or utility bins from the doors.

†®TORX is a registered trademark of Saturn Fasteners, Inc.

5

Page 5
Image 5
Whirlpool GX2FHDXVY, GX5FHTXVB, GX5FHDXVY, GX5FHTXVY, GX5FHTXVQ Refrigerator Doorsand Drawer, Style, Connect to Refrigerator

EB9SHKXVQ, W10366205A, GB9FHDXWB, GB9FHDXWQ, GB9FHDXWS specifications

The Whirlpool GX5FHTXVB, GX5FHDXVY, GX5FHTXVY, GX5FHTXVQ, and GX5FHDXVB are part of Whirlpool's innovative lineup of side-by-side refrigerators, designed to cater to modern consumer needs. These models blend style, functionality, and advanced technology to enhance kitchen spaces and improve the food preservation experience.

One of the standout features across this range is the Adaptive Defrost technology, which optimizes the defrosting process based on how frequently the refrigerator door is opened, thus minimizing frost buildup and enhancing energy efficiency. This helps users save on their energy bills while ensuring that food stays fresh longer.

Another important characteristic is the Accu-Chill Temperature Management System. This system senses the temperature inside the refrigerator and adjusts cooling settings accordingly, providing a stable environment for food items. This is particularly beneficial for perishable goods, ensuring that fruits and vegetables stay fresh longer.

Each model also boasts an external water and ice dispenser, offering convenient access to refreshing filtered water and ice without having to open the fridge door. This feature not only provides easy access but also helps maintain a consistent internal temperature, contributing to energy savings.

The interior layout of each model is designed for maximum usability. Adjustable shelves allow users to customize their storage needs based on the size of items they are storing. Additionally, the models feature humidity-controlled crispers that help maintain optimal moisture levels for fruits and vegetables, prolonging freshness.

In terms of design, these refrigerators exhibit a sleek, modern aesthetic with a fingerprint-resistant finish, making them easy to clean and maintain. The LED lighting illuminates the interior beautifully, providing visibility and enhancing the overall look.

Durability is another key characteristic, as Whirlpool is known for manufacturing reliable products. The GX series refrigerators are built with high-quality components to ensure long-term performance.

In conclusion, the Whirlpool GX5FHTXVB, GX5FHDXVY, GX5FHTXVY, GX5FHTXVQ, and GX5FHDXVB represent a commitment to quality and innovation in home appliances. With their advanced features, energy-efficient technologies, and user-friendly designs, these refrigerators are well-equipped to meet the demands of today’s households, making them a great addition to any kitchen.