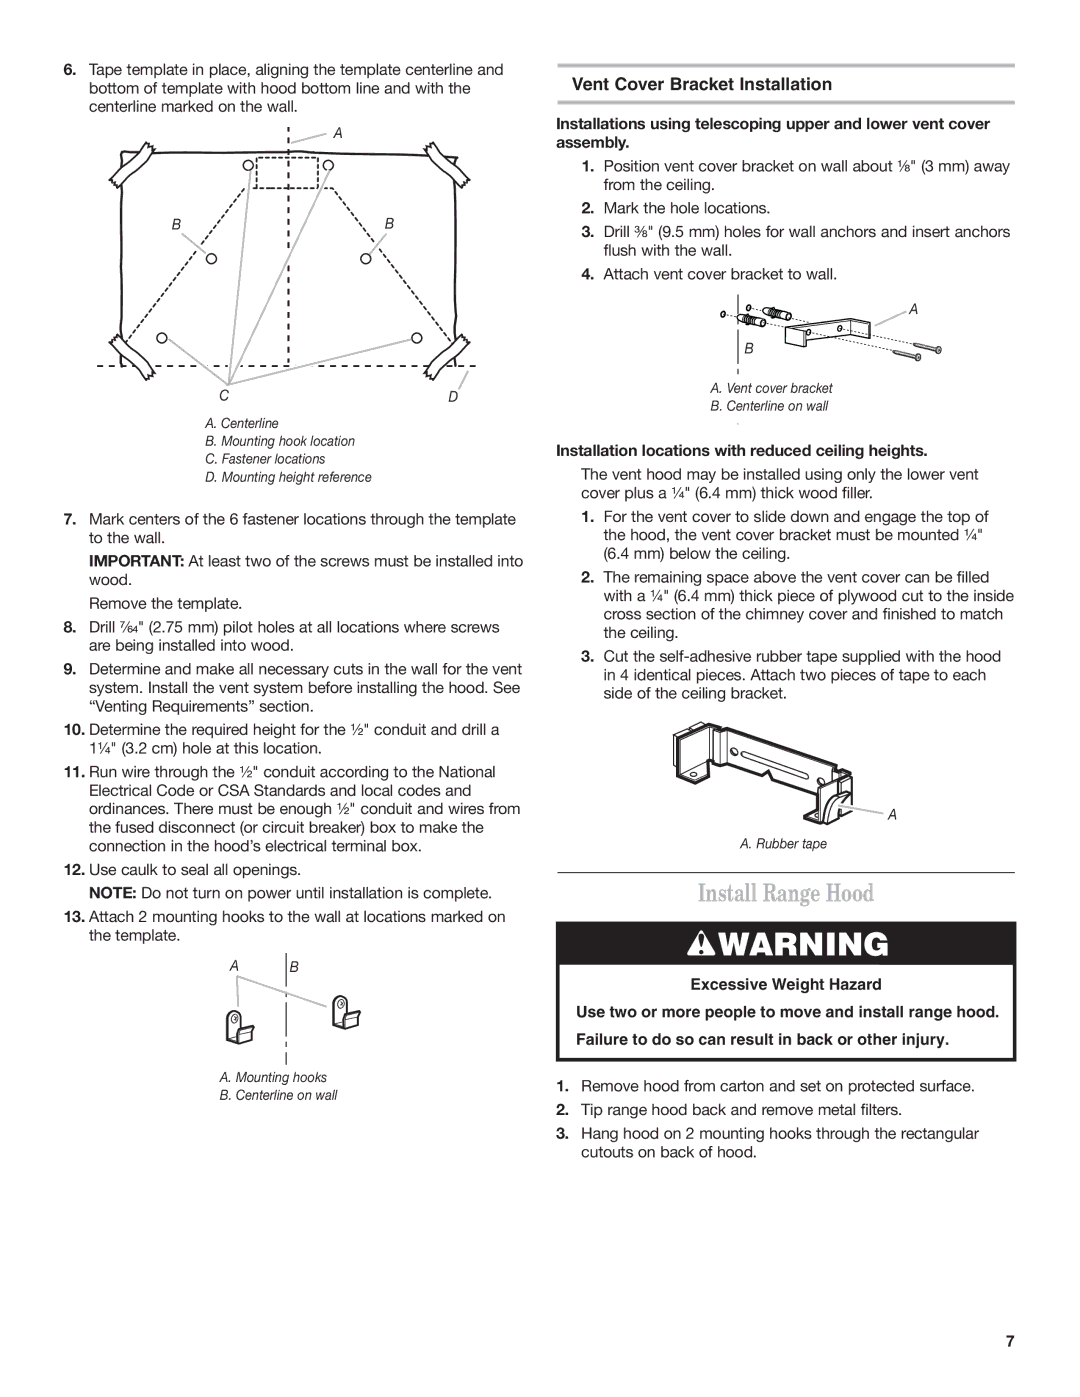
6.Tape template in place, aligning the template centerline and bottom of template with hood bottom line and with the centerline marked on the wall.

A

BB

CD

A.Centerline

B.Mounting hook location

C.Fastener locations

D.Mounting height reference

7.Mark centers of the 6 fastener locations through the template to the wall.

IMPORTANT: At least two of the screws must be installed into wood.

Remove the template.

8.Drill ⁷⁄₆₄" (2.75 mm) pilot holes at all locations where screws are being installed into wood.

9.Determine and make all necessary cuts in the wall for the vent system. Install the vent system before installing the hood. See “Venting Requirements” section.

10.Determine the required height for the ¹⁄₂" conduit and drill a 1¹⁄₄" (3.2 cm) hole at this location.

11.Run wire through the ¹⁄₂" conduit according to the National Electrical Code or CSA Standards and local codes and ordinances. There must be enough ¹⁄₂" conduit and wires from the fused disconnect (or circuit breaker) box to make the connection in the hood’s electrical terminal box.

12.Use caulk to seal all openings.

NOTE: Do not turn on power until installation is complete.

13.Attach 2 mounting hooks to the wall at locations marked on the template.

AB

A.Mounting hooks

B.Centerline on wall

Vent Cover Bracket Installation

Installations using telescoping upper and lower vent cover assembly.

1.Position vent cover bracket on wall about ¹⁄₈" (3 mm) away from the ceiling.

2.Mark the hole locations.

3.Drill ³⁄₈" (9.5 mm) holes for wall anchors and insert anchors flush with the wall.

4.Attach vent cover bracket to wall.

A

B

A. Vent cover bracket

B. Centerline on wall

Installation locations with reduced ceiling heights.

The vent hood may be installed using only the lower vent cover plus a ¹⁄₄" (6.4 mm) thick wood filler.

1.For the vent cover to slide down and engage the top of the hood, the vent cover bracket must be mounted ¹⁄₄"

(6.4 mm) below the ceiling.

2.The remaining space above the vent cover can be filled with a ¹⁄₄" (6.4 mm) thick piece of plywood cut to the inside cross section of the chimney cover and finished to match the ceiling.

3.Cut the self-adhesive rubber tape supplied with the hood in 4 identical pieces. Attach two pieces of tape to each side of the ceiling bracket.

A

A. Rubber tape

Install Range Hood

WARNING

Excessive Weight Hazard

Use two or more people to move and install range hood. Failure to do so can result in back or other injury.

1.Remove hood from carton and set on protected surface.

2.Tip range hood back and remove metal filters.

3.Hang hood on 2 mounting hooks through the rectangular cutouts on back of hood.

7

Page 7
Image 7
Whirlpool IH7302RS0 installation instructions Install Range Hood, Vent Cover Bracket Installation

IH7302RS0 specifications

The Whirlpool IH7302RS0 is a state-of-the-art kitchen appliance designed to enhance convenience and efficiency in modern cooking. This induction cooktop features a sleek and stylish design, making it a perfect fit for any contemporary kitchen. One of the primary advantages of this model is its powerful and precise cooking capabilities. With multiple cooking zones, it allows users to prepare multiple dishes simultaneously without sacrificing quality.

A standout feature of the Whirlpool IH7302RS0 is its advanced induction technology. Induction cooking utilizes magnetic fields to directly heat pots and pans, resulting in rapid temperature adjustments and reduced cook times. This technology not only provides a faster cooking experience but also ensures better energy efficiency, as heat is generated directly in the cookware instead of on the cooktop surface.

The cooktop offers various temperature settings and power levels, giving users control over their cooking processes. Its intuitive touch controls make it easy to adjust settings with a simple tap. Additionally, the model includes a timer function, so you can keep track of cooking times without needing to constantly monitor your dish.

Safety is a top priority with the Whirlpool IH7302RS0, which is equipped with child lock features to prevent accidental activation by young ones. The cooktop also contains an automatic shut-off function, which turns off the appliance after a set period of inactivity, providing peace of mind to users.

Another remarkable characteristic is the easy-to-clean ceramic glass surface, which not only looks elegant but also simplifies maintenance. Spills and splatters can be wiped away effortlessly, saving time and effort in cleanup after meals.

Moreover, the Whirlpool IH7302RS0 is designed with compatibility in mind, as it works with a variety of cookware materials including stainless steel and cast iron. This adaptability means that you can use your existing pots and pans without needing to invest in new equipment.

In summary, the Whirlpool IH7302RS0 stands out for its induction technology, user-friendly controls, safety features, and stylish appearance. It embodies the ideal blend of performance, convenience, and safety, making it an excellent choice for both novice cooks and experienced chefs alike.