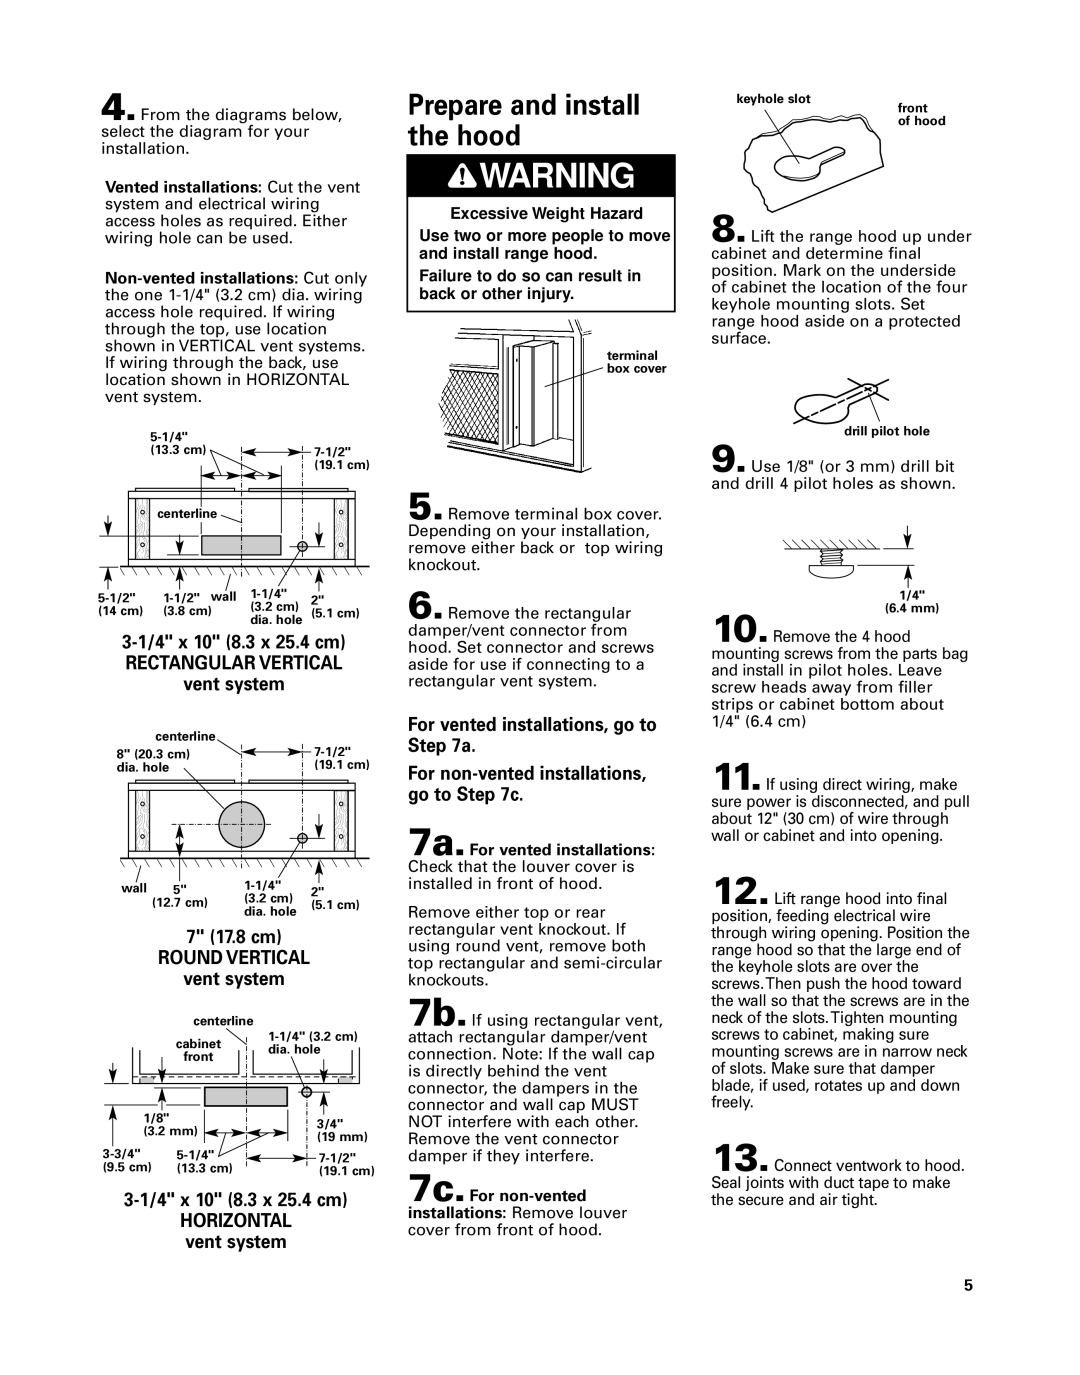
4.From the diagrams below, select the diagram for your installation.

Vented installations: Cut the vent system and electrical wiring access holes as required. Either wiring hole can be used.

Non-vented installations: Cut only the one 1-1/4" (3.2 cm) dia. wiring access hole required. If wiring through the top, use location shown in VERTICAL vent systems. If wiring through the back, use location shown in HORIZONTAL vent system.

5-1/4"


(13.3 cm)

7-1/2"


(19.1 cm)

centerline


wall 1-1/4"


5-1/2"

1-1/2"

2"

(14 cm)

(3.8 cm)

(3.2 cm)

dia. hole

(5.1 cm)


3-1/4" x 10" (8.3 x 25.4 cm)

RECTANGULAR VERTICAL

vent system

centerline


8" (20.3 cm)

7-1/2"

dia. hole

(19.1 cm)

wall

5"

1-1/4"

2"


(12.7 cm)

(3.2 cm)

(5.1 cm)


dia. hole


7" (17.8 cm)

ROUND VERTICAL

vent system

centerline


cabinet

1-1/4" (3.2 cm)

dia. hole

front


1/8"

3/4"

(3.2 mm)

(19 mm)


3-3/4"

5-1/4"

7-1/2"

(9.5 cm)

(13.3 cm)

(19.1 cm)

3-1/4" x 10" (8.3 x 25.4 cm)

HORIZONTAL vent system

Prepare and install the hood

WARNING

Excessive Weight Hazard

Use two or more people to move and install range hood.

Failure to do so can result in back or other injury.

terminal box cover

5.Remove terminal box cover. Depending on your installation, remove either back or top wiring knockout.

6.Remove the rectangular damper/vent connector from hood. Set connector and screws aside for use if connecting to a rectangular vent system.

For vented installations, go to Step 7a.

For non-vented installations, go to Step 7c.

7a.For vented installations: Check that the louver cover is installed in front of hood.

Remove either top or rear rectangular vent knockout. If using round vent, remove both top rectangular and semi-circular knockouts.

7b.If using rectangular vent, attach rectangular damper/vent connection. Note: If the wall cap is directly behind the vent connector, the dampers in the connector and wall cap MUST NOT interfere with each other. Remove the vent connector damper if they interfere.

7c.For non-vented

installations: Remove louver cover from front of hood.

keyhole slot

front of hood

8.Lift the range hood up under cabinet and determine final position. Mark on the underside of cabinet the location of the four keyhole mounting slots. Set range hood aside on a protected surface.

drill pilot hole

9.Use 1/8" (or 3 mm) drill bit and drill 4 pilot holes as shown.

1/4"

(6.4 mm)

10.Remove the 4 hood mounting screws from the parts bag and install in pilot holes. Leave screw heads away from filler strips or cabinet bottom about 1/4" (6.4 cm)

11.If using direct wiring, make sure power is disconnected, and pull about 12" (30 cm) of wire through wall or cabinet and into opening.

12.Lift range hood into final position, feeding electrical wire through wiring opening. Position the range hood so that the large end of the keyhole slots are over the screws.Then push the hood toward the wall so that the screws are in the neck of the slots.Tighten mounting screws to cabinet, making sure mounting screws are in narrow neck of slots. Make sure that damper blade, if used, rotates up and down freely.

13.Connect ventwork to hood. Seal joints with duct tape to make the secure and air tight.

5

Page 5
Image 5
Whirlpool RH3730 installation instructions Prepare and install the hood, 4 x 10 8.3 x 25.4 cm, Vent system, 17.8 cm

RH3730 specifications

The Whirlpool RH3730 is a cutting-edge refrigerator that combines modern design with advanced technology, ensuring that your food stays fresh while enhancing your kitchen’s aesthetic appeal. This model is particularly known for its spacious interior, innovative features, and user-friendly controls.

One of the standout features of the RH3730 is its spacious capacity, which allows for easy organization of groceries and other food items. With adjustable shelves and bins, users can customize the internal layout to accommodate various sizes of items, from tall bottles to snack containers. The refrigerator also includes a dedicated crisper drawer that helps keep fruits and vegetables fresh longer by maintaining optimal humidity levels.

The Whirlpool RH3730 is equipped with advanced cooling technologies, such as Adaptive Defrost, which monitors the refrigerator’s usage patterns and adjusts the defrost cycle accordingly. This not only helps in energy efficiency but also keeps your food safe from temperature fluctuations. The refrigerator also employs a unique air filtration system that minimizes odors, ensuring that each item retains its original flavor.

For those concerned about sustainability and energy consumption, the RH3730 features an Energy Star certification. This means it meets strict energy efficiency guidelines set by the U.S. Environmental Protection Agency, helping you save on electricity bills while minimizing your carbon footprint.

In terms of convenience, the RH3730 comes with smart features that integrate seamlessly with modern lifestyles. It includes a user-friendly control panel, allowing you to adjust temperatures and settings effortlessly. Additionally, some models may come with a smartphone app that enables you to monitor and control the refrigerator remotely, ensuring you never have to worry about food spoilage when you are away from home.

In conclusion, the Whirlpool RH3730 is a versatile and efficient refrigerator that stands out due to its spacious design, advanced cooling technologies, and energy efficiency. With features aimed at optimizing food preservation and enhancing user convenience, this model is an excellent choice for anyone seeking a reliable and stylish appliance for their kitchen. Whether you’re an avid cook or someone who values convenience, the RH3730 is designed to meet your needs while keeping your food fresher for longer.