Venting requirements

Horizontal wall venting


Now start...

Venting system must terminate to the outside.

Do not terminate the vent in an attic or other enclosed space.

Do not use four-inch laundry-type wall caps.

Do not use plastic vent.

Vent system needed for installation is not included. Wall or roof caps used must have backdraft damper.

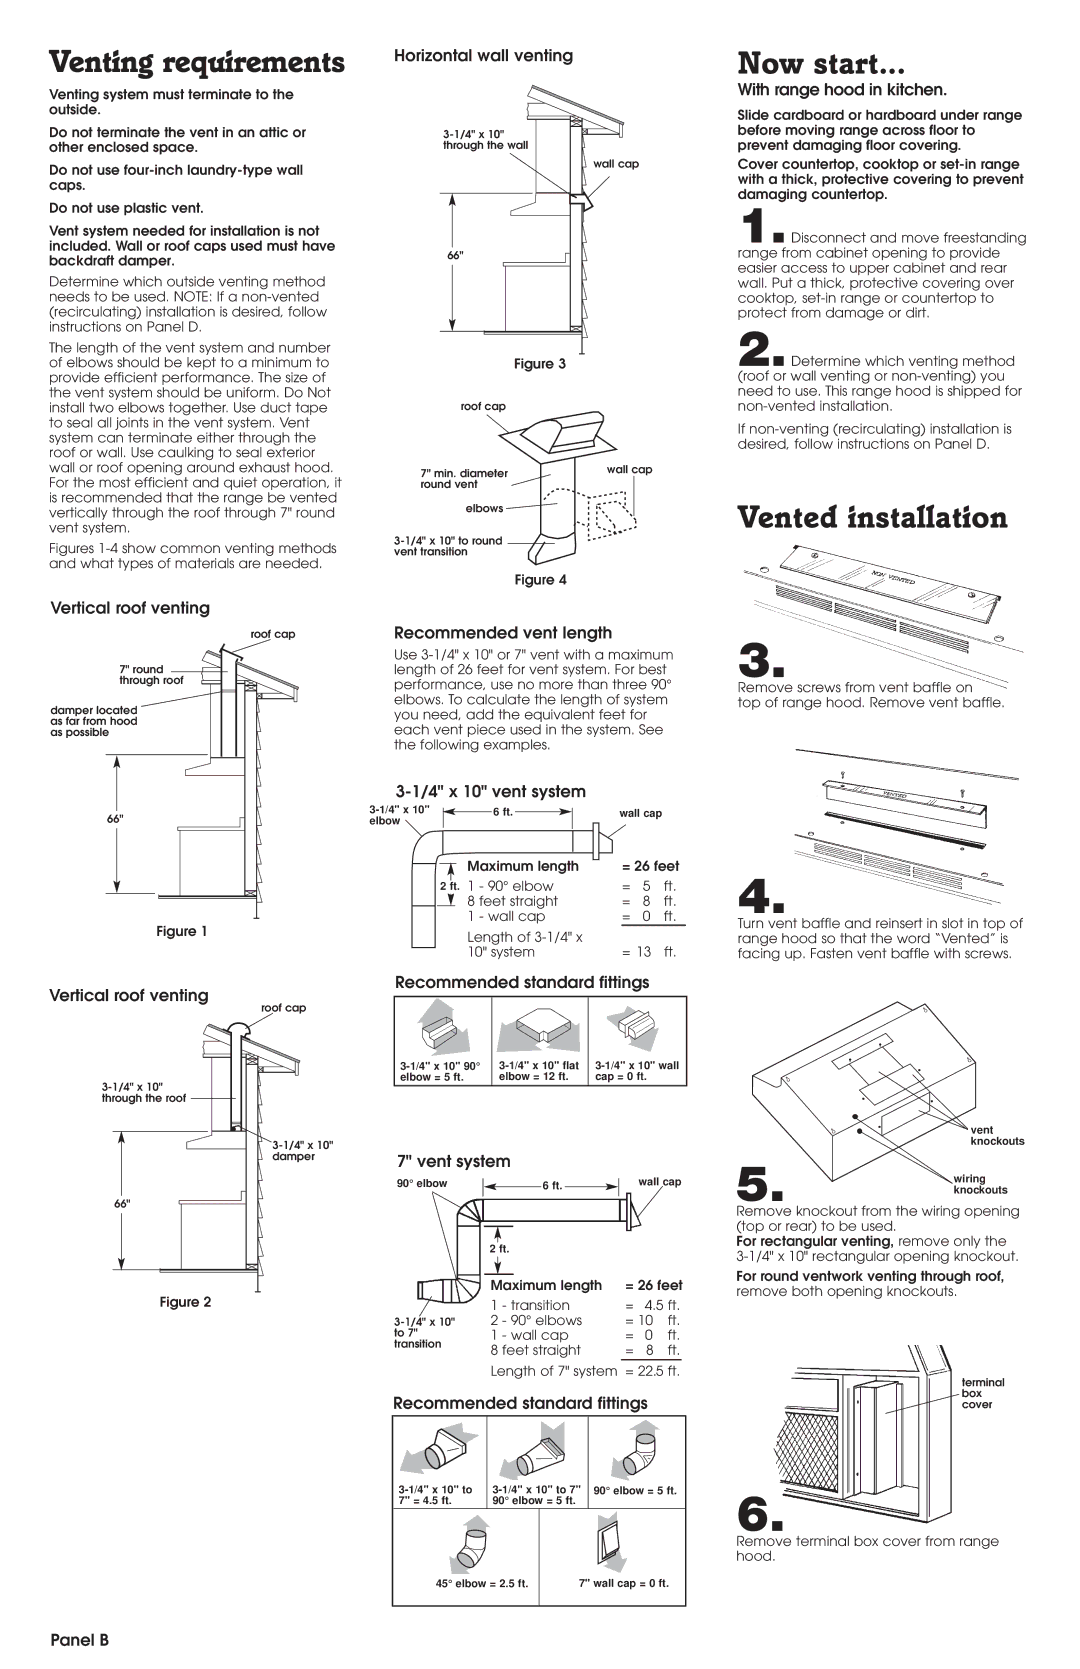
Determine which outside venting method needs to be used. NOTE: If a non-vented (recirculating) installation is desired, follow instructions on Panel D.

The length of the vent system and number of elbows should be kept to a minimum to provide efficient performance. The size of the vent system should be uniform. Do Not install two elbows together. Use duct tape to seal all joints in the vent system. Vent system can terminate either through the roof or wall. Use caulking to seal exterior wall or roof opening around exhaust hood. For the most efficient and quiet operation, it is recommended that the range be vented vertically through the roof through 7" round vent system.

Figures 1-4 show common venting methods and what types of materials are needed.

Vertical roof venting

roof cap

7" round

through roof

damper located

as far from hood

as possible

66"

Figure 1

Vertical roof venting

roof cap

3-1/4" x 10" through the roof

3-1/4" x 10" damper

3-1/4" x 10"

through the wall

wall cap

66"

Figure 3

roof cap

7" min. diameter

wall cap

round vent


elbows


3-1/4" x 10" to round vent transition

Figure 4

Recommended vent length

Use 3-1/4" x 10" or 7" vent with a maximum length of 26 feet for vent system. For best performance, use no more than three 90° elbows. To calculate the length of system you need, add the equivalent feet for each vent piece used in the system. See the following examples.

3-1/4" x 10" vent system

3-1/4" x 10"


6 ft.


wall cap


elbow


Maximum length

= 26 feet


1 - 90° elbow

=

5

ft.


2 ft.


8 feet straight

=

8

ft.


1 - wall cap

=

0

ft.


Length of 3-1/4" x


10" system

= 13

ft.

Recommended standard fittings

3-1/4" x 10" 90°

3-1/4" x 10" flat

3-1/4" x 10" wall

elbow = 5 ft.

elbow = 12 ft.

cap = 0 ft.


7" vent system

With range hood in kitchen.

Slide cardboard or hardboard under range before moving range across floor to prevent damaging floor covering.

Cover countertop, cooktop or set-in range with a thick, protective covering to prevent damaging countertop.

1.Disconnect and move freestanding range from cabinet opening to provide easier access to upper cabinet and rear wall. Put a thick, protective covering over cooktop, set-in range or countertop to protect from damage or dirt.

2.Determine which venting method (roof or wall venting or non-venting) you need to use. This range hood is shipped for non-vented installation.

If non-venting (recirculating) installation is desired, follow instructions on Panel D.

Vented installation

3.

Remove screws from vent baffle on

top of range hood. Remove vent baffle.

4.

Turn vent baffle and reinsert in slot in top of range hood so that the word “Vented” is facing up. Fasten vent baffle with screws.

vent knockouts

66"

Figure 2

90° elbow

3-1/4" x 10" to 7" transition

6 ft.

2 ft.

Maximum length

1 - transition

2 - 90° elbows

1 - wall cap

8 feet straight

wall cap

=26 feet

=4.5 ft.

=10 ft.

=0 ft.

=8 ft.

5.

wiring

knockouts


Remove knockout from the wiring opening (top or rear) to be used.

For rectangular venting, remove only the

3-1/4" x 10" rectangular opening knockout.

For round ventwork venting through roof, remove both opening knockouts.

Length of 7" system = 22.5 ft.

Recommended standard fittings


3-1/4" x 10" to

3-1/4" x 10" to 7"

90° elbow = 5 ft.


7" = 4.5 ft.

90° elbow = 5 ft.


45° elbow = 2.5 ft.

7" wall cap = 0 ft.

terminal box cover

6.

Remove terminal box cover from range hood.

Panel B

Page 3
Image 3
Whirlpool RH4900 SERIES, RH4700 SERIES installation instructions Venting requirements, Now start, Vented installation

RH4900 SERIES, RH4700 SERIES specifications

The Whirlpool RH4700 and RH4900 series represent a noteworthy evolution in home appliance technology, focusing on enhanced performance, energy efficiency, and user-friendly designs. These refrigerator models are designed to meet the needs of modern households, combining innovative features with reliability.

Both the RH4700 and RH4900 series refrigerators are equipped with advanced cooling technologies that ensure optimal temperature management. The Adaptive Defrost system intelligently determines when to defrost the appliance, preventing ice buildup and ensuring efficient operation. This not only prolongs the lifespan of the refrigerator but also improves energy efficiency, translating to lower utility bills.

One of the defining features of these series is the Flexi-Slide bin, which allows for easy reconfiguration of storage space. This bin can be adjusted to accommodate larger items, ensuring that homeowners have the flexibility they need when organizing their groceries. Additionally, the humidity-controlled crisper drawers protect the freshness of fruits and vegetables by providing the ideal environment for longer shelf life.

Energy efficiency is a key characteristic of the RH4700 and RH4900 series. Both models come with an Energy Star certification, indicating that they meet strict energy efficiency guidelines set by the U.S. Environmental Protection Agency. This not only helps to conserve energy but also contributes to a more sustainable household.

Furthermore, these refrigerators feature a sleek, modern design that fits seamlessly into any kitchen aesthetic. The stainless-steel finish is not only stylish but also resistant to fingerprints and smudges, making maintenance a breeze. The LED interior lighting provides excellent visibility, making it easy to find items, even in the back of the fridge.

Smart technology integration is another highlight of these series. With options for Wi-Fi connectivity, homeowners can monitor and manage their refrigerator settings remotely. This allows for enhanced convenience, as users can adjust temperatures or receive alerts about door openings directly from their smartphones.

In summary, the Whirlpool RH4700 and RH4900 series refrigerators are exemplars of modern appliance design and engineering. With their blend of advanced cooling technologies, energy efficiency, user-friendly features, and stylish aesthetics, they stand out as exceptional options for households seeking to enhance their kitchen experience. These models showcase Whirlpool's commitment to innovation and quality in home appliances, ensuring that they meet the diverse needs of contemporary consumers.