Manuals
/
Whirlpool
/
Kitchen Appliance
/
Refrigerator
Whirlpool
TS25AFXKQ00
manual
Changing the Light Bulbs, Dispenser Light on some models
Models:
TS25AFXKQ00
1
17
48
48
Download
48 pages
55.26 Kb
14
15
16
17
18
19
20
21
Troubleshooting
Install
Performance Data Sheets
Connecting to Water Line
Warranty
on some models - Accessory
Utilisation des commandes
Adjusting Rotary Controls
Cleaning
Door and Hinge Replacement
Page 17
Image 17
Page 16
Page 18
Page 17
Image 17
Page 16
Page 18
Contents
RÉFRIGÉRATEUR CÔTE À CÔTE
SIDE BY SIDE REFRIGERATOR
Use & Care Guide
Guide d’utilisation et d’entretien
TABLE DES MATIÈRES
TABLE OF CONTENTS
Your safety and the safety of others are very important
REFRIGERATOR SAFETY
Proper Disposal of Your Old Refrigerator
Suffocation Hazard Remove doors from your old refrigerator
Excessive Weight Hazard
REFRIGERATOR INSTALLATION
Use two or more people to move and install refrigerator
Cleaning before use
Base Grille
Electrical Requirements
Electrical Shock Hazard Plug into a grounded 3 prong outlet
Do not remove ground prong Do not use an adapter
Reconnect both ground wires before operating
Electrical Shock Hazard Disconnect power before removing doors
Door Removal
Failure to do so can result in death or electrical shock
Door and Hinge Replacement
Electrical Shock Hazard Reconnect both ground wires
Failure to do so can result in death or electrical shock
Handle Removal optional
Connecting to Refrigerator
Connecting to Water Line
Door Closing
Water Supply Connection
Water System Preparation
REFRIGERATOR USE
Normal Sounds
Ensuring Proper Air Circulation
Adjusting Rotary Controls
Using the Controls
Cut Hazard Use a sturdy glass when dispensing ice or water
Water and Ice Dispensers
The water dispenser
To dispense ice
To dispense water
The dispenser light
Using the dispenser without the water filter
Non-indicator water filter on some models
Water Filtration System
The base grille water filter status light on some models
Ice Maker and Storage Bin/Bucket
on some models - Accessory
Refrigerator Shelves
REMEMBER
Adjusting the control
Adjustable Flip-up Shelf
Flip-up Shelf
Convertible Vegetable/Meat Drawer Crisper and Covers
Crisper Humidity Control
FREEZER FEATURES
Wine or Can/Bottle Rack
Utility Bin
Cleaning
DOOR FEATURES
Explosion Hazard Use nonflammable cleaner
Cleaning your refrigerator
Dispenser Light on some models
Changing the Light Bulbs
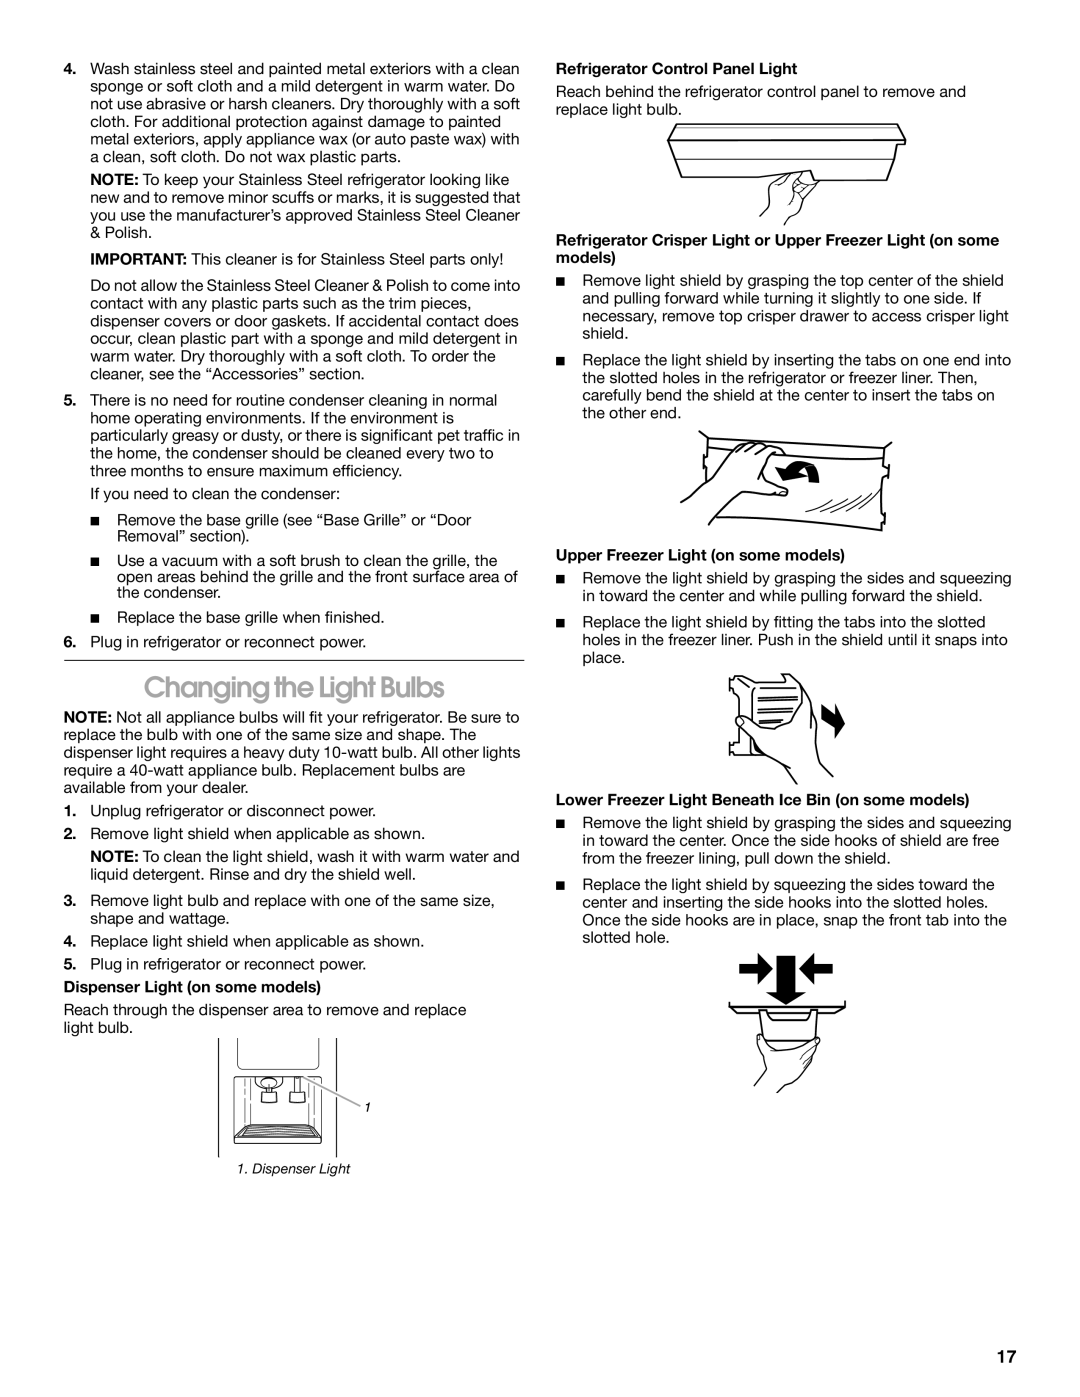
Refrigerator Control Panel Light
Refrigerator Crisper Light or Upper Freezer Light on some models
Power Interruptions
TROUBLESHOOTING
Vacation and Moving Care
Vacations
There is water in the defrost drain pan
The lights do not work
The motor seems to run too much
The refrigerator seems to make too much noise
Ice bucket difficult to remove
The ice dispenser will not operate properly
The water dispenser will not operate properly
Water or ice is leaking from the dispenser
If you need replacement parts
Computer Troubleshooting on some models
In the U.S.A
There is interior moisture buildup
For service in Canada
Accessories
Stainless Steel Cleaner & Polish
WATER FILTER CERTIFICATIONS
Base Grille Water Filtration System
PERFORMANCE DATA SHEETS
Model WF-NL300/NL300 capacity 300 Gallons 1136 Liters
Model WF-L500/L500 capacity 500 Gallons 1893 Liters
ESTATE REFRIGERATOR WARRANTY
AVERTISSEMENT
SÉCURITÉ DU RÉFRIGÉRATEUR
Mise au rebut de votre vieux réfrigérateur
Risque de suffoquer Enlever les portes de votre vieux réfrigérateur
Emplacement d’installation
INSTALLATION DU RÉFRIGÉRATEUR
Déballage
Risque du poids excessif
Spécifications électriques
Méthode recommandée de mise à la terre
Grille de la base
Risque de choc électrique Brancher sur une prise à 3 alvéoles reliée
Risque de choc électrique
Enlèvement des portes
Déconnecter la source de courant électrique avant denlever les portes
Charnière
Enlèvement des poignées facultatif
Réinstallation des portes et des charnières
Enlèvement des portes
Risque de choc électrique
Raccordement de la canalisation deau
Fermeture des portes
Arrivée d’eau froide
Raccordement à une canalisation d’eau
Sons normaux
Préparation du système d’eau
sur certains modèles
Raccordement au réfrigérateur
Commandes rotatives sur certains modèles
Utilisation des commandes
Ajustement des commandes rotatives
UTILISATION DU RÉFRIGÉRATEUR
LIGHT
Distributeurs d’eau et de glaçons
Risque de coupure
Utiliser un verre robuste pour prendre des glaçons ou de leau
Système de filtration d’eau
Remplacement de la cartouche de filtre à eau à la grille de la base
DISPENSER
Verrouillage du distributeur sur certains modèles
Purge du système d’eau après le remplacement du filtre
sur certains modèles - Accessoire
Machine à glaçons et bac/seau d’entreposage
Utilisation du distributeur sans filtre à eau
CARACTÉRISTIQUES DU
RÉFRIGÉRATEUR
Tablettes du réfrigérateur
Tablette relevable
Tiroir pour spécialités alimentaires
Pour retirer et réinstaller le tiroir pour spécialités alimentaires
Tiroir à légumes/viande convertible bac à légumes et couvercles
Réglage de la température du tiroir à légumes/viande convertible
Emplacement de la commande d’humidité
sur certains modèles -Accessoire
Pour enlever et réinstaller la tablette
CONGÉLATEUR
Pour retirer et réinstaller les porte-cannettes/balconnets
Pour retirer et réinstaller les tringles
LA PORTE
ENTRETIEN DU RÉFRIGÉRATEUR
Lumière du tableau de commande du réfrigérateur
Remplacement des ampoules d’éclairage
Lampe de distributeur sur certains modèles
Lumière de la partie supérieure du congélateur sur certains modèles
Pannes de courant
DÉPANNAGE
Entretien avant les vacances ou lors d’un déménagement
Vacances
Le plat de dégivrage contient de l’eau
Les ampoules n’éclairent pas
Le moteur semble fonctionner excessivement
Le réfrigérateur semble faire trop de bruit
Le distributeur de glaçons ne fonctionne pas correctement
Mauvais goût, odeur ou couleur grise des glaçons
Le seau à glaçons est difficile à enlever
Le distributeur d’eau ne fonctionne pas bien
Le débit d’eau du distributeur diminue beaucoup
L’eau ou la glace coule du distributeur
L’eau du distributeur n’est pas assez froide
La cloison entre les deux sections est tiède
Accessoires
ASSISTANCE OU SERVICE
Solution de problèmes pour ordinateurs sur certains modèles
Pour service au Canada
Système de filtration d’eau à la grille de la base
FEUILLES DE DONNÉES SUR LE PRODUIT
Modèle WF-NL300/NL300 Capacité 300 gallons 1 136 litres
Modèle WF-L500/L500 Capacité 500 gallons 1 893 litres
GARANTIE DU RÉFRIGÉRATEUR ESTATE
5/02
2002 Whirlpool Corporation
All rights reserved
Tous droits réservés
Top
Page
Image
Contents